

PX4 MAVSDK – C++ Programming [Episode 10] Custom Logging and Integration Testing (gtest)
Hello! This is Aiden from the Marketing Team. In our previous sessions, we explored various methodologies for actual drone control, including Offboard mode.
However, when developing real-world robotics software in university labs or corporate environments, you quickly realize that debugging and verifying system stability often takes much longer than writing the initial code. Due to the nature of drones, a minor logic error can lead to a crash—resulting in catastrophic hardware damage.
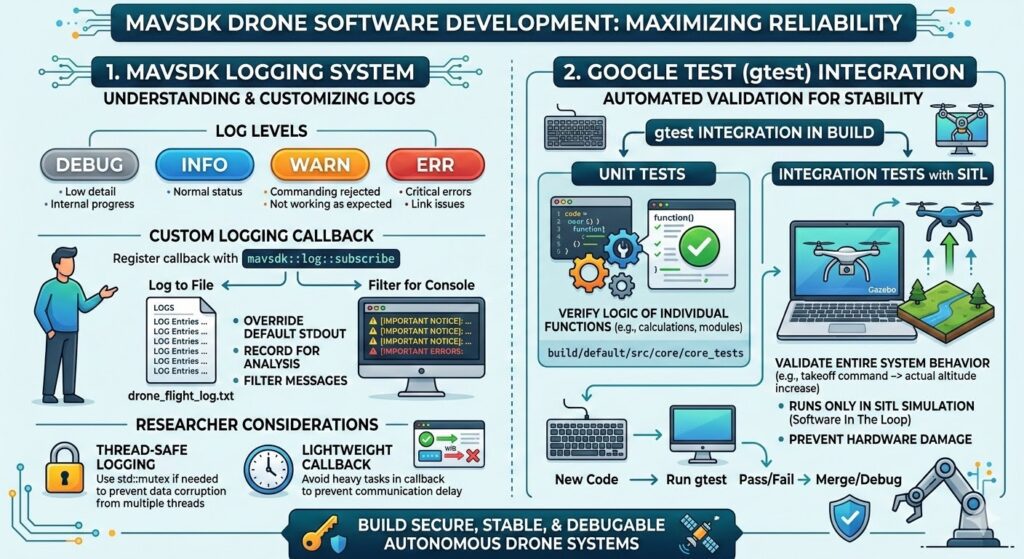
Therefore, in this 10th installment, we will take a deep dive into two essential technologies for maximizing the reliability of autonomous flight systems: Custom Logging and Automated Integration Testing using the Google C++ Testing Framework (gtest).
1. Understanding the MAVSDK Logging System
To understand what data is flowing inside the drone during flight, or to identify communication latency and packet loss, you must monitor the logs. The MAVSDK core and plugins are designed to continuously output useful log messages during operation. By default, these messages are directed to standard output (stdout), appearing directly on your console.
Log messages are categorized into four levels based on their importance:
- Debug: Detailed messages for reporting internal progress or status. (Note: These are hidden in Release builds.)
- Info: Informational messages regarding general progress and status.
- Warn: Warning messages triggered when the vehicle does not behave as expected, such as a rejected command.
- Err: Reports critical errors related to SDK operation, such as communication link issues or retry failures.

Custom Logging (Custom Logging Callback)
While flooding the console with logs is great for real-time debugging, it is inconvenient when you need to analyze research data post-flight or transmit logs to a server. MAVSDK provides the ability to override the logging system’s behavior by registering a custom callback function.
Using the mavsdk::log::subscribe function, you can save log messages to external files or filter out less important messages (e.g., Debug).
[C++ Example: Custom Logging]
#include <iostream>
#include <fstream>
#include <mavsdk/mavsdk.h>
#include <mavsdk/log_callback.h>

using namespace mavsdk;

int main() {
    // Open a file stream to save logs
    std::ofstream log_file("drone_flight_log.txt", std::ios::app);

    // Register a custom log callback (using a lambda function)
    mavsdk::log::subscribe([&log_file](mavsdk::log::Level level,
                                       const std::string& message,
                                       const std::string& file,
                                       int line) {
        // 1. Record all logs to a file (Custom logic)
        if (log_file.is_open()) {
            log_file << "[" << file << ":" << line << "] " << message << std::endl;
        }

        // 2. Filter console output to show only Warn and Err
        if (level == mavsdk::log::Level::Warn || level == mavsdk::log::Level::Err) {
            std::cerr << "⚠️ [CRITICAL]: " << message << '\n';
        }
    });

    std::cout << "Custom logging has started.\n";

    // Drone connection and control logic omitted...

    return 0;
}Applying this code executes the lambda function registered as the callback. Calling subscribe a second time will overwrite the previous callback. To return to the default logging behavior (stdout), simply call subscribe with nullptr to unsubscribe.
🚨 Note for Researchers: Multi-threaded Logging
Callbacks can be invoked randomly from multiple internal threads. To prevent performance degradation, MAVSDK does not handle synchronization (such as mutex locks) for the log stream. If your external file logging system is not thread-safe, you must implement synchronization yourself using std::mutex to prevent data corruption. Additionally, keep the code inside the callback lightweight; heavy tasks can cause communication latency.
Internal Logging API for Plugins and Testing
If you are modifying the MAVSDK core or writing new integration tests and need console logging, you can use the internal macro APIs provided by MAVSDK. These APIs automatically append timestamps, log levels, filenames, and line numbers to your messages.
#include "integration_test_helper.h"
#include "log.h"

void my_test_function() {
    LogDebug() << "This is a debug message for monitoring progress.";
    LogInfo() << "This is an informational message.";
    LogWarn() << "The vehicle is not behaving as commanded!";
    LogErr() << "Communication link lost.";
}Output Example: [04:55:08|Error] This is an error message (test_file.cpp:26)
Furthermore, if you wish to track all raw packet data for MAVLink messages, you can set the #define MESSAGE_DEBUGGING 1 macro at the top of src/core/system.cpp and rebuild (only active in Debug builds).
Automated Reliability Verification: Google Test (gtest) Integration
After writing hundreds of lines of autonomous flight code, you cannot realistically power up the drone and go outside for a test every single time. The MAVSDK C++ library natively integrates the Google C++ Testing Framework (gtest), the world’s most widely used testing framework, to verify code integrity.
Whenever new code is committed to the library, these tests are executed; the code can only be merged into the main branch once all tests pass.
1) Unit Tests
Unit tests verify logical errors in individual functions, such as communication modules or distance calculation algorithms. After building the project, you can run all unit tests with the following command: build/default/src/core/core_tests
build/default/src/core/core_tests2) Integration Tests and SITL Integration
While unit tests verify logic, integration tests verify the organic operation of the entire system—for example, “Does the virtual drone actually increase altitude when a takeoff command is issued?” Because running integration tests on physical hardware can be dangerous due to unpredictable behavior, they must be executed in a SITL (Software In The Loop) simulator environment.

[SITL-based Integration Test Procedure] To run integration tests, the PX4 Gazebo simulation must be running in the background. Open two terminals and follow these steps:
- Terminal 1 (Manual Simulator Execution): Use the
HEADLESS=1option if you want to run the simulator in the background without a 3D GUI (highly useful for remote servers or CI/CD pipelines). - Terminal 2 (Integration Test Execution): Run the compiled integration test runner.
3) Test Filtering and Debugging Tips
As the number of test cases grows, you may want to test specific features only. You can use gtest’s powerful filtering functionality:
- Check entire test list:
--gtest_list_tests - Run a specific test (e.g., telemetry health check):
--gtest_filter=TelemetryTest.Health
For researchers implementing new avoidance algorithms for a thesis, automating unit tests for your plugin and integration tests with SITL is crucial. This allows you to prove in just one minute that your existing functions remain intact even after large-scale refactoring.
In this 10th episode, we explored how to build a custom logging system that serves as the “eyes” of autonomous flight software and the gtest-based automated testing workflow that ensures code reliability.
Maintaining thread-safety in logging, keeping callbacks lightweight, and establishing an automated SITL-based testing framework before actual flight are the decisive differences between hobbyist coding and professional R&D.
With this, we have covered almost all practical elements of MAVSDK C++ programming, from environment setup to control APIs, logging, and testing.
In the next [Episode 11: MAVSDK vs. MAVROS vs. uXRCE-DDS Comparison], we will perform a deep dive into the three technologies researchers struggle with most when choosing a drone communication framework, using academic data (latency, resource utilization).

Author: Aiden, Marketing Team at QUAD Drone Research Lab
Date: 2026.03.20
![[PX4 Tuning Series 7] Land Detector Configuration: The Essential Guide for a Perfect Flight Conclusion](https://quad-drone-lab.co.kr/wp-content/uploads/2026/03/Drone-Ground-Contact-Landing-Logic-768x429.png)
![PX4 MAVSDK – C++ Programming [9편] 정밀한 드론 제어: 오프보드(Offboard) 모드](https://quad-drone-lab.co.kr/wp-content/uploads/2026/03/0319_인포그래픽-768x429.jpg)
![[PX4 Tuning Series Appendix] Racing Drone Tuning Guide (Racer Setup): Unlocking Extreme Performance](https://quad-drone-lab.co.kr/wp-content/uploads/2026/03/Racing-Drone-Minimalism-and-Balance-768x429.png)
![PX4 MAVSDK – C++ Programming [Part 3] Installing MAVSDK C++ and Setting Up the SITL Simulation Environment](https://quad-drone-lab.co.kr/wp-content/uploads/2026/03/0313_인포그래픽-768x419.jpg)
![PX4 MAVSDK – C++ Programming [7편] 특정 위치로 이동 (goto_location) 및 하버사인 공식의 이해](https://quad-drone-lab.co.kr/wp-content/uploads/2026/03/0317_인포-768x512.png)