
[PX4 Tuning Series Appendix] Racing Drone Tuning Guide (Racer Setup): Unlocking Extreme Performance
Hello once again to all university students, graduate students, and researchers dedicating yourselves to aerospace engineering and autonomous drones!
From [Series 1] through [Series 7], we have covered the entire process of optimizing the flight performance and safe landing of a standard research multicopter. However, if your research goal goes beyond simply “hovering stably” and involves aggressive maneuvers in swarm flights, high-speed evasive maneuvers using FPV (First-Person View), or building a dedicated Racing Drone, you need a completely different approach.
Racing drones are incredibly fast and agile vehicles explicitly designed to be “overpowered”. To achieve this, you must boldly strip away heavy sensors and apply extreme settings to shave off even a single millisecond (ms) of control latency. In today’s Appendix, we will provide a detailed hardware and software setup guide to configure a racing drone based on PX4 and extract its absolute maximum performance in Acro mode.
1. Hardware Setup: Minimalism and Eradicating Vibrations
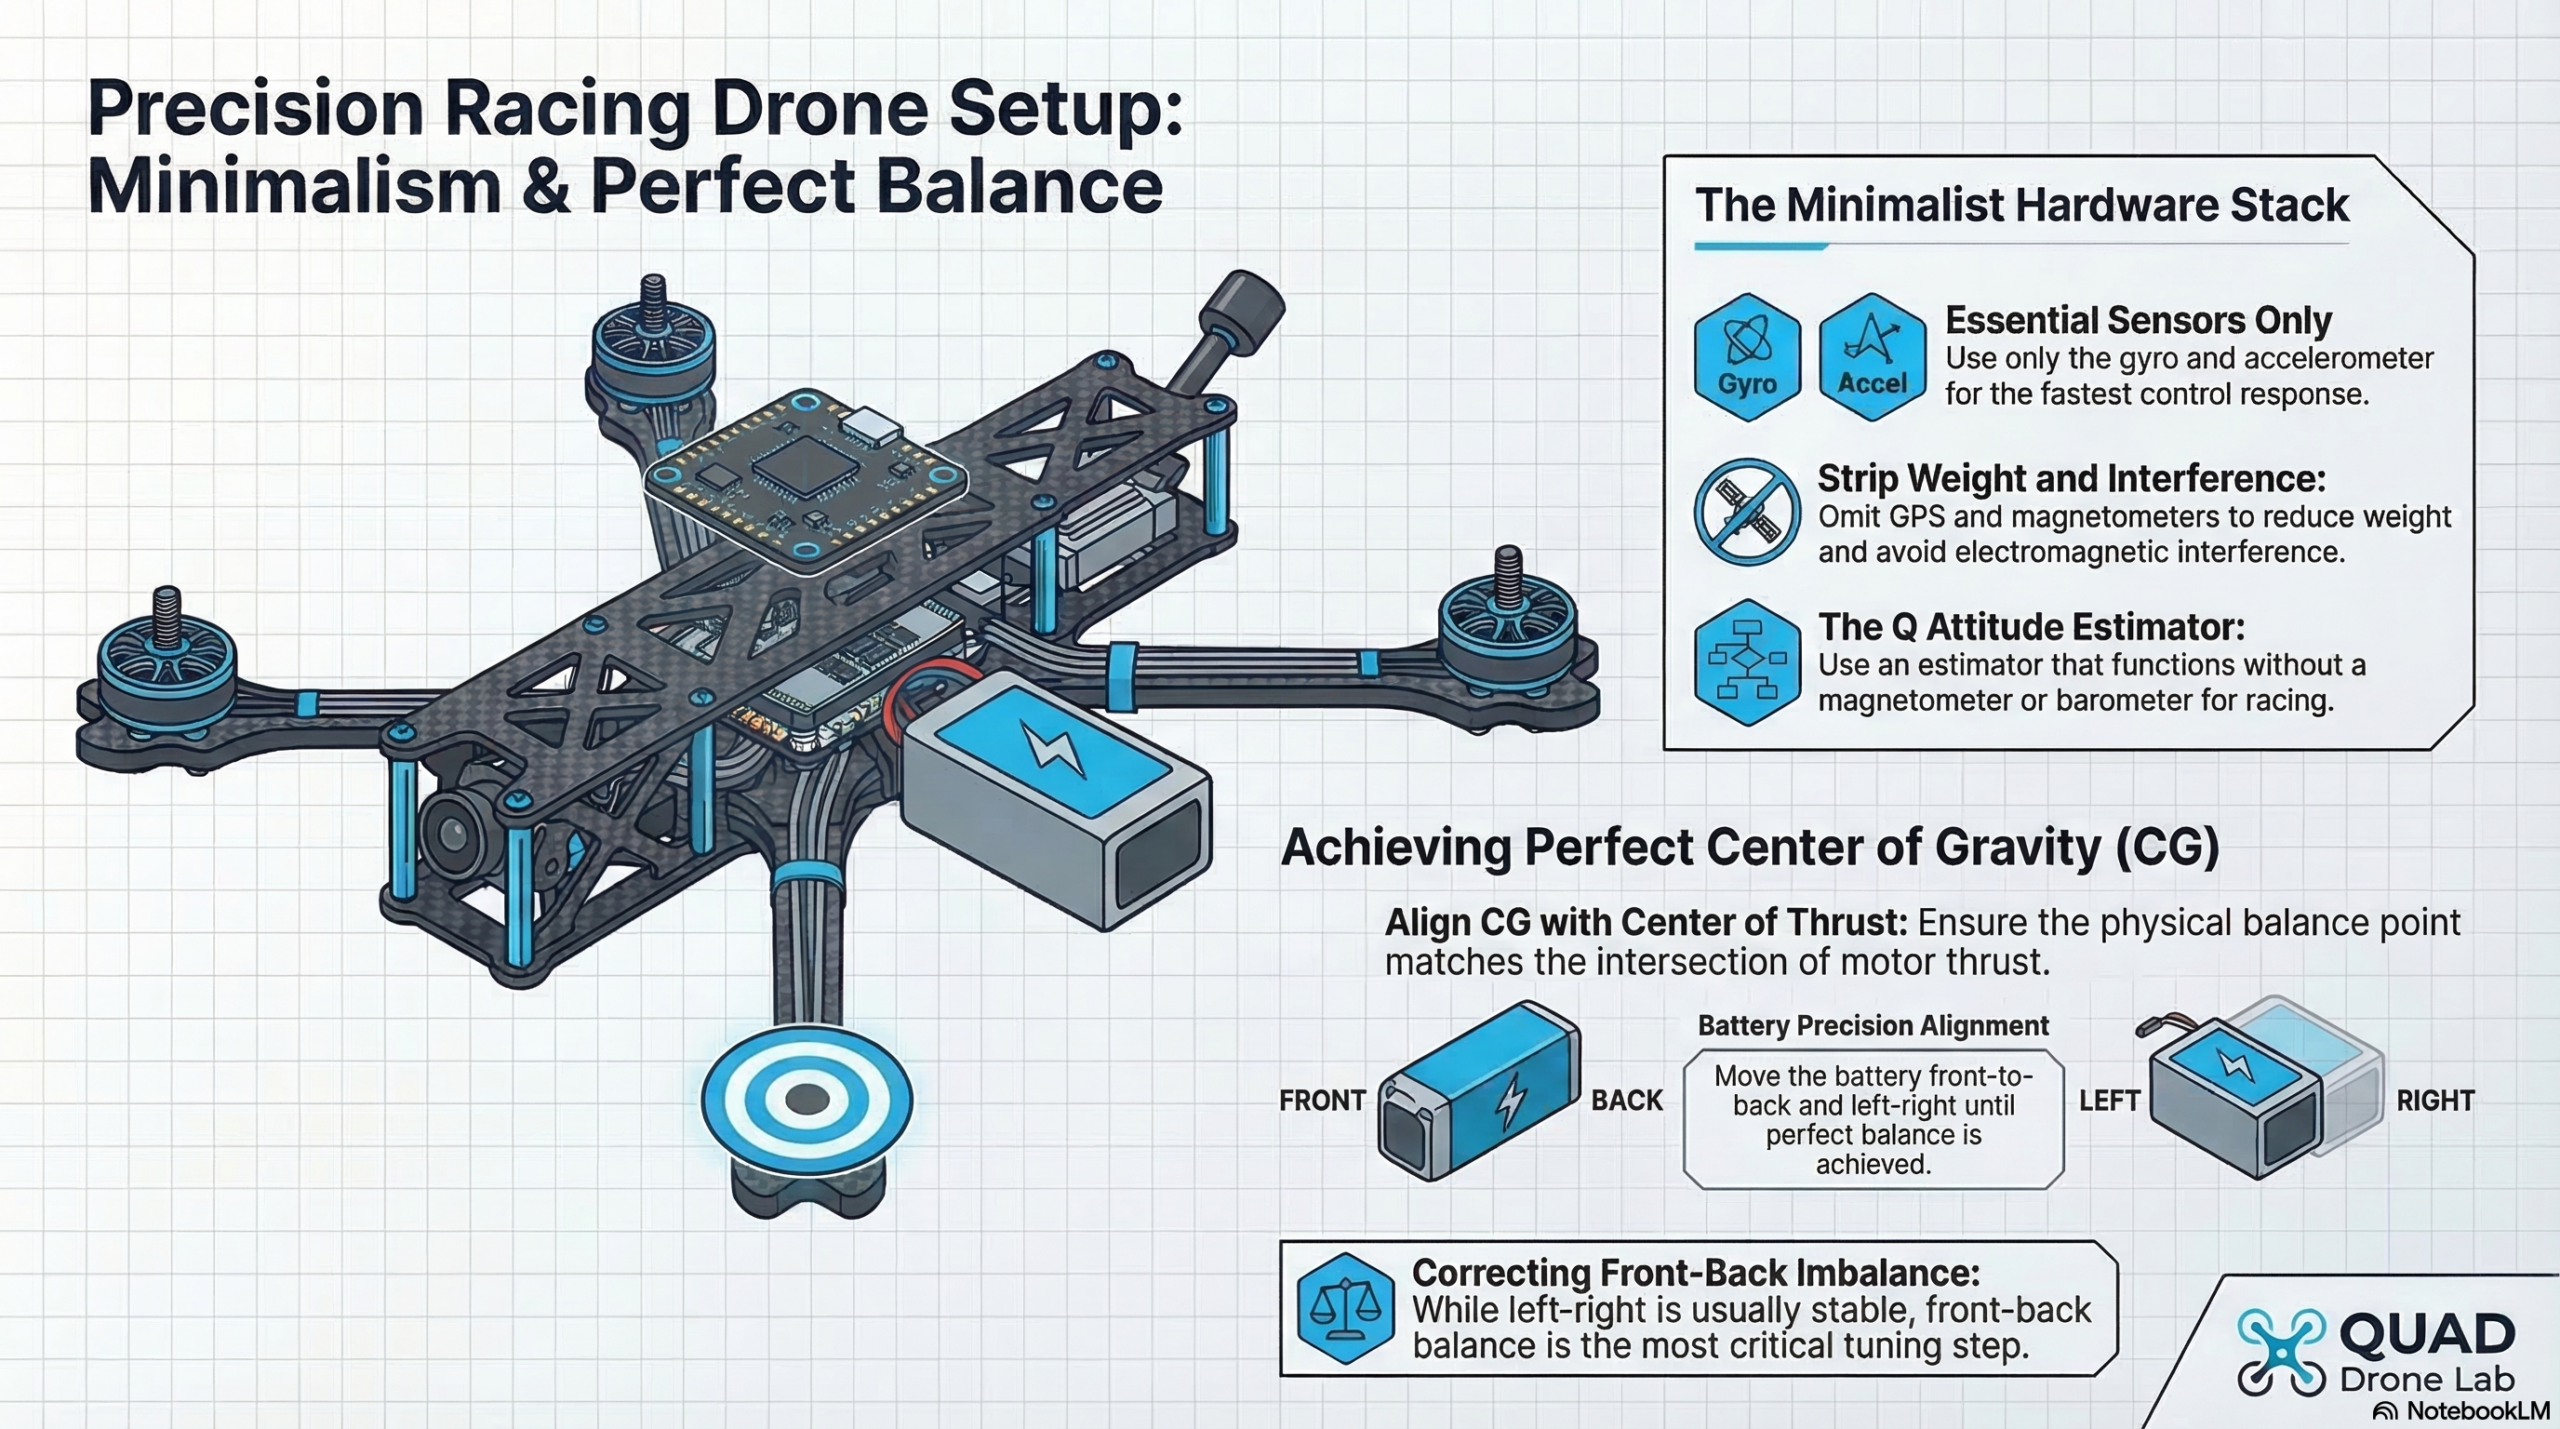
Because racing drones are expected to crash frequently, the golden rule is to minimize any sensors that can break.
Sensor Diet: The minimal configuration for a racing drone requires only a gyroscope and an accelerometer. Mounting a heavy GPS is generally not recommended as it breaks easily during crashes, and because the high electrical currents generate strong electromagnetic interference, the flight controller’s internal magnetometer must also be completely disabled.
Vibration Suppression and Center of Gravity (CG): Since racers use extremely high-output motors, physically eliminating hardware vibrations is far more critical than relying on software filters. As seen in the actual flight test cases from QUAD Drone Lab, if post-flight log analysis reveals vibrations in the 60~80Hz range (typically from the propellers or frame), you should not blindly increase filter values. Instead, you must tightly secure the frame tolerances to block the physical vibrations at their source and ensure you are using perfectly balanced props. Furthermore, when mounting the battery, ensure that not only the left-right balance but also the front-back Center of Gravity (CG) perfectly aligns with the center of thrust, marking the optimal spot on the frame.

2. Software Setup: Q Estimator and Failsafe Configuration
If you have removed the GPS, magnetometer, and barometer, the default state estimator, EKF2, will not function properly. Therefore, you must switch to the ‘Q Attitude Estimator’, which can calculate the vehicle’s attitude without magnetic or pressure data.
Please configure the following parameters in QGroundControl (QGC):
# 1. Disable unused sensors
SYS_HAS_MAG = 0      # No magnetometer [10]
SYS_HAS_BARO = 0     # No barometer [10]

# 2. Change the State Estimator
ATT_EN = 1           # Enable Q Estimator [10]
EKF2_EN = 0          # Disable EKF2 [10]
LPE_EN = 0           # Disable LPE [10]

# 3. Detailed Q Estimator Settings
ATT_ACC_COMP = 0     # [10]
ATT_W_ACC = 0.4      # [10]
ATT_W_GYRO_BIAS = 0  # [10]
Failsafe and Minimum Thrust: Because there is no GPS, you cannot use the “Return Mode” if the transmitter signal is lost. Therefore, you must set your RC Loss failsafe to ‘Lockdown’, which immediately shuts off the motors, preventing the drone from flying away uncontrollably. You must also assign a dedicated ‘Kill Switch’ on your radio transmitter and train yourself to use it instinctively. For true freefall capabilities during Acro flight, the manual minimum thrust MPC_MANTHR_MIN should be set to 0.
3. Strategies for Minimizing Control Latency
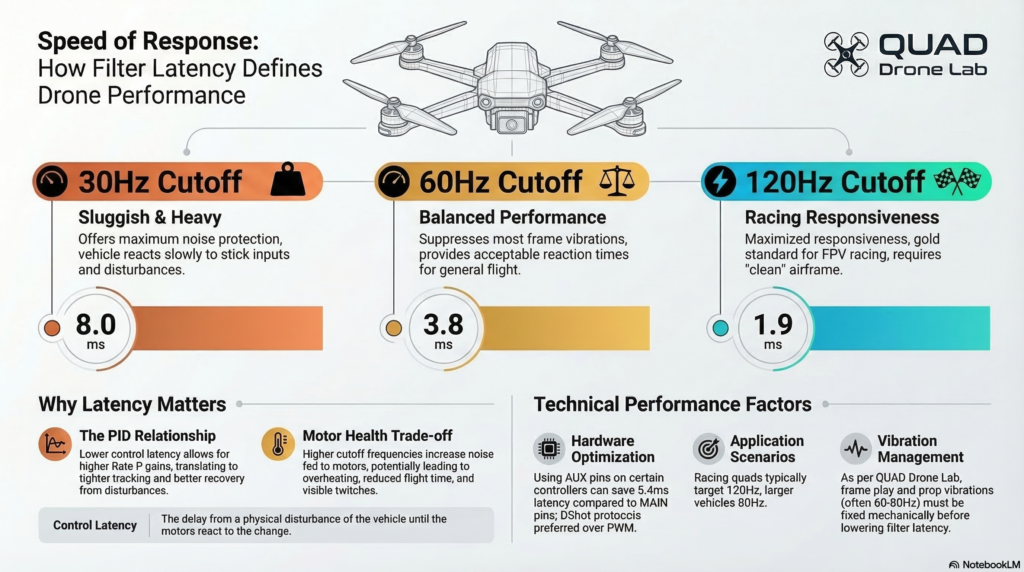
In racing drones, reducing control latency is a matter of life and death. Control latency is the delay from a physical disturbance of the vehicle until the motors react. The lower the latency, the higher you can push the proportional (P) gains, which directly translates to razor-sharp, locked-in flight performance. Even saving a single millisecond (ms) makes a massive difference.
① Use AUX Pins Instead of MAIN Pins When using flight controllers like the Pixhawk, connecting motor signal wires to the MAIN pins routes them through an IO chip, adding a painful 5.4ms of latency. To avoid this IO delay, motors must be connected to the latency-free AUX pins during Actuator Configuration (Note: This does not apply to boards like Pixracer or Omnibus F4).
② Utilize the DShot Protocol Instead of the older analog PWM signals, you must enable a digital communication protocol like DShot (or at least One-Shot) to maximize the transmission speed of your motor control signals.
③ Extreme Filter Tuning While stronger filtering reduces noise, it severely increases latency. To minimize delay, FPV racers push the gyro cutoff frequencies much higher than the default 30Hz.
IMU_GYRO_CUTOFF: For a racing drone, this is typically set high, around 120Hz, dropping the delay to just 1.9ms. (However, you must constantly check if the motors are getting too hot).IMU_DGYRO_CUTOFF: Because the D-term is highly susceptible to noise, it is set slightly lower than the gyro, typically between 50 and 80Hz.
4. Acro Mode Optimization and PID Tuning
The true beauty of a racing drone shines in Acro mode, where the pilot’s stick inputs are directly mapped to angular rate commands. To achieve flawless Acro flight, we must eliminate any non-linearities in the stick inputs.
Acro Mode Prerequisites: To create a perfectly intuitive 1:1 linear mapping between your sticks and the drone’s rotation, disable all Expo settings. Additionally, massively increase the maximum rotation rates to suit a racing environment.
MC_ACRO_EXPO = 0         # Disable Roll/Pitch Expo [20]
MC_ACRO_EXPO_Y = 0       # Disable Yaw Expo [20]
MC_ACRO_P_MAX = 200      # Max pitch rate (deg/sec) [20]
MC_ACRO_R_MAX = 200      # Max roll rate (deg/sec) [20]
PID Tuning Strategy: Tuning a racing drone is done in two distinct phases.
- First Round (Under-tuned): Initially, intentionally set the P and D gains very low. This prevents the controller from oscillating, ensuring that when you analyze the logs for filter tuning, you are looking at pure physical hardware noise rather than PID-induced oscillations.
- Second Round (Tight-tuned): Once your extreme filter settings are locked in, push the P and D gains to their absolute limits—right before the drone starts oscillating—to maximize responsiveness. Be very careful with the D gain, as it amplifies high-frequency noise and can quickly overheat the motors.
The MPC_THR_HOVER Trap: Because racing drones are overpowered, they might hover at 35% throttle or even less. If you leave this parameter at its default of 50% (0.5), the flight controller will assume the drone has hit the ground when you lower the throttle to descend. This triggers a false land detection in the air, causing the motors to cut out and instantly spool back up—a terrifying phenomenon known as “twitching”. You must accurately input the vehicle’s true hover throttle (e.g., 0.35).
5. Airmode: The Final Polish for Perfect Flight
Once your extreme PID and Filter tuning is complete, the final step is to enable Airmode (MC_AIRMODE).
In a standard mixer setup, if the pilot drops the throttle to 0, the roll and pitch commands are essentially ignored to prevent negative motor commands. However, when Airmode is enabled, the flight controller artificially boosts the base commanded thrust even at zero throttle, ensuring the motors never stop and the vehicle flawlessly tracks your rotational rate commands.
This allows the pilot to execute breathtaking maneuvers—like perfectly controlled vertical dives down the sides of buildings or inverted flips with the throttle completely cut. However, if you enable Airmode on an improperly tuned drone that suffers from oscillations, the controller will continuously boost the thrust to fight the wobble, causing the drone to uncontrollably shoot up into the sky even at zero stick input. Therefore, Airmode must be the absolute last parameter you enable after verifying the drone flies perfectly.
Conclusion
Through this Appendix, you have learned how to strip away the GPS and barometer, shave down Control Latency to the exact millisecond, and unlock the true potential of Acro mode and Airmode. Your vehicle is no longer just a standard research drone; it has evolved into a gravity-defying “racing machine” that acts as a direct extension of your fingertips.
Tuning a racing drone relies heavily on intuition, hands-on testing, and meticulous log analysis, just as much as it does on mathematical models. Because you are dealing with extreme speeds and agility, please always prioritize safety. Keep your finger resting on the Kill Switch, and only push the limits of your machine in safe, wide-open outdoor environments. We wish all researchers the most thrilling and successful flight tests!

Author: maponarooo, CEO of QUAD Drone Lab
Date: March 14, 2026
![[ROS2 Mastery 8편] 로봇 수학의 핵심, TF2(Transform) 시스템 개요 완벽 가이드](https://quad-drone-lab.co.kr/wp-content/uploads/2026/05/0531_인포그래피-768x384.png)
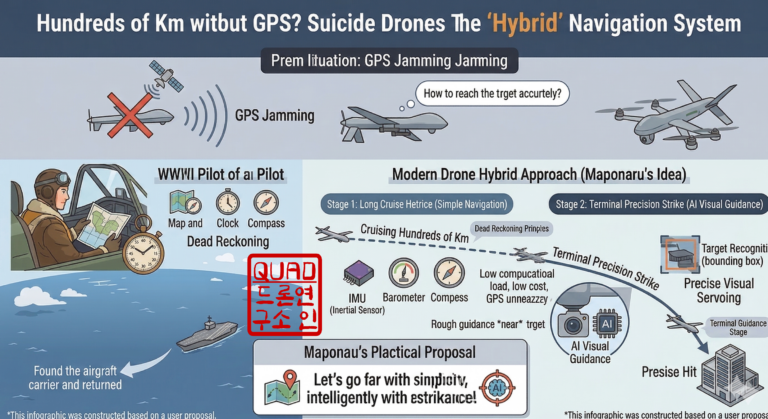
![[하이브리드 항법 시스템 제1편: 개요] GPS 없이 수백 km를 날아간다? 2차대전 조종사에게 배우는 하이브리드 항법 시스템](https://quad-drone-lab.co.kr/wp-content/uploads/2026/04/컴패니언-컴퓨터-기반의-AI-지형지물-보정-768x419.jpg)
![[PX4 튜닝 시리즈 7] 착륙 감지기 설정 (Land Detector Configuration): 완벽한 비행의 마무리를 위한 필수 가이드](https://quad-drone-lab.co.kr/wp-content/uploads/2026/03/Drone-Ground-Contact-Landing-Logic-768x429.png)
![PX4 MAVSDK – C++ Programming [11편] MAVSDK vs MAVROS vs uXRCE-DDS 완벽 비교](https://quad-drone-lab.co.kr/wp-content/uploads/2026/03/0322_인포그래피-768x512.png)