
[ROS2 Mastery Part 5] ROS2 Topic Programming (2) – Receiving Location Information with a Subscriber
Hello! Welcome to the 5th post in our “ROS2 Crash Course” blog series, brought to you based on materials from the QUAD Drone Lab, for university students and researchers studying and developing autonomous mobile robots and system control.
In our last post (Part 4), we learned how to write a Publisher node—the core of ROS2 communication—to send movement commands (cmd_vel) to the turtlesim robot and make it draw a circle. In this 5th post, we will program a Subscriber node, which is the counterpart to the publisher.
In robot control, understanding the “current state of the robot (such as position and velocity)” is absolutely essential. In this hands-on session, we will build a Python node that subscribes to the real-time location info topic being published by the Turtlesim node itself and prints that coordinate data directly onto the terminal screen.
We have structured the explanations in detail to match the rigorous standard of researchers who want a deep understanding of the underlying principles, so please follow along step-by-step!
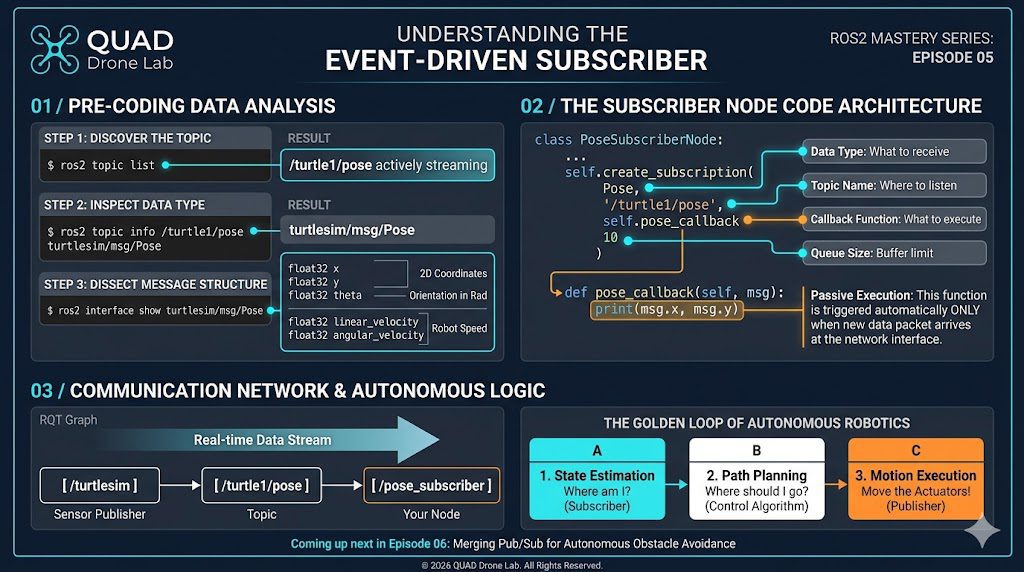
Analyzing the Subscription Target: Which Topic Should We Receive?
The first step in ROS2 programming is always data analysis using CLI (Command Line Interface) tools. Before writing any code, we must identify the exact topic name we need to subscribe to and determine the structure of the data that the topic contains.
Let’s start by opening a terminal and running the turtle simulator.
ros2 run turtlesim turtlesim_node
Now, let’s open a new terminal and run the following analysis commands in sequence.
1. Checking the Topic List
This command lists all the topics currently active in the ROS2 network.
ros2 topic list
Looking at the outputted list, you can see that a topic named /turtle1/pose is being published. As the name suggests, there is a high probability that this topic contains the pose (position and orientation) information of the turtle.
Checking the Topic Data Type
We check the specific data type (message type) being used for communication on that topic.
ros2 topic info /turtle1/pose
The result shows that the data type is turtlesim/msg/Pose.
3. Understanding the Message Structure
We will now dissect the structure of this Pose message object to see exactly which specific variables are contained inside it.
ros2 interface show turtlesim/msg/Pose
Running the command will display the following structure:
float32 x
float32 y
float32 theta
float32 linear_velocity
float32 angular_velocity
Based on the analysis, we can see that this message contains all the essential data: the $x$ and $y$ coordinates representing the position in a 2D space, theta (in radians) indicating the direction the turtle is facing, as well as the current linear_velocity and angular_velocity.
💡 [Researcher Tip] Real-Time Data Monitoring
To verify that sensor data is flowing properly before diving into coding, you can use the echo command.
ros2 topic echo /turtle1/pose
With this command running, open another terminal and execute ros2 run turtlesim turtle_teleop_key to move the turtle. As the turtle moves, you will be able to see the $x$ and $y$ values printed on the terminal change in real time.
Now, our objective has become crystal clear! All we need to do is write a callback function that receives data of the turtlesim/msg/Pose type.
Writing the Subscriber Node Code: pose_subscriber.py
Navigate to our my_robot_controller package directory where we are working, create a new Python source file, and grant it execution permissions.
# Move to the directory containing the node source code
cd ~/ros2_ws/src/my_robot_controller/my_robot_controller

# Create the file and grant execution permissions (+x)
touch pose_subscriber.py
chmod +x pose_subscriber.pyOpen a text editor like VS Code and write the following code into the pose_subscriber.py file.
#!/usr/bin/env python3
import rclpy
from rclpy.node import Node
from turtlesim.msg import Pose  # Import the Pose message type we analyzed.

class PoseSubscriberNode(Node):
    def __init__(self):
        # 1. Initialize the node name
        super().__init__('pose_subscriber')

        # 2. Create the Subscriber
        # Type: Pose, Topic Name: '/turtle1/pose', Callback Function: self.pose_callback, Queue Size: 10
        self.pose_subscriber_ = self.create_subscription(
            Pose,
            '/turtle1/pose',
            self.pose_callback,
            10
        )
        self.get_logger().info("Turtle Position Subscriber Node has been started!")

    # 3. Define the Callback function
    def pose_callback(self, msg: Pose):
        # Print the X and Y coordinates of the received message (msg) to the terminal log.
        self.get_logger().info(f"Current Turtle Position - X: {msg.x:.2f}, Y: {msg.y:.2f}")

def main(args=None):
    rclpy.init(args=args)
    node = PoseSubscriberNode()

    try:
        # Keep the node running and spin it to wait for callbacks.
        rclpy.spin(node)
    except KeyboardInterrupt:
        pass
    finally:
        node.destroy_node()
        rclpy.shutdown()

if __name__ == '__main__':
main()💡 [In-Depth Code Analysis]
Although the code looks simple, it contains a critical architecture for understanding the event-driven nature of robot software.
- Importing the Message Package: We load the
Poseclass from theturtlesim.msgpackage, which is the exact data type we previously verified using the CLI. - Creating the Subscriber: We create the subscriber using the
self.create_subscription()method.- First Parameter (
Pose): The data type of the message to be received. - Second Parameter (
'/turtle1/pose'): The exact name of the topic we want to communicate over. - Third Parameter (
self.pose_callback): Specifies the callback function to be executed whenever data arrives. - Fourth Parameter (
10): The size of the data reception queue (buffer).
- First Parameter (
- Callback Function: In our previous Publisher example, the callback was executed periodically by a timer. However, the Subscriber’s callback function (
pose_callback) is triggered passively and automatically every single time new topic data arrives over the network. Themsgobject passed as a parameter contains thex,y, andthetavalues, allowing us to readmsg.xandmsg.yand print them to the screen viaget_logger().info().
Updating the Configuration File (setup.py) and Registering the Entry Point
Once you have finished writing the node code, you must register its entry point in setup.py so that the ROS2 environment (the colcon build system) can locate and execute this Python script via terminal commands.
Open the setup.py file located in your package’s root folder (~/ros2_ws/src/my_robot_controller), and add our new node to the console_scripts array inside the entry_points section.
entry_points={
        'console_scripts': [
            'test_node = my_robot_controller.my_first_node:main',
            'draw_circle = my_robot_controller.draw_circle:main',
            # Add the entry point for the subscriber node we just wrote.
            'pose_subscriber = my_robot_controller.pose_subscriber:main'
        ],
},pose_subscriber =: This is the executable name of the node you will type in the terminal right after theros2 runcommand.my_robot_controller.pose_subscriber:main: This means mapping the execution to themainfunction inside thepose_subscriber.pyfile, which is located within your package folder.
Package Build and Execution Test
Everything is ready! Now, let’s build the modified package and test if it successfully receives the turtle’s position.
Navigate to the root directory of your workspace to perform the build:
# Navigate to the workspace root
cd ~/ros2_ws

# Build the entire package (using --symlink-install minimizes the need to rebuild when modifying Python files)
colcon build --symlink-installIf the build completes without any errors, let’s open three terminals and run the entire system to see it in action.
💡 [Execution Steps]
- Terminal 1 (Simulator):
ros2 run turtlesim turtlesim_node - Terminal 2 (Subscriber):
source install/setup.bash$\rightarrow$ros2 run my_robot_controller pose_subscriber - Terminal 3 (Teleop):
ros2 run turtlesim turtle_teleop_key
Try pressing the arrow keys to move the turtle around. As the turtle moves, you can see the coordinate values ($X, Y$) changing in real time in the terminal window where pose_subscriber is running! You have successfully succeeded in receiving sensor data.
Checking Communication Network Visualization with RQT Graph
As your research progresses and the number of robot nodes increases, being able to grasp the system’s communication network at a glance becomes the core of effective debugging. Let’s use the RQT utility we covered in Part 2 to visualize the communication structure we have built so far.
With your current nodes still running, open a fourth terminal and enter the following command:
rqt_graph
Looking at the screen, you can see a perfect communication diagram where the arrow originating from the /turtlesim node (the sensor publisher) flows data in real time via the /turtle1/pose topic directly into the /pose_subscriber node (the sensor subscriber) that we just coded ourselves.
This visual confirmation proves that your network architecture is properly configured and that the node is successfully integrated into the active ROS2 computation graph.
In Conclusion
In this 5th post, we took a deep dive into Sensor Data Reception (Subscriber), which is one of the most critical building blocks of robot control. We analyzed the interface data type (Pose), implemented an asynchronous callback function (pose_callback) to process incoming topic streams, and successfully built a structure that tracks the robot’s real-time state ($X, Y$ coordinates).
When designing autonomous navigation algorithms in robotics, the most fundamental logic always follows this exact execution pipeline:
- State Estimation (Subscriber): Where is the robot right now? (Reading sensors)
- Error Calculation (Algorithm): How far away is the target, and what adjustments are needed? (Processing logic)
- Control Command Transmission (Publisher): Move the motors to minimize that error. (Acting on the environment)
We have already mastered the Publisher in Part 4 and the Subscriber in this Part 5! In the next [ROS2 Mastery Part 6], we will combine these two core nodes into a single Python file to demonstrate “Implementing Autonomous Driving in Turtlesim Using Topic Communication,” where the turtle will autonomously detect the screen’s wall (fence) coordinates and turn around to avoid a collision before it hits them.
YouTube Tutorial

Author: Aiden, Marketing Team at QUAD Drone Research Lab
Date: May 16, 2026
![[하이브리드 항법 시스템: 제6편] [구현-2단계] 중간 보정 단계: OpenCV/YOLO 지형지물 대조 및 Digital Twin 테스트](https://quad-drone-lab.co.kr/wp-content/uploads/2026/06/Absolute_Visual_Localization_for_UAVs-768x429.jpg)
![[PX4 튜닝 시리즈 부록] 레이싱 드론 튜닝 가이드 (Racer Setup): 한계를 뛰어넘는 극강의 퍼포먼스](https://quad-drone-lab.co.kr/wp-content/uploads/2026/03/Racing-Drone-Minimalism-and-Balance-768x429.png)
![[ROS2 Mastery Part 3] A Guide to Creating Your First ROS2 Package and Programming a Python Node](https://quad-drone-lab.co.kr/wp-content/uploads/2026/05/0507_인포그래픽-768x512.png)
![[하이브리드 항법 시스템: 제4편] ROS 2를 활용한 PX4와 외부 INS 오도메트리 연계 및 통신 검증](https://quad-drone-lab.co.kr/wp-content/uploads/2026/04/Drone-Navigation-Data-Integration-Flow-768x429.jpg)