

[MAVSDK C++ Part 4] Building Your Own App: Project Setup and Drone Connection
Hello! This is Aiden from the Marketing Team. In our previous episode (Part 3), we built a SITL virtual environment for safe autonomous flight testing and ran basic MAVSDK examples to see our drone take off in virtual space.
However, as a researcher or developer, simply running pre-made examples isn’t enough, right? In this Part 4, we will guide you from a blank folder to setting up your own C++ project (Build) and establishing a communication link (Connection) with the drone system. Even if you are a college student unfamiliar with C++ build systems, you can master this by following along step-by-step!

Understanding the MAVSDK C++ Build System
To turn C++ source code into an executable program, you must go through a process called Compilation and Linking. While the MAVSDK core library is written in the modern C++17 standard, it provides C++11 interfaces (such as std::function) for external apps, meaning your application must be built in a C++11 environment or higher.
MAVSDK uses CMake, a cross-platform open-source toolchain, as its build system. We strongly recommend using CMake for your apps as well. With CMake, you can configure your app with the same build settings regardless of whether you are on Linux, macOS, or Windows.
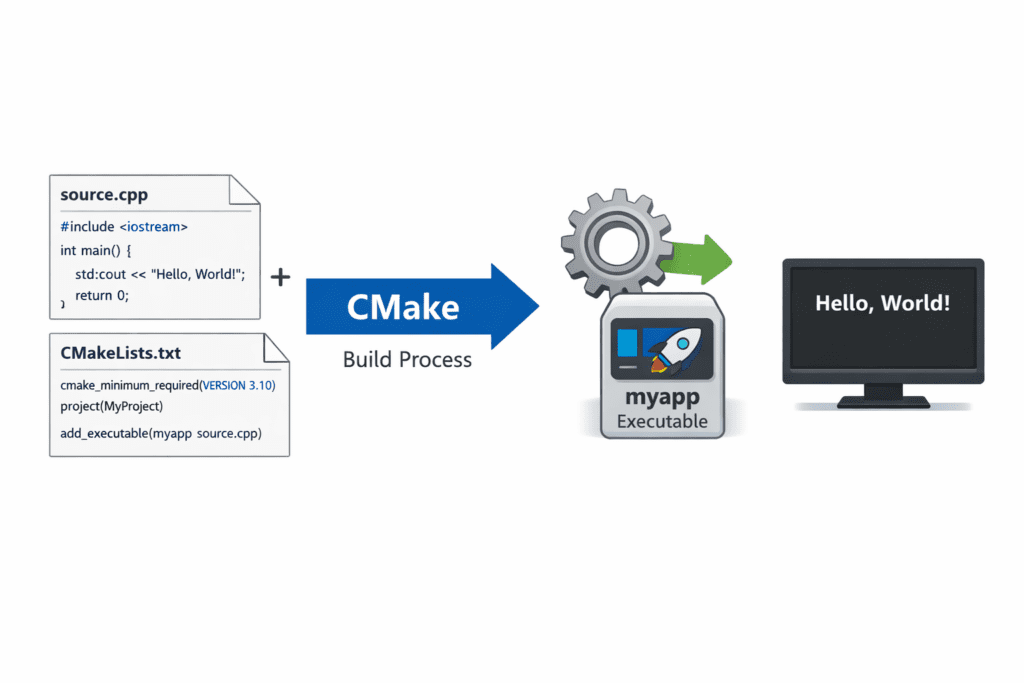
Writing CMakeLists.txt
The first step in building your app is to create a build definition file named CMakeLists.txt in your project’s root directory. This file contains the project name, source files to be used, and information about the libraries (MAVSDK) to link.
Here is a basic template for CMakeLists.txt:
# 1. Set minimum CMake version
cmake_minimum_required(VERSION 3.10)

# 2. Set project name and language
project(MyDroneApp LANGUAGES CXX)

# 3. Enable C++17 standard
set(CMAKE_CXX_STANDARD 17)
set(CMAKE_CXX_STANDARD_REQUIRED ON)

# 4. Find MAVSDK library package
find_package(MAVSDK REQUIRED)

# 5. Create executable (compile main.cpp to create my_drone_app)
add_executable(my_drone_app main.cpp)

# 6. Link MAVSDK libraries to the created executable
target_link_libraries(my_drone_app
    MAVSDK::mavsdk
    MAVSDK::mavsdk_action
    MAVSDK::mavsdk_telemetry
)💡 Practical Tip for Researchers: Setting Library Paths
- System-wide Installation: If you installed MAVSDK to
/usr/localusingsudo make installin Part 3, thefind_package(MAVSDK REQUIRED)command will find it automatically. - Local Installation: If you built it in a specific folder (e.g.,
~/mavsdk_local) to avoid conflicts with system libraries, you must specify-DCMAKE_PREFIX_PATHwhen building your app so CMake can locate it.- Build command example:
cmake -DCMAKE_PREFIX_PATH=~/mavsdk_local -Bbuild -S.
- Build command example:
Fundamentals of Drone Connection (add_any_connection)
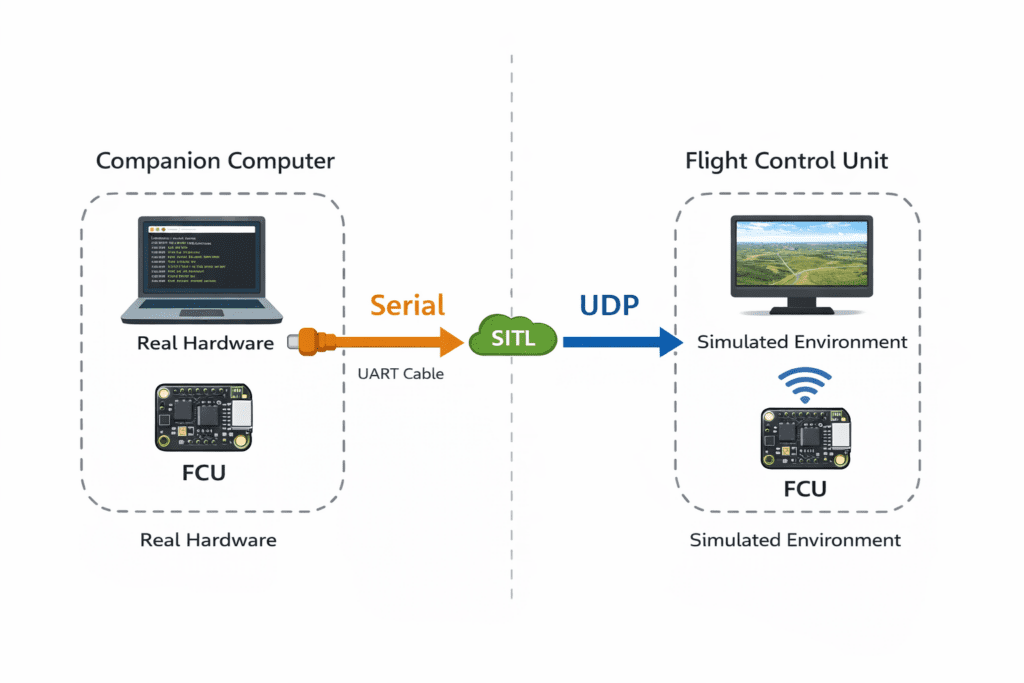
Now that your build environment is ready, it’s time to write the code to connect to the drone. MAVSDK can connect to one or more vehicles (drones) via a local WiFi network or a Serial port.
When specifying a communication port and starting monitoring, use the add_any_connection() method, which returns a ConnectionResult indicating success or failure. The connection URL format varies depending on the network environment.
Connection URL Formats:
- UDP:
udpin://[ip][:port],udpout://[ip][:port] - TCP:
tcpin://[ip][:port],tcpout://[ip][:port] - Serial:
serial://[path][:baudrate]
1) Connecting to an Actual Aircraft via Serial Port
Used when connecting to a Pixhawk flight controller via USB, FTDI, or Telemetry radio.
- Linux Example:
mavsdk.add_any_connection("serial:///dev/ttyUSB0:57600"); - Windows Example:
mavsdk.add_any_connection("serial://COM3:57600");
2) SITL Connection via UDP (Server Mode)
When communicating with virtual environments or network-based drones, UDP server mode (udpin) is primarily used. Specifying 0.0.0.0 allows listening on all network interfaces.
- Connecting to SITL Standard Offboard Port 14540:
mavsdk.add_any_connection("udpin://0.0.0.0:14540");- Note: Port 14540 is standardized for external APIs in SITL, while Ground Control Stations like QGroundControl use port 14550.
System Discovery Notifications and Essential C++ Syntax
Once the port is open, you need to wait for the drone to be “discovered” by detecting Heartbeat messages.
Registering System Detection Callback (subscribe_on_new_system)
MAVSDK provides subscribe_on_new_system(), which notifies you when a new drone is discovered. Using C++ Lambda functions makes this code very intuitive.
mavsdk.subscribe_on_new_system([]() {
    std::cout << "A new drone system has been discovered!\n";
});The lambda function [](){ ... } is an “anonymous on-the-fly function,” a powerful C++11 feature that allows you to write callback logic directly where it’s needed without defining a separate function elsewhere.
Accessing the Drone (System) Object
Once a drone is discovered, you can get a list of currently connected systems (in Vector format) using the systems() method.
mavsdk.subscribe_on_new_system([]() {
    std::cout << "A new drone system has been discovered!\n";
});💡 C++ Tip! Using the
autoKeyword
Theautokeyword allows the compiler to automatically deduce the variable’s data type.
MAVSDK often has long and complex return types (likestd::vector<std::shared_ptr<System>>);
usingautomakes your code much cleaner and more accurate, significantly increasing research efficiency.
Full Code Integration and Build Execution
Let’s combine everything we’ve learned into one complete main.cpp source file.
#include <iostream>
#include <thread>
#include <chrono>
#include <mavsdk/mavsdk.h>

using namespace mavsdk;

int main() {
    // 1. Create Core Engine Object
    Mavsdk mavsdk{Mavsdk::Configuration{ComponentType::GroundStation}};

    // 2. Set up UDP Port 14540 (SITL) Connection
    std::cout << "Attempting to connect to SITL environment...\n";
    auto connection_result = mavsdk.add_any_connection("udpin://0.0.0.0:14540");

    if (connection_result != ConnectionResult::Success) {
        std::cerr << "Connection failed: " << connection_result << '\n';
        return 1;
    }

    // 3. Register notification for new system detection (using Lambda)
    std::atomic<bool> discovered{false};
    mavsdk.subscribe_on_new_system([&discovered]() {
        std::cout << "🎉 A new system (drone) has been discovered!\n";
        discovered = true;
    });

    // 4. Wait until the drone is discovered
    std::cout << "Waiting for drone heartbeat messages...\n";
    while (!discovered) {
        std::this_thread::sleep_for(std::chrono::seconds(1));
    }

    // 5. Access and verify the System object
    auto system = mavsdk.systems().front();
    std::cout << "Connected System ID: " << static_cast<int>(system->get_system_id()) << '\n';

    return 0;
}Now, open your terminal and enter the following commands to build and run the app we wrote:
# 1. Create build directory and configure CMake environment
cmake -Bbuild -S.

# 2. Proceed with compilation (use 4 cores for faster building)
cmake --build build -j4

# 3. Run the application (ensure SITL simulator is running)
./build/my_drone_appIf you see the message “A new drone system has been discovered!” in your terminal, your first C++ drone control app has successfully established a communication channel with the drone!
In this Part 4, we learned how to write CMakeLists.txt for a professional MAVSDK project, how to use add_any_connection() for various environments (UDP, Serial), and even sophisticated discovery logic using lambdas and auto.
Now that the communication pipeline is complete, it’s time to extract detailed data through it. In the next [Part 5: Querying System Info and Using Telemetry], we will dive deep into real-time monitoring of GPS location, battery levels, and flight modes using asynchronous methods.
YouTube Tutorial

Author: Aiden, QUAD Drone Lab Marketing Team
Date: March 14 , 2026
![ROS2 Mastery [Part 2] Core Communication Concepts of ROS2 and How to Use the Powerful Utility “RQT”](https://quad-drone-lab.co.kr/wp-content/uploads/2026/03/0331_그림6-768x512.png)
![[ROS2 Mastery Part 5] ROS2 Topic Programming (2) – Receiving Location Information with a Subscriber](https://quad-drone-lab.co.kr/wp-content/uploads/2026/05/0516_인포그래피-768x429.jpg)
![PX4 MAVSDK – C++ Programming [11편] MAVSDK vs MAVROS vs uXRCE-DDS 완벽 비교](https://quad-drone-lab.co.kr/wp-content/uploads/2026/03/0322_인포그래피-768x512.png)