[PX4 Autopilot Safety Configuration] Part 1. Pre-Flight Warm-up: Regulations, Flight Location Selection, and Geofencing Guide
Hello, drone researchers, graduate students, and developers!
The PX4 Autopilot is an incredibly powerful open-source flight controller platform extensively used in both academic research and industrial UAV development. However, migrating your custom control algorithms or new hardware setups from a safe, virtual simulation environment to a real-world outdoor flight test is a massive transition.
In the laboratory, a software crash simply means restarting a container or re-running a script. In the field, an unhandled exception or an uncalibrated safety parameter translates into a catastrophic crash, financial liability, or, worst of all, physical injury. Therefore, the absolute first goal of any flight test is not proving a new trajectory tracking algorithm—it is bringing the airframe back home in one piece.
In this masterclass series, we will bridge the gap between control theory and real-world system safety. In Part 1, we will cover the critical legal boundaries, scientific criteria for choosing an outdoor testing site, the configuration of Geofences and Rally Points, and how to safely mock and test these failsafe behaviors using the PX4 SITL (Software-in-the-Loop) State Machine Simulator.
1. Know the Law: Regulatory Boundaries and Licensing
Before you even plug in your flight battery, you must understand the legal airspace you are operating in. Regulatory bodies worldwide (such as the FAA in the US, EASA in Europe, or local civil aviation authorities) impose strict regulations on unmanned aerial vehicles (UAVs).
Key Regulatory Checkpoints for Researchers:
- Pilot Licensing: Many jurisdictions legally require drone operators to hold an official license (e.g., FAA Part 107 or equivalent) when flying drones above a certain size/weight limit, or when conducting flights for academic, research, or commercial purposes.
- Airspace Approvals & Permissions: Never assume that open sky is free sky. If your test site falls under controlled airspaces (near airports, military installations, or sensitive infrastructure), you must obtain official flight authorization via local GCS networks or civil aviation portals before taking off.
- Camera & Data Collection Permits: If your research involves optical cameras, LiDAR, or multispectral sensors, ensure you have explicit government or local security permits to capture aerial data over that specific region.
- Liability Insurance: Research drones are often custom-built, experimental prototypes. Standard liability insurance is critical to protect your university or research lab from third-party damages in the event of an unpreventable flyaway or system failure.
2. Selecting a Good Flight Location: Scientific and Physical Criteria
Choosing where to conduct your first outdoor flight test is a critical decision that determines both flight safety and sensor accuracy.
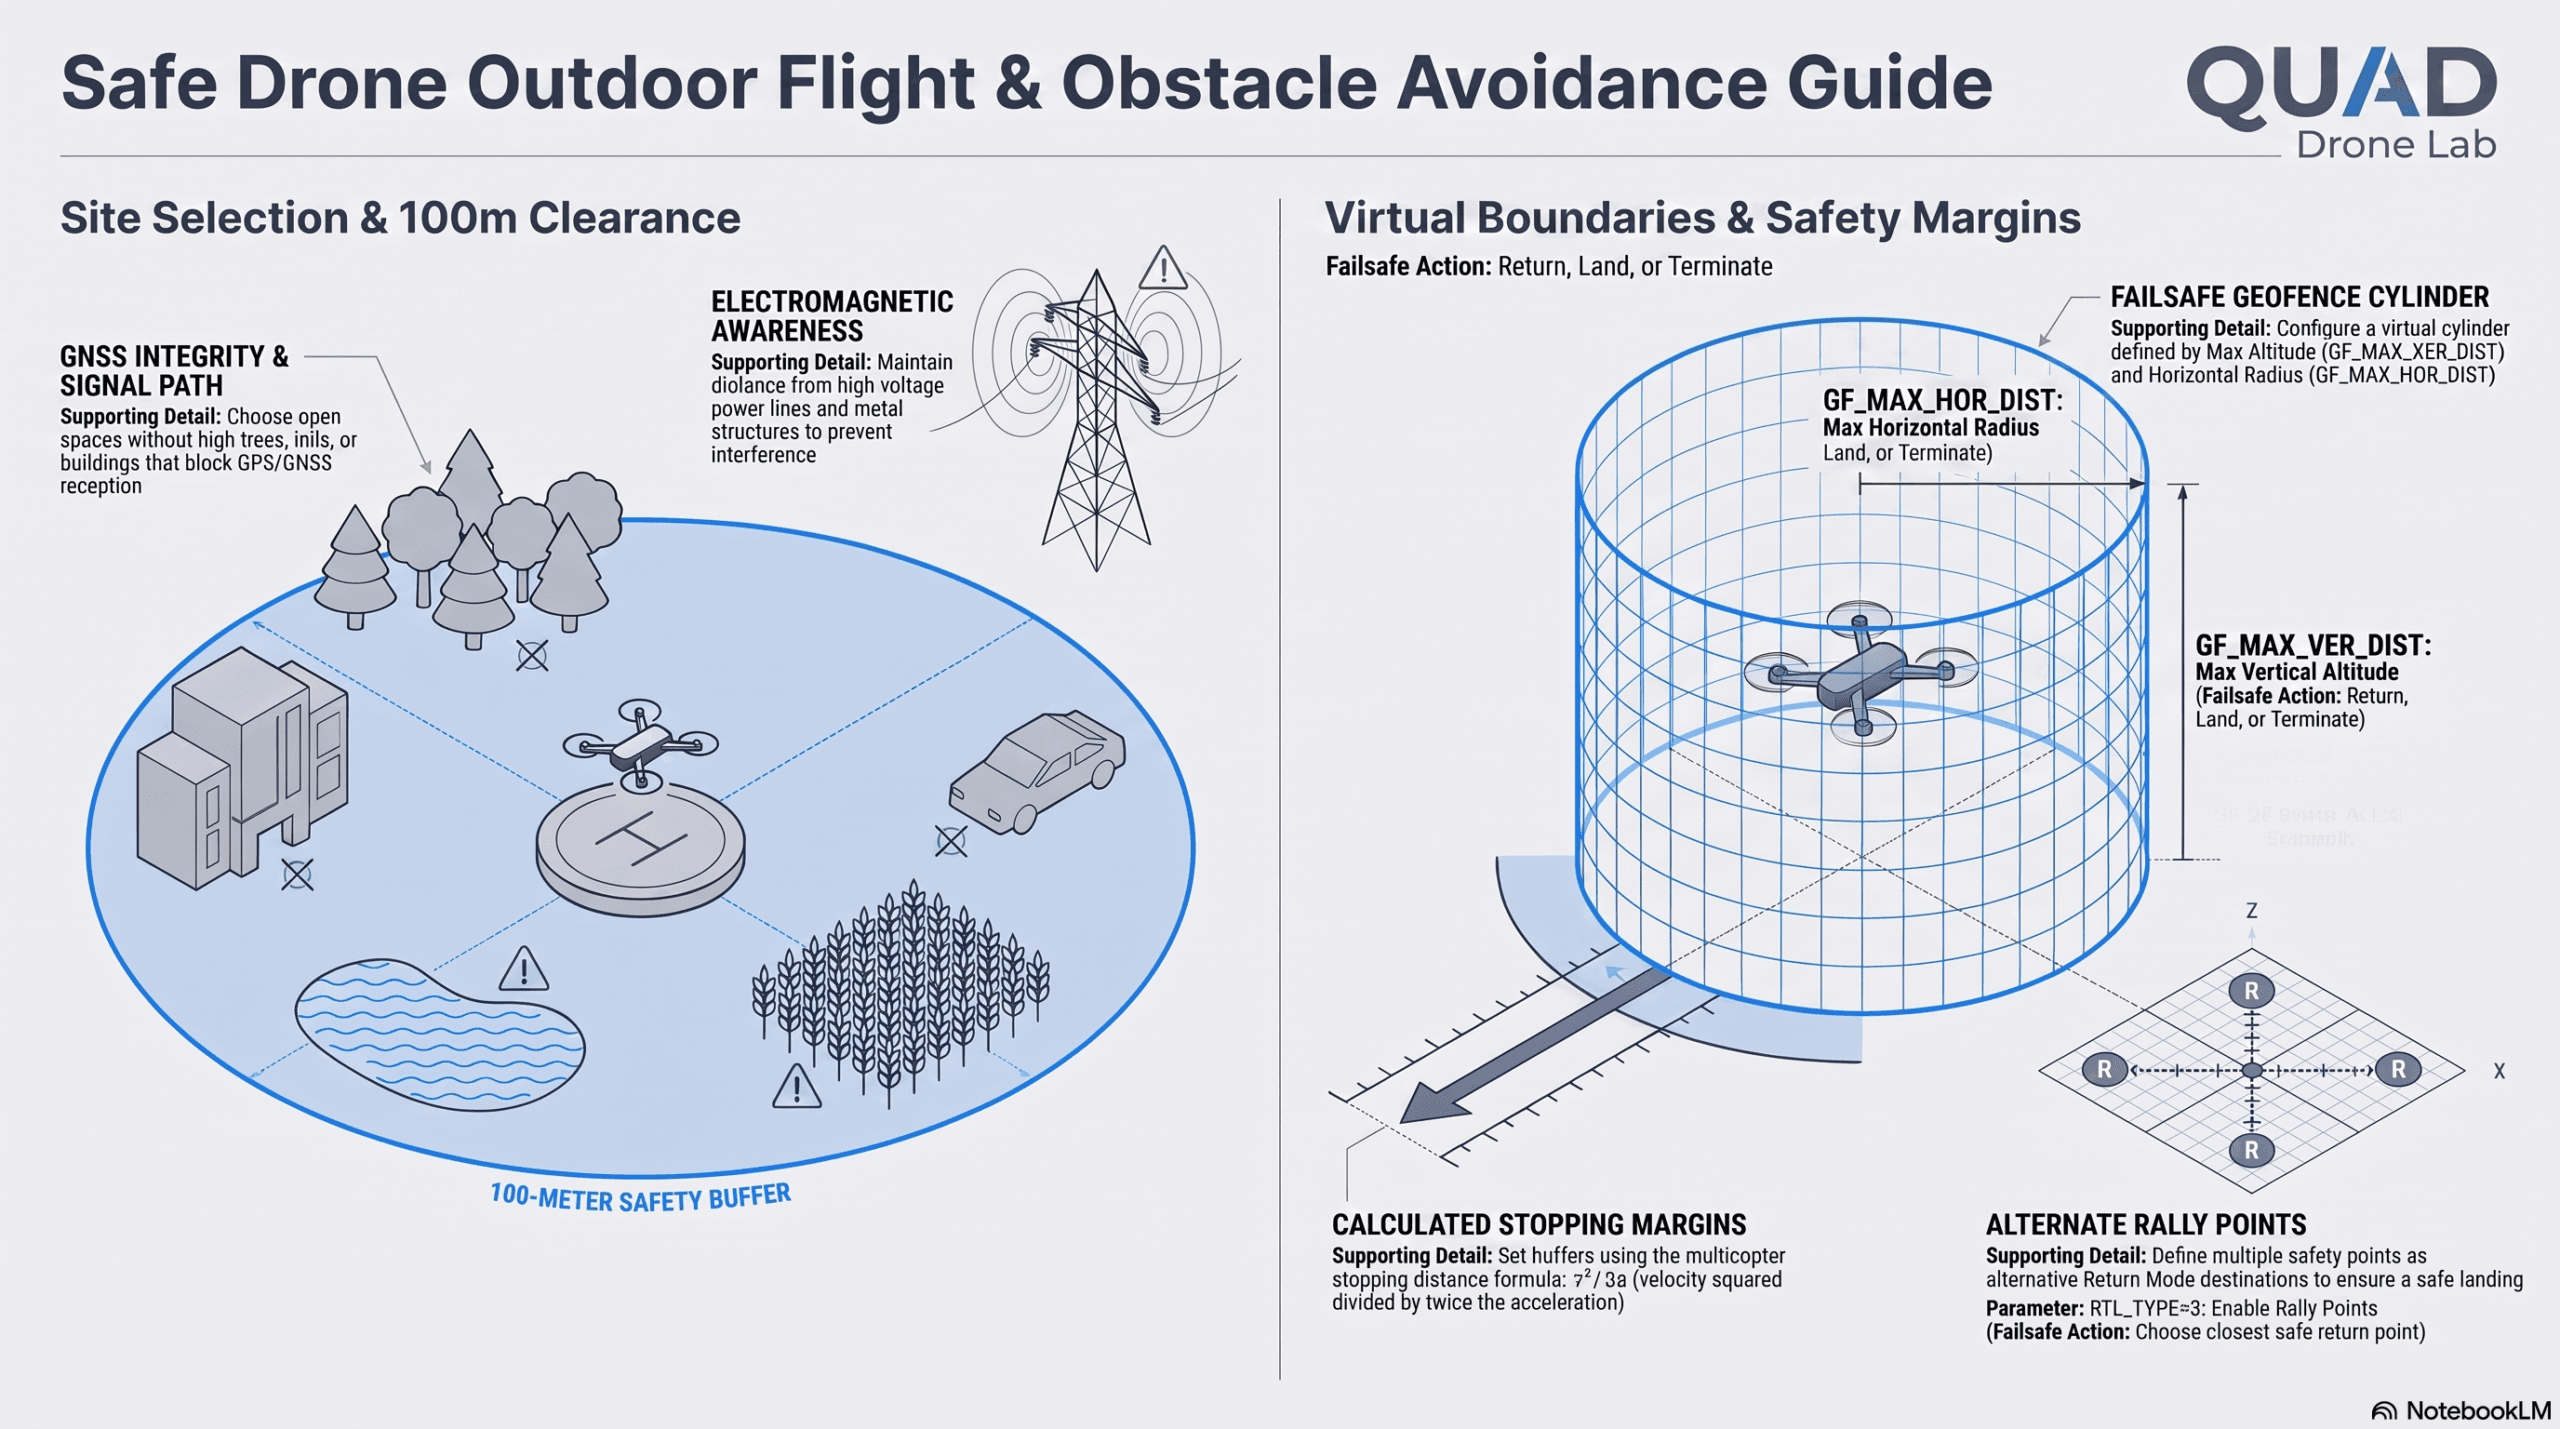
An ideal testing site must satisfy the following three major constraints:
① Open Space & Unobstructed GNSS Reception
PX4 relies heavily on a high-quality global position estimate for its autonomous flight modes (such as Hold, Mission, and Return-to-Launch).
- The GNSS Obstacle Rule: Choose a space that is completely open. There must be no high trees, hills, or buildings nearby, as these physical barriers block line-of-sight to orbiting satellites and cause severe multipath signal interference.
- Sensor Interference Prevention: Keep a substantial distance from high-voltage power lines, industrial transformers, or large metallic structures. These introduce severe electromagnetic noise that will corrupt your magnetometer (compass) readings, leading to rapid orientation drift and potential flyaways.
② The 100-Meter Safety Clearance Rule
To minimize the risks associated with temporary control loss, you must enforce a strict safety buffer:
- Personnel Buffer: Ensure there are no non-involved people within a 100-meter (300 feet) radius of your takeoff, flight path, and landing areas.
- Property Buffer: Ensure there is nothing valuable that you shouldn’t crash onto within 100 meters—including houses, public structures, parking lots, roads, or open water.
- Vegetation Warning: Avoid conducting initial tests over dense crop fields (such as corn or wheat fields) or thick forests. Prototype drones that descend unexpectedly in these environments are notoriously difficult to locate, often resulting in the loss of expensive on-board computer payloads (e.g., Jetson nodes or custom depth cameras).
③ Bringing a Pro & Flight Planning
- The Expert Co-Pilot: Always bring an experienced pilot for your first flight test. They can run through pre-flight checklists with you and, more importantly, intervene using a manual transmitter switch if the automated controller malfunctions.
- Pre-Planned Route: Plan the entire flight route, including the exact takeoff point, the pattern of execution, and the landing destination, before arming the motors.
3. Configuring Digital Safety Nets: Geofences & Safety (Rally) Points
When physical safety margins are established, you must hardcode them into the PX4 autopilot using Geofences and Safety Points (Rally Points) to prevent the drone from escaping your designated safe airspace.
① Cylinder Failsafe Geofence vs. Complex Geofence Plans
PX4 provides two distinct, robust methods for configuring virtual flight boundaries:
<그림 2: QGroundControl Failsafe Geofence (Cylinder) vs. Complex Geofence Plan Layout>
A. Failsafe Geofence (Standard Cylinder)
This is a simple, highly reliable cylindrical safety barrier centered on the drone’s Home Position. It is configured via direct parameters in QGroundControl:
- GF_MAX_HOR_DIST (Max Horizonal Radius): The maximum horizontal distance the drone is allowed to fly from the Home Position (disabled if set to 0).
- GF_MAX_VER_DIST (Max Vertical Altitude): The maximum allowable altitude relative to Home (disabled if set to 0).
- GF_ACTION (Breach Action): Dictates the immediate autopilot action when a boundary is crossed. For research flights, setting this to Return Mode (the drone flies back to Home) or Hold Mode (the drone stops and hovers) is highly recommended. (Warning: Setting this to Terminate will immediately shut down the motors and drop the drone, which is extremely dangerous unless a parachute is deployed).
B. Geofence Plan (Complex Polygons and Inclusions/Exclusions)
When flying in restricted locations with complex shapes, you can draw custom boundaries in QGC Plan View > Fence:
- Inclusion Zones: Areas where the drone is allowed to fly.
- Exclusion Zones: Strict no-fly/keep-out areas (e.g., near an adjacent highway or building).
- Upload Rule: PX4 will reject any Geofence that does not include the Home Position. This prevents uploading fences that would immediately trigger a failsafe upon takeoff.
C. Calculating Safe Stopping Margins (Deceleration Math)
To prevent geofence breaches due to high inertia, you must configure a safety margin. The physical stopping distance of a multicopter can be modeled using its maximum horizontal cruise velocity and maximum deceleration capability:
Stopping Distance≈2av2
- Where v is the maximum horizontal velocity parameter (
MPC_XY_VEL_MAX). - Where a is the maximum horizontal acceleration limit (
MPC_ACC_HOR_MAX). - Practical Guideline: If your drone cruises at 12 m/s with a maximum stopping deceleration of 4 m/s2, the minimum stopping distance is 18 meters. Account for latency, sensor uncertainty, and tailwinds by adding an extra 5∼10 meter buffer to your geofence boundary.
② Safety Points (Rally Points) for Flexible Return
During a failsafe event, returning directly to the takeoff “Home” position is not always the safest choice. The home area might have become crowded, or winds might block a safe landing path.
- Definition: Safety Points (Rally Points) are alternative Return-to-Launch (RTL) destinations mapped in QGroundControl.
- Autopilot Logic: When Rally Points are uploaded and enabled by setting RTL_TYPE = 3, PX4 dynamically evaluates the aircraft’s current position and commands it to return to the closest destination out of: the Home location, the mission landing pattern, or any pre-configured Rally Point.
4. Emergency Action Mechanisms & Failure Detectors
When a prototype drone behaves abnormally, the pilot must be able to instantly trigger safety overrides, or the autopilot must detect structural failures autonomously.
① Manual Transmitter Safety Switches
- The Motor Kill Switch: Assign a designated, easy-to-reach switch on your RC transmitter to the Kill Switch. Activating this instantly cuts all PWM signals to the ESCs, shutting down the motors immediately. If the switch is reverted within 5 seconds in manual flight, the motors can restart, but after 5 seconds the vehicle disarms permanently.
- The Kill Gesture: As a stick-based alternative, holding throttle at minimum and yaw at minimum for 1 second will manually disarm the vehicle. For a hard kill, you can configure
MAN_KILL_GEST_Tto cut motors after holding sticks in a specified extreme gesture. This action cannot be reverted without a full system reboot. - Return Switch: Always map a toggle switch to engage Return Mode (RTL) instantly.
② PX4 Autopilot Failure Detector & Flight Termination
The PX4 Failure Detector runs in the background at 10Hz to identify critical structural or attitude losses during flight:
- Attitude Limits (Flip Detection): If the drone rolls or pitches beyond defined limits (
FD_FAIL_R,FD_FAIL_P—e.g., exceeding 60∘ of tilt) for longer than a specified hysteresis time (FD_FAIL_R_TTRI,FD_FAIL_P_TTRI—typically 0.3 seconds), a critical failure is triggered. - In-Flight Action (Flight Termination): To enable actual termination actions during flight, set the circuit breaker parameter CBRK_FLIGHTTERM = 0 (it is set to 121212 by default to prevent accidental termination).
- Hardware Interfacing (Parachutes): On Flight Termination, all stabilization controllers are permanently locked out. It forces all PWM outputs to their pre-defined failsafe values, which can be mapped to trigger an autonomous recovery device, such as deploying a ballistic parachute (via setting
PWM_MAIN_FAILnorPWM_AUX_FAILnvalues to the deploy threshold).
5. Safe Verification: PX4 Failsafe State Machine Simulation
Before testing safety limits on a live drone, you should run the PX4 Failsafe State Machine Simulation. This simulator compiles and runs the exact same C++ logic executed on the physical flight controller, allowing you to safely mock, test, and visualize failsafe logic branches directly in your web browser.
<그림 3: PX4 Failsafe State Machine Simulation Web Interface & Parameters>
Step-by-Step Simulation Checklist:
- Locate the Web Interface: Open the official PX4 online Failsafe Simulation tool (available in the PX4 user guide), or compile and launch the emscripten-based simulation locally from your PX4 Autopilot source directory using:
- Configure the Vehicle & Parameters (Left Panel):
- Select Multirotor as your Vehicle Type.
- Set NAV_RCL_ACT (Manual Control Loss Action) to Return Mode.
- Set COM_FAIL_ACT_T (Failsafe Hold Delay) to 5 seconds. This represents the duration the drone will wait in a stable hover before executing the return path.
- Set the Initial Flight State:
- Check the Armed box to arm the virtual flight stack.
- Set the Intended Mode (commanded flight mode) to POSCTL (Position Control).
- Mock a Fail Event (Manual Control Loss Simulation):
- Under the Conditions panel, check the box labeled Manual control (RC) signal lost.
- Observe the Output:
- The console instantly displays a warning.
- The vehicle transitions into its delayed failsafe holding period.
- Failsafe Action State: Note that for the first 5 seconds (
COM_FAIL_ACT_T), the simulated drone enters Hold Mode. Moving virtual RC sticks will not override this failsafe-hold state. - Once the 5-second timer expires, the Failsafe Action automatically escalates, and the Output panel changes to Return Mode (RTL).
By practicing with this simulator, you can verify how complex parameters like COM_LOW_BAT_ACT, GF_ACTION, and link loss exceptions interact, ensuring there are no surprises during your real outdoor flight tests.
6. Part 1 Conclusion: “Build a Safe Foundation”
Transitioning a drone project from a simulation to the physical field is the most exciting milestone of your research. By respecting local aviation laws, selecting a clear GNSS-friendly location, establishing a 100-meter safety zone, and properly configuring your Geofence parameters and Rally Points, you build an ironclad safety foundation.
Remember, a safe flight test is a successful flight test.
First Flight Safety Checklist
- [ ] Is your research flight approved by local civil aviation authorities?
- [ ] Is the GNSS flight zone completely clear of high trees, hills, and power lines within 100 meters?
- [ ] Did you map and test your Transmitter Kill Switch?
- [ ] Are the Geofence horizontal (
GF_MAX_HOR_DIST) and vertical (GF_MAX_VER_DIST) bounds active? - [ ] Is your Return-to-Launch altitude set safely higher than any nearby physical obstacles?
In Part 2 of the PX4 Safety Flight Guide, we will shift our focus to the physical machine. We will explore Pre-arm, Arm, and Disarm safety configurations, examine how PX4 runs its 10Hz Pre-flight sensor health checks, and show you how to configure safety buttons to prevent propeller accidents on the ground.