

[PX4 ROS 2 Programming] Part 1: Understanding PX4-ROS 2 Architecture and Environment Setup
Integrating PX4 with ROS 2 is an essential process in the robotics field for implementing drone autonomous flight or computer vision-based control. In this post, we will understand the architecture of how PX4 and ROS 2 communicate and build a simulation development environment where you can run actual code. I have organized this with core concepts and essential commands so that even undergraduate students who are new to this can easily follow along!
1. Understanding the PX4-ROS 2 Architecture
In previous PX4 versions (v1.13 and earlier), a middleware called FastRTPS was used, but starting from PX4 v1.14, it uses a new middleware called ‘uXRCE-DDS’ to communicate with ROS 2.
The core of this architecture is the Client and the Agent.
- uXRCE-DDS Client (PX4 side): This runs inside the drone’s flight controller (PX4). It translates the internal
uORBmessages used by PX4 into a format that ROS 2 can understand. - Micro XRCE-DDS Agent (Companion computer / ROS 2 side): This runs on an external computer like a Raspberry Pi or a laptop. It connects bi-directionally with the PX4 Client and acts as a proxy for the client to publish and subscribe to topics in the global ROS 2 data space.

In other words, when we send a message like a movement command through our ROS 2 program, it travels via the Agent to the Client and is converted into an internal uORB topic in PX4, which ultimately makes the drone move.
2. Setting up the Development Environment
For stable development, we will proceed based on the officially supported and recommended environment: Ubuntu 22.04 and ROS 2 “Humble”.
Step 1: Install PX4 Simulator (SITL)
To test the code on a computer without an actual drone, we download the PX4 source code and install the simulator.
cd ~
git clone https://github.com/PX4/PX4-Autopilot.git --recursive
bash ./PX4-Autopilot/Tools/setup/ubuntu.sh
cd PX4-Autopilot/
make px4_sitlStep 2: Install ROS 2 Humble
Let’s install ROS 2 Humble on Ubuntu 22.04. The development tool ros-dev-tools and Python dependency packages must also be installed.
sudo apt update && sudo apt upgrade -y
sudo apt install ros-humble-desktop
sudo apt install ros-dev-tools
source /opt/ros/humble/setup.bash && echo "source /opt/ros/humble/setup.bash" >> ~/.bashrc
pip install --user -U empy==3.3.4 pyros-genmsg setuptoolsStep 3: Install and Build the Micro XRCE-DDS Agent
Now, we build the Agent from the source code, which will handle communication with PX4 on the ROS 2 side.
git clone -b v2.4.3 https://github.com/eProsima/Micro-XRCE-DDS-Agent.git
cd Micro-XRCE-DDS-Agent
mkdir build && cd build
cmake ..
make
sudo make install
sudo ldconfig /usr/local/lib/3. Configuring and Building the ROS 2 Workspace
For ROS 2 to correctly interpret PX4 messages, it needs a package (px4_msgs) that contains the exact same message definitions used in the PX4 firmware.
Let’s create a workspace in the home directory and download the px4_msgs package and the px4_ros_com package, which contains example codes.
# Create the workspace folder
mkdir -p ~/ws_sensor_combined/src/
cd ~/ws_sensor_combined/src/

# Clone px4_msgs (message definitions) and px4_ros_com (example code) packages
git clone https://github.com/PX4/px4_msgs.git
git clone https://github.com/PX4/px4_ros_com.gitNow, build the workspace using the colcon tool.
cd ..<br>source /opt/ros/humble/setup.bash<br>colcon build4. Verifying Communication (Running the Example)
All installations are complete! Now let’s launch the simulator and check if the ROS 2 node receives the sensor data from PX4 properly. You need to open 3 separate terminals and run them respectively.
Terminal 1: Run Micro XRCE-DDS Agent Run the agent to wait for UDP communication on port 8888 of the local host.
MicroXRCEAgent udp4 -p 8888Terminal 2: Run PX4 Simulator (SITL) Navigate to the downloaded PX4 folder and run the Gazebo simulator. The PX4 simulator starts the uXRCE-DDS client automatically, connecting to UDP port 8888 on the local host.
cd ~/PX4-Autopilot<br>make px4_sitl gz_x500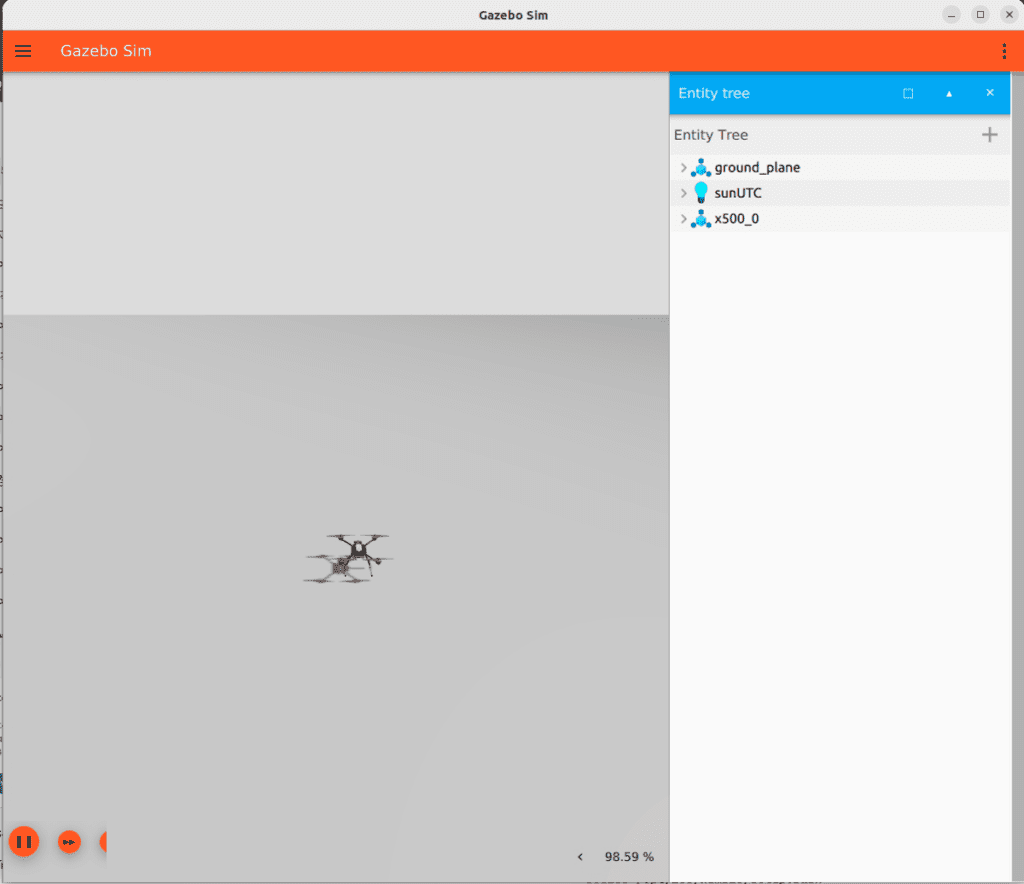
(As soon as the agent connects the output should include INFO messages showing creation of data writers)
...
[1675929445.268957] info     | ProxyClient.cpp    | create_publisher         | publisher created      | client_key: 0x00000001, publisher_id: 0x0DA(3), participant_id: 0x001(1)
[1675929445.269521] info     | ProxyClient.cpp    | create_datawriter        | datawriter created     | client_key: 0x00000001, datawriter_id: 0x0DA(5), publisher_id: 0x0DA(3)
[1675929445.270412] info     | ProxyClient.cpp    | create_topic             | topic created          | client_key: 0x00000001, topic_id: 0x0DF(2), participant_id: 0x001(1)
...
...
INFO [uxrce_dds_client] synchronized with time offset 1675929429203524us
INFO [uxrce_dds_client] successfully created rt/fmu/out/failsafe_flags data writer, topic id: 83
INFO [uxrce_dds_client] successfully created rt/fmu/out/sensor_combined data writer, topic id: 168
INFO [uxrce_dds_client] successfully created rt/fmu/out/timesync_status data writer, topic id: 188
...Terminal 3: Run ROS 2 Example Node (Listener) Apply the built workspace environment using source, and run the example node that outputs sensor data to the screen.
cd ~/ws_sensor_combined/
source /opt/ros/humble/setup.bash
source install/local_setup.bash
ros2 launch px4_ros_com sensor_combined_listener.launch.pyIf this is working you should see data being printed on the terminal where you launched the ROS listener. This means that communication between PX4 and ROS 2 is perfectly established!
RECEIVED DATA FROM SENSOR COMBINED
================================
ts: 870938190
gyro_rad: 0.00341645
gyro_rad[17]: 0.00626475
...
accelerometer_m_s2: -0.273381
accelerometer_m_s2[17]: 0.0949186YouTube Class
Summary & Next Teaser
In Part 1, we understood the uXRCE-DDS communication architecture between PX4 and ROS 2. Based on this, we successfully completed setting up a simulation environment on Ubuntu 22.04 and testing data reception.
In Part 2, we will take an in-depth look at the QoS (Quality of Service) settings issue commonly experienced when receiving data and the Coordinate Frame Conversions (NED vs ENU) concept, which is essential to know for drone control. Stay tuned!

Author: maponarooo, CEO of QUAD Drone Lab
Date: February 27, 2026
![[ROS2 Mastery 4편] ROS2 Topic 프로그래밍 (1) – Publisher로 거북이 제어하기](https://quad-drone-lab.co.kr/wp-content/uploads/2026/05/0510_인포그래픽-768x429.png)
![PX4 MAVSDK – C++ Programming [10편] 사용자 정의 로깅 및 통합 테스트(gtest)](https://quad-drone-lab.co.kr/wp-content/uploads/2026/03/0320_인포그래피-768x419.jpg)
![[Series Announcement] ROS2 Mastery: A Comprehensive ROS2 Guide for Students and Researchers](https://quad-drone-lab.co.kr/wp-content/uploads/2026/03/image-11-768x429.png)
![[ROS2 Mastery 2편] ROS2 핵심 통신 개념 및 강력한 유틸리티 ‘RQT’ 활용법](https://quad-drone-lab.co.kr/wp-content/uploads/2026/05/0505_인포그래픽-768x419.jpg)
Please let me know if you’re looking for a author for your blog.
You have some really good articles and I think I would be a good asset.
If you ever want to take some of the load off, I’d love to write some articles for your blog in exchange for a link back to mine.
Please blast me an e-mail if interested. Thanks!
Hi there! Thank you for the interest in QUAD’s blog. We take great pride in our technical content regarding autonomous drones and Pixhawk systems. Since our blog focuses on high-level R&D and engineering, we only feature guest posts that meet our specific technical standards.
If you have a background in robotics or AI and have a specific topic in mind, please feel free to send a brief outline or your portfolio to our email (maponarooo@naver.com). We’d be happy to review it. Thanks! 🙏
Wow, this article is pleasant, my younger sister is analyzing these things, thus I am going to inform her.
Thank you. 👍 ❤️