
ROS2 Mastery [Part 2] Core Communication Concepts of ROS2 and How to Use the Powerful Utility “RQT”
Hello! This is Aiden from the Marketing Team.
To all university students and researchers studying robotics and autonomous driving: Did you successfully finish building and building your ROS2 workspace in Part 1?
Now, it’s time to connect the ‘neural network’ so your robot system can breathe. Modern robot software is not a single giant program, but a structure where numerous small programs collaborate by exchanging data.
In this Part 2, we will understand the core communication concepts (Node, Topic, Service, Action, Parameter) that form the backbone of ROS2, and we will kindly explore how to use ‘RQT’, the best visualization utility that allows you to grasp and control this complex communication state at a glance.

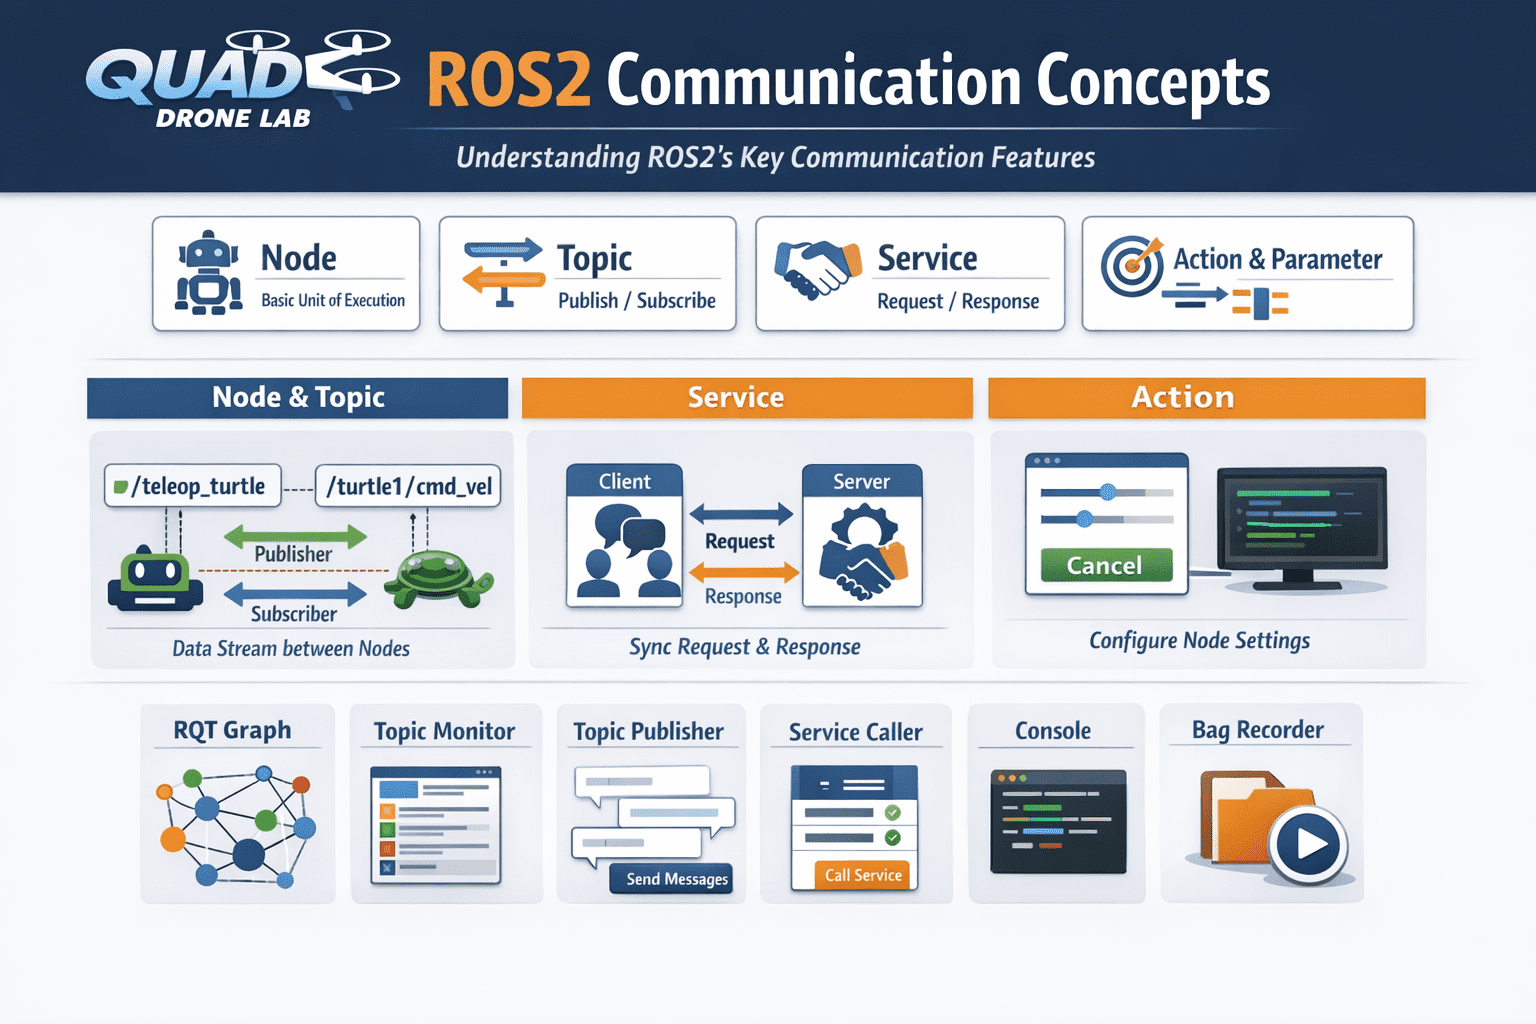
Understanding Core ROS2 Communication Concepts
Before writing code to control a robot, it is essential to clearly know the basic units and communication methods that make up the system.
1) Node
In a ROS2 system, a node is the most basic unit of execution. A single node is an independent program that performs a single, specific purpose, such as controlling a laser scanner (LiDAR), controlling motor speed, or processing camera images. Nodes gather together to form one giant robot system.
2) Topic – Asynchronous Unidirectional Communication
A topic is a bus used when streaming data between nodes. A node that sends data is called a Publisher, and a node that receives data is called a Subscriber. For example, to move a turtle in the turtle simulator (Turtlesim), the topic /turtle1/cmd_vel is used. This topic has a data type of geometry_msgs/msg/Twist, and if you look inside, it is configured to control linear movement and angular movement with 3D vectors (x, y, z) as follows:
[Example: Checking Topic Data Type]
$ ros2 interface show geometry_msgs/msg/Twist
Vector3  linear
Vector3  angular
This topic communication is very suitable for sensor data streaming or continuous transmission of control commands.
3) Service – Synchronous Bidirectional Communication
A service is a one-time communication method where a Client sends a specific task Request to a Server, and the server returns a Response after processing.
Let’s experience services directly through a demo node provided by ROS2. Open a terminal and run the add_two_ints_server node, which adds two numbers.
$ ros2 run demo_nodes_cpp add_two_ints_serverTo check what data specification (type) this service uses, you need to examine the .srv file stored in paths like /opt/ros/humble/share (or the jazzy path). Let’s check it with the ros2 interface show command.
$ ros2 interface show example_interfaces/srv/AddTwoInts
int64 a
int64 b
---
int64 sumThe --- separator in the middle is very important here. The upper part represents the data requested by the client (two numbers a, b), and the lower part represents the data the server responds with (the result sum). If you open another terminal and request the service as a client, you can receive a response immediately.
$ ros2 run demo_nodes_cpp add_two_ints_client 2 3
# The server adds 2 and 3 and returns 5 as a response.4) Action and Parameter
- Action: Similar to a service, but used for tasks that take a long time to complete, such as driving to a goal position. You can receive continuous Feedback during the task, and cancellation is also possible.
- Parameter: Refers to the configuration values of each node. You can dynamically tune the robot’s behavior (e.g., maximum driving speed, etc.) by changing values even while the node is running.
Running Turtlesim and Teleop Nodes
To visualize what we’ve learned in theory, let’s run Turtlesim, a cute 2D robot simulator. Open a new terminal and run the turtle node with the command below.
$ ros2 run turtlesim turtlesim_node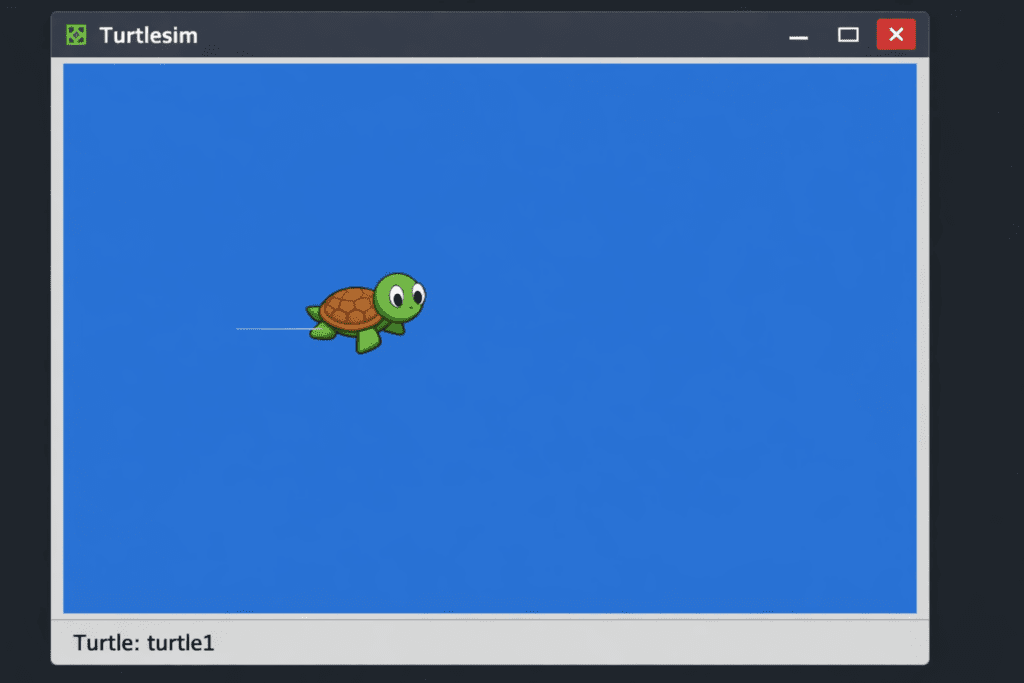
Next, open another terminal and run the teleop node, which allows you to remotely control the turtle with keyboard arrow keys.
$ ros2 run turtlesim turtle_teleop_keyNow, when you press the arrow keys, you can see the turtle moving freely within the screen. Under the hood, the keyboard node is Publishing the cmd_vel topic, and the turtle node is Subscribing to it to move.
How to Use ‘RQT’, a Powerful ROS2 Visualization Utility
For robot researchers, RQT is a tool like a stethoscope or a Swiss Army knife. It is a GUI plugin framework that can visualize the invisible communication status of ROS2 and inject commands.
Open a completely new terminal and run rqt.
$ rqtWhen you run it for the first time, an empty window appears. This is because RQT works by adding various ROS2 utilities in the form of plugins. Click [Plugins] in the top menu to look at the six core plugins essential for research one by one.
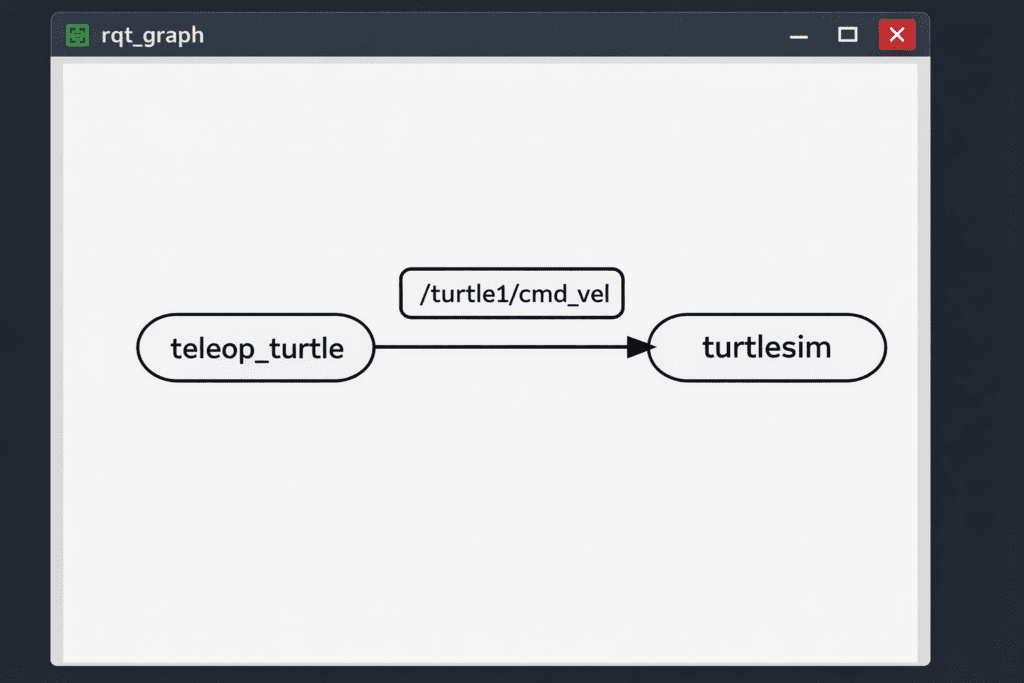
1) RQT Graph (Node/Topic Visualization)
- Path: Plugins -> Introspection -> Node Graph
It visualizes the nodes currently running in the ROS2 system and the topics through which the nodes exchange data in a graphical tree format. You can see at a glance that the/teleop_turtlenode and/turtlesimnode are connected by the/turtle1/cmd_veltopic arrow, which is very useful for debugging communication connections.
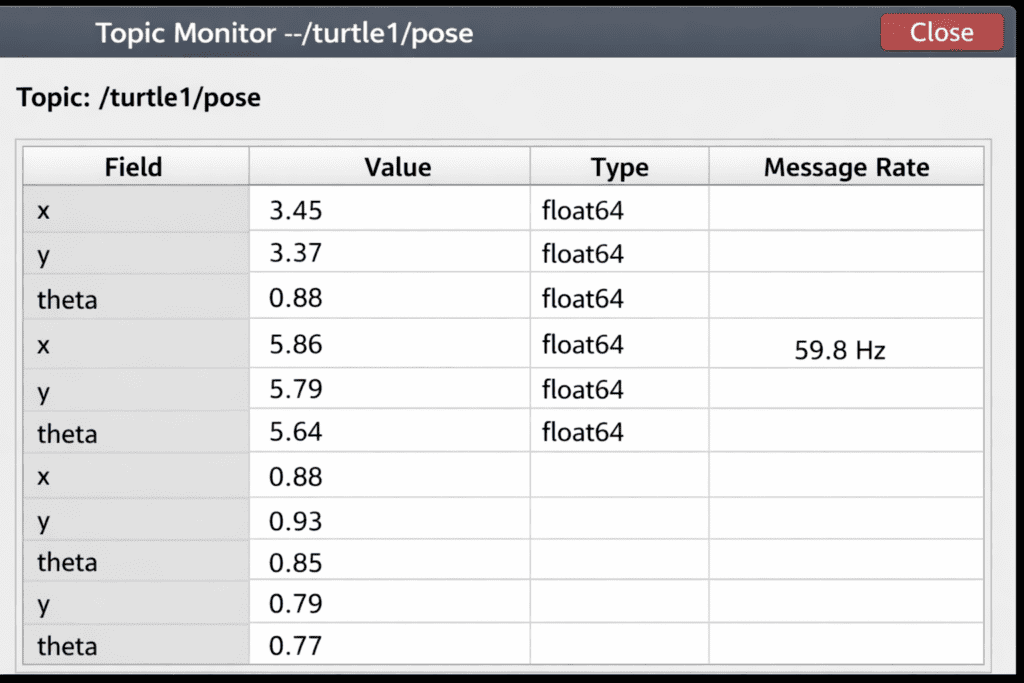
2) Topic Monitor (Data Flow Monitoring)
- Path: Plugins -> Topics -> Topic Monitor
This plugin allows you to monitor the actual values of topics currently being exchanged in real-time. If you click the checkbox for the/turtle1/posetopic while the turtle is moving, you can directly see the numbers for the turtle’s current x, y coordinates and rotation angle (theta) changing in real-time. This is essential for checking if sensor values are coming in correctly during research.
3) Topic Publisher (Forced Topic Publication)
- Path: Plugins -> Topics -> Message Publisher
|You can publish topics and control nodes directly on the RQT GUI without terminal commands or Python code. If you select the/turtle1/cmd_veltopic, setlinear.xto 2.0 andangular.zto 1.0, and turn on the publication frequency at 1Hz, you can see the turtle automatically spinning in circles without keyboard operation. This is a great tool for unit testing to see if the robot motors respond properly before writing code.

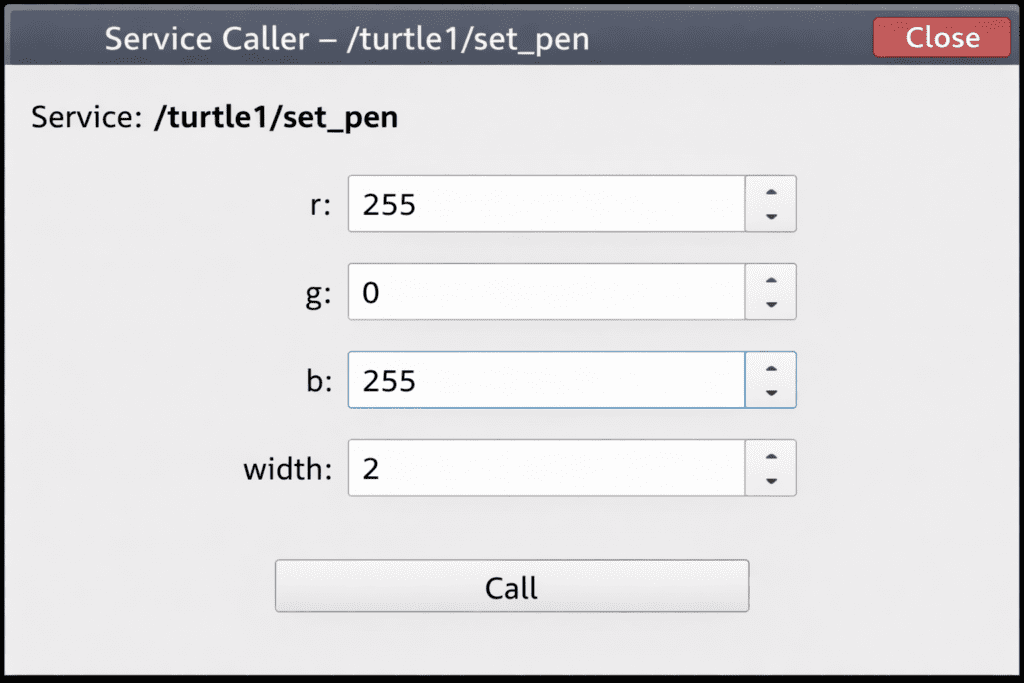
4) Service Caller (Direct Service Call)
- Path: Plugins -> Services -> Service Caller
This plugin allows you to look up the list of services currently registered in the ROS2 network through a dropdown menu and call services directly by entering parameters. If you select the/turtle1/set_penservice, which changes the color of the trajectory the turtle draws, enter the desired color code in the r, g, b values, and press the ‘Call’ button, the turtle’s pen color changes immediately. You can verify service logic without writing complex service client code.
5) Console (Log Management)
- Path: Plugins -> Logging -> Console
- This is a monitoring console that gathers all logs (INFO, WARN, ERROR, FATAL, etc.) output by ROS2 nodes in one place. Without needing to check numerous terminal windows individually, you can quickly and accurately debug error statuses and warning messages of the entire robot system by filtering them in this single window.
6) Bag (Data Recording and Playback
- Path: Plugins -> Logging -> Bag
If you have collected experimental data by taking an expensive and heavy actual robot outside the lab, you can record all node execution states, topics, and sensor data in their entirety using the Bag plugin. When you return to the lab and play back the recorded Bag file, it emits the exact same data as if the robot were actually moving, allowing you to repeatedly verify results after modifying code.
In this Part 2, we looked at ‘Communication Concepts (Node, Topic, Service)’, which are like the blood vessels of a ROS2 system, along with examples, and practiced the six powerful functions of ‘RQT’, an all-weather tool for looking into and manipulating these blood vessels.
Even in the face of numerous bugs and communication errors that occur during the robot research process, if you pull out the RQT Graph and Topic Monitor learned today, you will be able to find the cause of the problem quickly.
Now that you perfectly understand how ROS2 communicates, in the next Part 3: Creating Your First ROS2 Package and Python Node Programming, we will finally write Python code ourselves to create a ‘my_robot_controller’ package that handles the turtle at will.
YouTube Tutorial

Author: Aiden, Marketing Team at QUAD Drone Lab
Date: March 30, 2026
![PX4 MAVSDK – C++ Programming [12편] MAVSDK C++를 활용한 최신 자율 비행 연구 사례](https://quad-drone-lab.co.kr/wp-content/uploads/2026/03/0322_인프그래피2-768x429.jpg)
![PX4 MAVSDK – C++ Programming [3편] MAVSDK C++ 설치 및 SITL 시뮬레이션 환경 구축](https://quad-drone-lab.co.kr/wp-content/uploads/2026/03/0313_인포그래픽-768x419.jpg)
![PX4 MAVSDK – C++ Programming [9편] 정밀한 드론 제어: 오프보드(Offboard) 모드](https://quad-drone-lab.co.kr/wp-content/uploads/2026/03/0319_인포그래픽-768x429.jpg)

![PX4 MAVSDK – C++ Programming [11편] MAVSDK vs MAVROS vs uXRCE-DDS 완벽 비교](https://quad-drone-lab.co.kr/wp-content/uploads/2026/03/0322_인포그래피-768x512.png)
![PX4 MAVSDK – C++ Programming [Part 2] Core C++ Syntax for MAVSDK](https://quad-drone-lab.co.kr/wp-content/uploads/2026/03/0312_인포그래픽-768x768.jpg)