
The Ultimate Guide to MAVSDK-Python Programming [Part 11]: Creating Manual Drone Control via Keyboard Inputs
Hello once again, university students and researchers dedicating yourselves to autonomous flight robotics and drone control algorithms! Welcome to the eleventh installment of QUAD Drone Lab’s MAVSDK-Python blog series.
Up until [Part 10], we deeply explored the core principles of autonomous flight, such as position control, velocity control, and feed-forward simultaneous control, where the drone independently makes judgments and flies toward designated targets. You must have felt a tremendous sense of achievement watching your drone flawlessly evade obstacles and reach its destination based on your perfectly crafted code.
However, as you progress in your research, you will realize that ‘Human-in-the-loop’ (manual intervention during emergencies) and ‘direct piloting for data collection’ are just as crucial as developing autonomous algorithms. There are times when a human must manually fly the drone to collect sensor data for Reinforcement Learning or Imitation Learning. Furthermore, if your coded algorithm malfunctions, the researcher must be able to instantly take back control.
Therefore, in this [Part 11: Creating Manual Drone Control via Keyboard Inputs], we will implement a Python program that allows you to manually control the drone using a standard PC keyboard (WASD, arrow keys)—just like playing a PC game—without needing a complex RC transmitter.
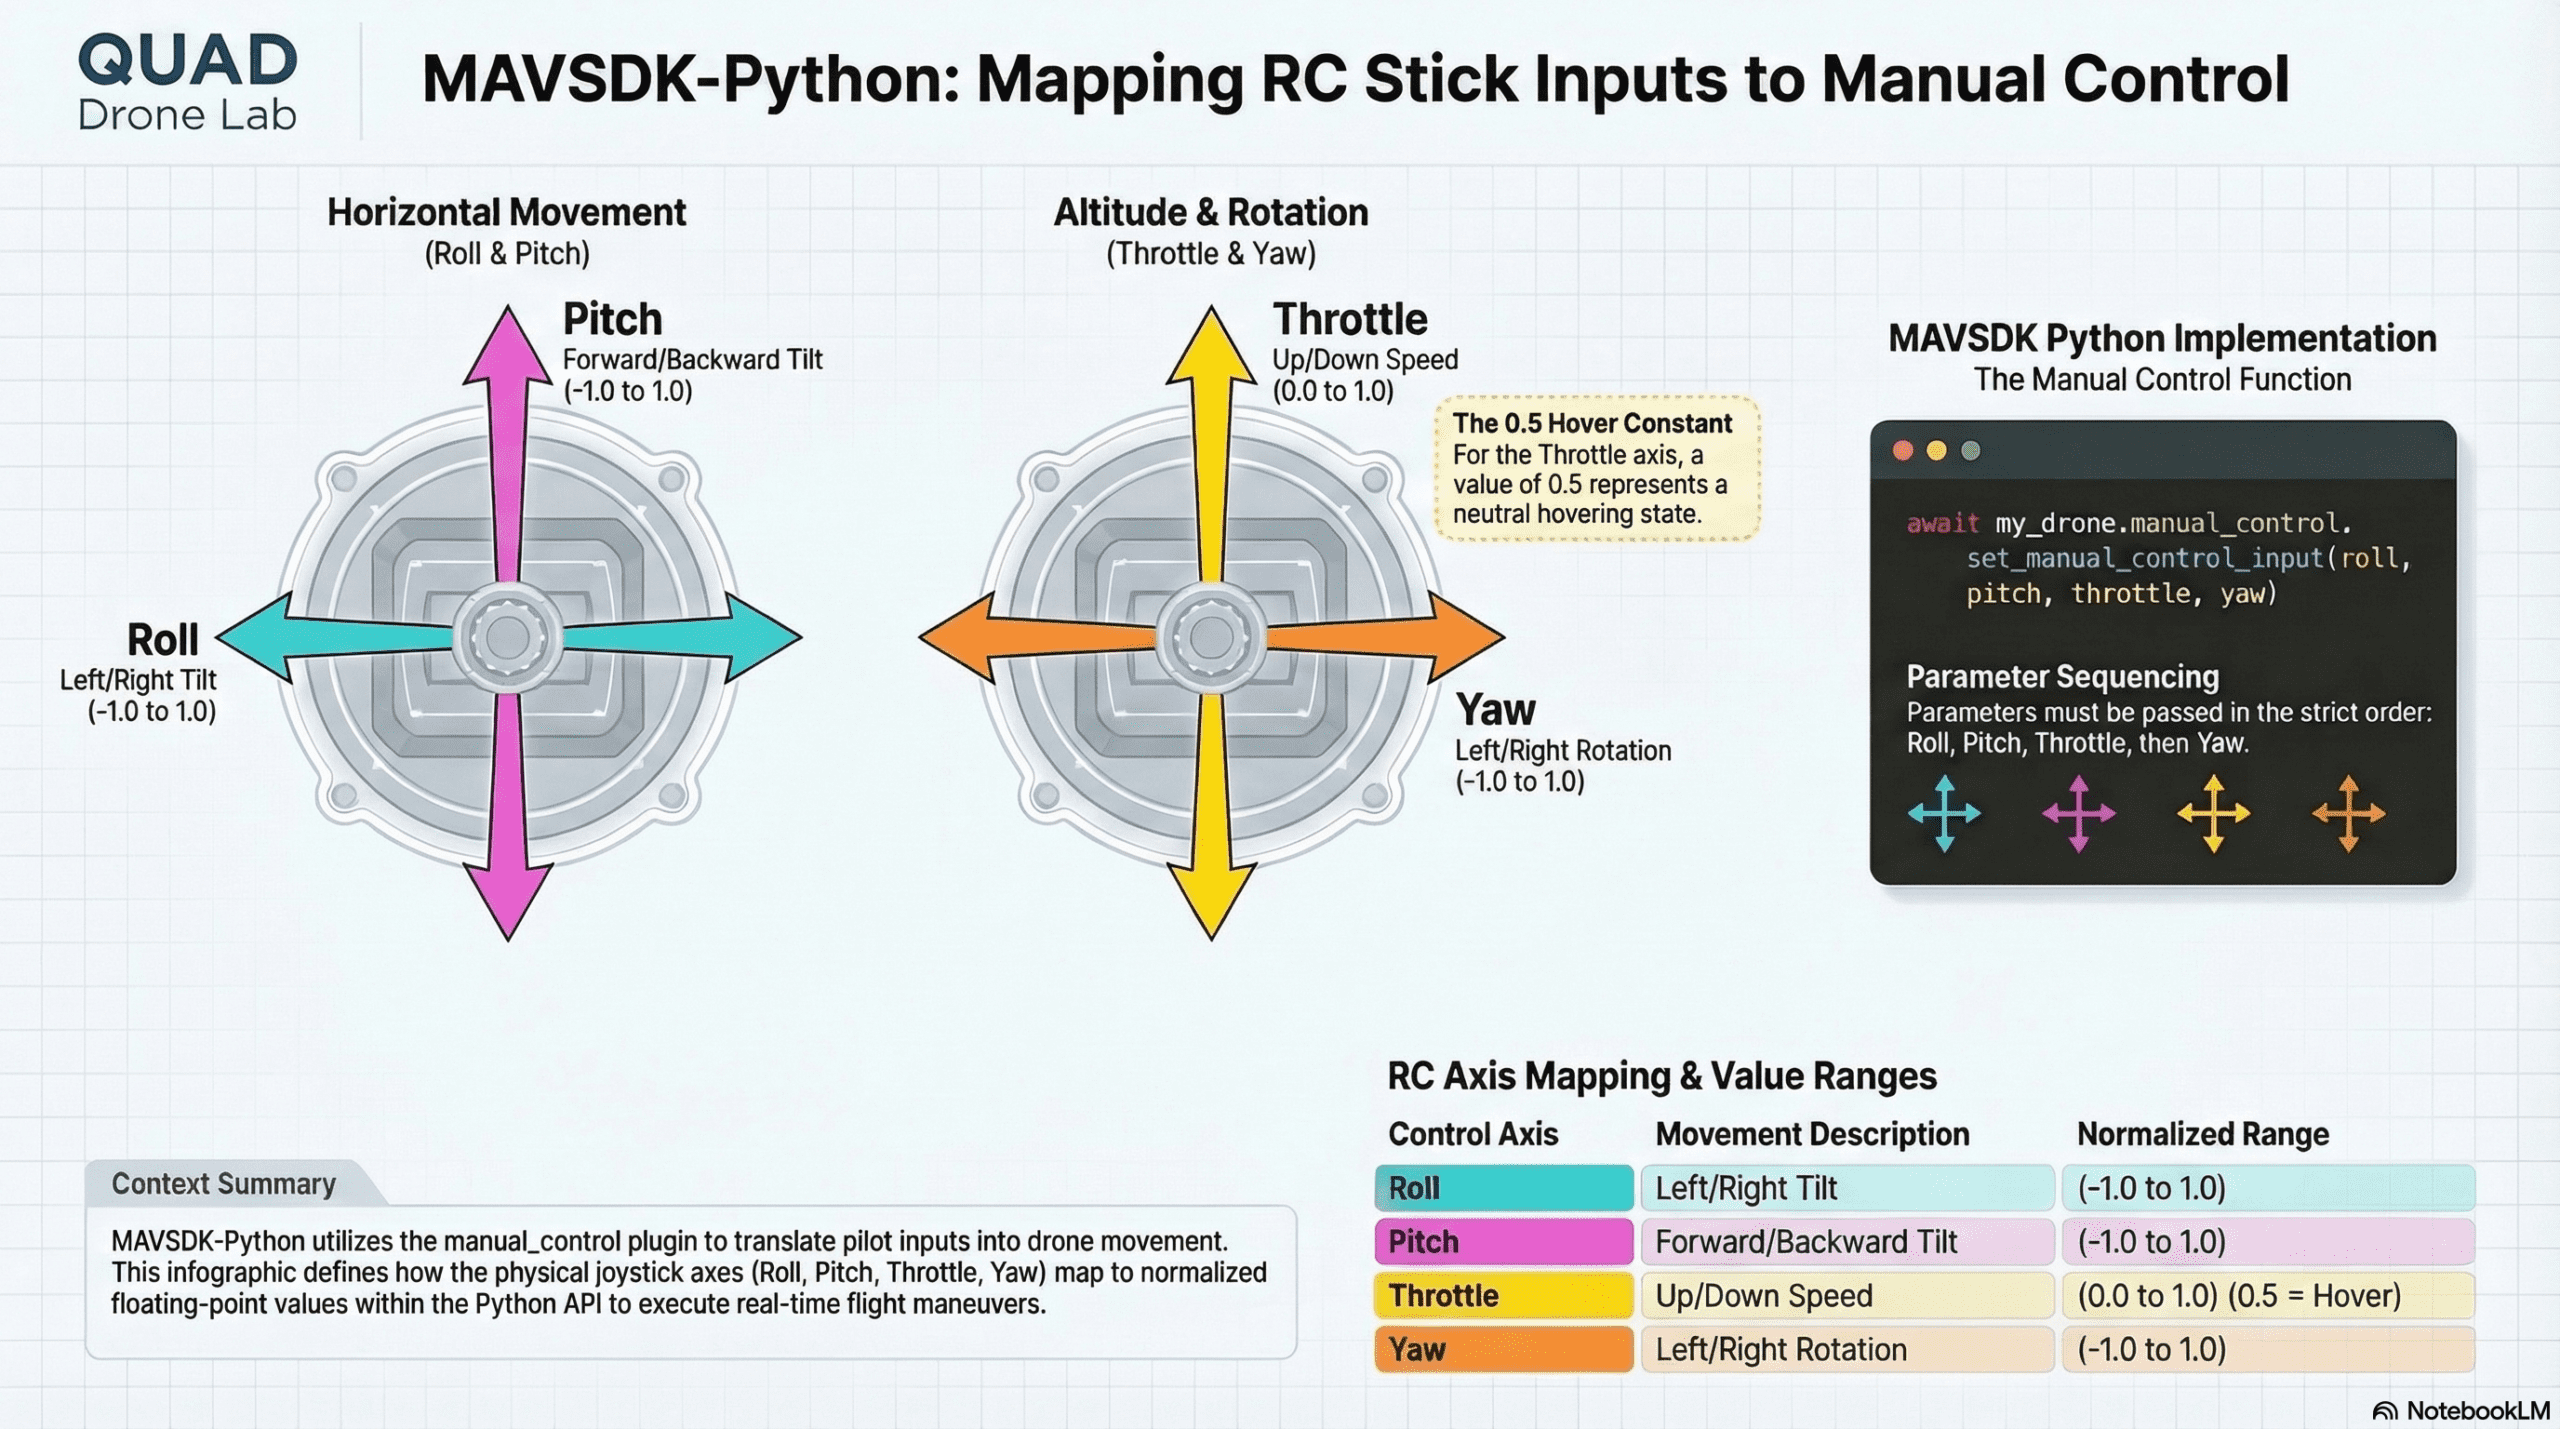
1. Understanding the ManualControl Class
Until now, we have primarily used the Action class or the Offboard class to control the vehicle’s movements. However, to directly transmit keyboard or joystick inputs to the drone, we must utilize MAVSDK’s ManualControl API.
Piloting a drone via a keyboard essentially means writing Python code that mimics the exact signals generated by moving the sticks on an RC controller. To do this, we must thoroughly understand the concept of the 4 core axes:
- Roll: Left/right tilt. (Typically ranges from -1.0 to 1.0).
- Pitch: Forward/backward tilt. (Typically ranges from -1.0 to 1.0).
- Throttle: Upward/downward vertical speed. (Typically ranges from 0.0 to 1.0. Note that 0.5 represents the Hovering state where altitude is maintained).
- Yaw: Left/right rotation of the nose. (Typically ranges from -1.0 to 1.0).
The core method we will use is set_manual_control_input(roll, pitch, throttle, yaw). When specific keys on the keyboard are pressed, we will dynamically alter these four variables and continuously send them to the Flight Controller (FC) to maneuver the vehicle.

2. Keyboard Input Processing and the Magic of asyncio Parallelism
When writing a keyboard-controlled drone program, the most common bottleneck novice researchers face is the ‘infinite loop collision’.
To send piloting signals to the drone, you must constantly beam the current roll, pitch, throttle, yaw states within an infinite while True: loop. However, simultaneously, the program must continuously detect which keyboard keys are being pressed in the background. In synchronous programming, waiting for a key input causes a “blocking” phenomenon, freezing the loop that sends the control signals.
We can solve this elegantly using Python’s asyncio, which we completely mastered in [Part 5]!
- Task 1: An infinite loop that detects keyboard inputs and updates the values (
getKeyboardInputfunction). - Task 2: An infinite loop that continuously transmits the updated values to the drone (
manual_control_dronefunction).
By running these two asynchronous tasks in parallel in the background using asyncio.ensure_future() (or asyncio.create_task()), we achieve buttery-smooth manual control without any CPU blocking.
3. Step-by-Step Practical Code Analysis
Let’s break down the keyboard input example step-by-step using the KeyPressModule (abbreviated as kp) utilized in QUAD Drone Lab’s tutorials. (💡 Note: KeyPressModule is a custom module provided to easily capture keyboard events.)
① Initializing Global Variables
First, we set up the environment and define our initial control states.
import asyncio
from mavsdk import System
import KeyPressModule as kp

kp.init()
drone = System()
# Initial pilot values: Roll, Pitch, and Yaw are neutral (0), Throttle is set to hover (0.5)
roll, pitch, throttle, yaw = 0, 0, 0.5, 0
② Task 1: Keyboard Input Detection Logic (getKeyboardInput)
This asynchronous function checks the keyboard state every 0.1 seconds and updates the global variables.
async def getKeyboardInput(my_drone):
    global roll, pitch, throttle, yaw
    while True:
        # Reset values to initial neutral state every loop (so it hovers when keys are released)
        roll, pitch, throttle, yaw = 0, 0, 0.5, 0
        value = 0.5

        # Pitch and Roll control via Arrow Keys
        if kp.getKey("LEFT"): pitch = -value
        elif kp.getKey("RIGHT"): pitch = value

        if kp.getKey("UP"): roll = value
        elif kp.getKey("DOWN"): roll = -value

        # Altitude (Throttle) control via W, S keys
        if kp.getKey("w"): throttle = 1.0  # Ascend
        elif kp.getKey("s"): throttle = 0.0  # Descend

        # Nose rotation (Yaw) control via A, D keys
        if kp.getKey("a"): yaw = -value  # Rotate Left
        elif kp.getKey("d"): yaw = value   # Rotate Right

        # Function keys: i (Check Flight Mode), r (Arm), l (Land)
        elif kp.getKey("i"):
            asyncio.ensure_future(print_flight_mode(my_drone))
        elif kp.getKey("r") and my_drone.telemetry.landed_state():
            await my_drone.action.arm()
        elif kp.getKey("l") and my_drone.telemetry.in_air():
            await my_drone.action.land()

        # Breathe to allow other async tasks to run
        await asyncio.sleep(0.1)
The most crucial point here is that we reset the variables to 0, 0, 0.5, 0 at the beginning of every loop. Thanks to this, the moment the user takes their hands off the keyboard, the drone immediately registers a neutral control signal and safely maintains a hovering position exactly where it is.
③ Task 2: Manual Control Signal Transmission Logic (manual_control_drone)
async def manual_control_drone(my_drone):
    global roll, pitch, throttle, yaw
    while True:
        # Transmit the updated R, P, T, Y values to the drone
        await my_drone.manual_control.set_manual_control_input(roll, pitch, throttle, yaw)
        await asyncio.sleep(0.1)
This function also runs an infinite loop, constantly beaming the roll, pitch, throttle, yaw values—which are being modified in real-time by getKeyboardInput—straight to the drone.
4. The Complete Integrated Example Code (manual_control.py)
Here is the fully executable code that integrates the logic explored above with the drone connection process. Please write this script in your development environment and test it out!
#!/usr/bin/env python3
# Copyright. 2025. QUAD Drone Lab

import asyncio
from mavsdk import System
import KeyPressModule as kp

# Initialize the keyboard input module
kp.init()
drone = System()

# Global variables for manual control (Format: [roll, pitch, throttle, yaw])
roll, pitch, throttle, yaw = 0, 0, 0.5, 0

async def getKeyboardInput(my_drone):
    global roll, pitch, throttle, yaw
    while True:
        # Reset to default hover values
        roll, pitch, throttle, yaw = 0, 0, 0.5, 0
        value = 0.5

        if kp.getKey("LEFT"): pitch = -value
        elif kp.getKey("RIGHT"): pitch = value

        if kp.getKey("UP"): roll = value
        elif kp.getKey("DOWN"): roll = -value

        if kp.getKey("w"): throttle = 1.0
        elif kp.getKey("s"): throttle = 0.0

        if kp.getKey("a"): yaw = -value
        elif kp.getKey("d"): yaw = value

        elif kp.getKey("i"):
            asyncio.ensure_future(print_flight_mode(my_drone))
        elif kp.getKey("r") and my_drone.telemetry.landed_state():
            print("-- Sending Arm command!")
            await my_drone.action.arm()
        elif kp.getKey("l") and my_drone.telemetry.in_air():
            print("-- Sending Land command!")
            await my_drone.action.land()

        await asyncio.sleep(0.1)

async def print_flight_mode(my_drone):
    async for flight_mode in my_drone.telemetry.flight_mode():
        print("Current FlightMode: ", flight_mode)
        break # Print once and exit

async def manual_control_drone(my_drone):
    global roll, pitch, throttle, yaw
    while True:
        # print(roll, pitch, throttle, yaw) # Uncomment to monitor value changes
        await my_drone.manual_control.set_manual_control_input(roll, pitch, throttle, yaw)
        await asyncio.sleep(0.1)

async def run_drone():
    # 1. Run the keyboard input detection task in the background
    asyncio.ensure_future(getKeyboardInput(drone))

    # 2. Connect to the drone
    await drone.connect(system_address="udp://:14540")
    print("Waiting for drone to connect...")
    async for state in drone.core.connection_state():
        if state.is_connected:
            print("-- Connected to drone!")
            break

    # 3. Verify GPS and position estimation stability
    async for health in drone.telemetry.health():
        if health.is_global_position_ok and health.is_home_position_ok:
            print("-- Global position state is good enough for flying.")
            break

    # 4. Run the manual control signal transmission task in the background
    asyncio.ensure_future(manual_control_drone(drone))

    print("=========================================")
    print(" Ready for Piloting! Shortcut Guide:")
    print(" [R]: Arm             [L]: Land")
    print(" [W/S]: Ascend/Descend  [A/D]: Rotate Nose Left/Right")
    print(" [UP/DOWN/LEFT/RIGHT]: Move Forward/Backward/Left/Right")
    print("=========================================")

async def run():
    """Main function to connect to the drone and input manual controls"""
    await asyncio.gather(run_drone())

if __name__ == "__main__":
    # Start the main asynchronous loop (runs forever until CTRL-C)
    asyncio.ensure_future(run())
    asyncio.get_event_loop().run_forever()
5. Execution Results and Research Applications
Execute the code and check your simulator screen. First, press the ‘r’ key to arm the motors. Then, if you press and hold the ‘w’ key, the drone’s Throttle value will jump to 1.0, making it soar powerfully into the sky. When you release your hands from the keyboard, the Throttle will return to 0.5, allowing the drone to hover steadily at its current altitude.
In that state, pressing the arrow keys will make the drone slide forward, backward, left, or right, and you can use the ‘a’ or ‘d’ keys to rotate the drone’s heading. It feels exactly like playing an exciting racing game, but you are directly inputting the control values you tuned yourself!
[Pro-Tip for Researchers] This program is not just for ‘fun’. When creating a Supervised Learning dataset to train models for autonomous driving research, try adding code within this script’s while True: loop that saves camera images and logs the corresponding R, P, T, Y pilot values into a CSV file. When you manually fly the drone smoothly between obstacles, that flight immediately becomes a high-quality “Expert Demonstration” dataset, serving as the core ingredient for training your Reinforcement Learning AI.
Wrapping Up
In this Part 11, we fully leveraged Python’s asynchronous (asyncio) processing capabilities to successfully build a Manual Control program that flawlessly accepts keyboard inputs while simultaneously broadcasting control signals.
From complex Offboard algorithms to today’s highly intuitive manual control tools, you have now equipped yourselves with a powerful arsenal to maneuver the drone exactly as your scenario demands!
Starting from our next session, we will move on to the [Troubleshooting and System Expansion] phase, where we will resolve the most frequent issues encountered in actual research environments.
If you face any difficulties following the code or have inquiries regarding the KeyPressModule setup, please feel free to leave your questions in the comments. QUAD Drone Lab is always here to support and elevate your passionate research! Thank you!

Author: maponarooo, CEO of QUAD Drone Lab
Date: March 5, 2026
![[PX4 Tuning Series 6] Trajectory Generator and Setpoint Tuning: The Art of Flight Feel and Smooth S-Curves](https://quad-drone-lab.co.kr/wp-content/uploads/2026/03/Drone-Trajectory-Comparison-768x429.png)
![[ROS2 Mastery 9편] 싱글 프레임 및 움직이는 로봇 TF2 브로드캐스팅 실습 가이드](https://quad-drone-lab.co.kr/wp-content/uploads/2026/06/0605_인포그래픽-768x429.jpg)
![[ROS2 Mastery Chapter 8] The Essence of Robotics Math: The Ultimate Guide to the TF2 (Transform) System](https://quad-drone-lab.co.kr/wp-content/uploads/2026/05/0531_인포그래피-768x384.png)
![PX4 MAVSDK – C++ Programming [9편] 정밀한 드론 제어: 오프보드(Offboard) 모드](https://quad-drone-lab.co.kr/wp-content/uploads/2026/03/0319_인포그래픽-768x429.jpg)
![[Hybrid Navigation System: Special Edition] Survive GPS Jamming! A Complete Guide to “PX4 Dead-Reckoning Mode”](https://quad-drone-lab.co.kr/wp-content/uploads/2026/05/Resilient_Drone_Dead-Reckoning_Navigation-768x429.jpg)