

The Ultimate Guide to MAVSDK-Python Programming [Part 9]: OFFBOARD Velocity Control (Based on BODY and NED Frames)
Hello and welcome back, university students and researchers dedicating yourselves to autonomous flight robotics and drone control algorithms! Welcome to the ninth installment of our MAVSDK-Python blog series.
In our last session, [Part 8], we learned about Offboard Position Control, which commands the vehicle to move to specific coordinates (NED). However, position control alone has clear limitations when you need to implement dynamic maneuvers, such as tracking a moving object in real-time using computer vision or smoothly evading sudden obstacles.
To solve this, the most widely used control method among researchers is Velocity Control. Instead of giving the drone a “target coordinate,” you command it by saying, “Fly forward at a speed of 5m/s based on the direction you are currently facing!”
In this [Part 9: OFFBOARD Velocity Control (Based on BODY and NED Frames)], we will deeply and kindly analyze the principles and complete codes of two velocity control methods that make the drone’s movements significantly smoother and more intuitive.
1. The Two Reference Frames for Velocity Control (BODY vs. NED)
Before writing the code, we must clearly distinguish between the two coordinate systems used as references when commanding velocity. The frame you choose will completely change depending on your research objectives.
- BODY Frame (FRD Coordinate System): This is based on the drone’s actual physical body. It consists of directions for Forward, Right, and Down. If a camera is mounted on the front of the drone and a tracked target appears on the right side of the screen, you can simply command the drone to “generate velocity to the right.” This makes it an essential frame for vision-based object tracking research.
- NED Frame (North-East-Down): This is based on Earth’s absolute cardinal directions (North/East/Down). Regardless of which way the vehicle is facing, it will generate velocity and move towards the absolute North or East. This is highly useful when scanning a large agricultural field in a grid pattern or performing patrol missions based on absolute compass bearings.
2. Perfect Understanding of BODY-Based Velocity Control (offboard_velocity_body.py)
When controlling velocity based on the vehicle’s body, we use the VelocityBodyYawspeed class. This class takes the following four parameters:
forward_m_s: Forward velocity (m/s)right_m_s: Rightward velocity (m/s)down_m_s: Downward velocity (m/s) (⚠️ Input a negative value to take off!)yawspeed_deg_s: How many degrees per second should the drone’s Nose rotate? (Clockwise is positive)
① Injecting the Initial Setpoint
Before starting Offboard mode, you must absolutely initialize the setpoint to zero using the specific method corresponding to your control type (set_velocity_body).
print("-- Setting initial setpoint")
await drone.offboard.set_velocity_body(VelocityBodyYawspeed(0.0, 0.0, 0.0, 0.0)) [3]
② Logic Analysis: Takeoff and Circle Flight
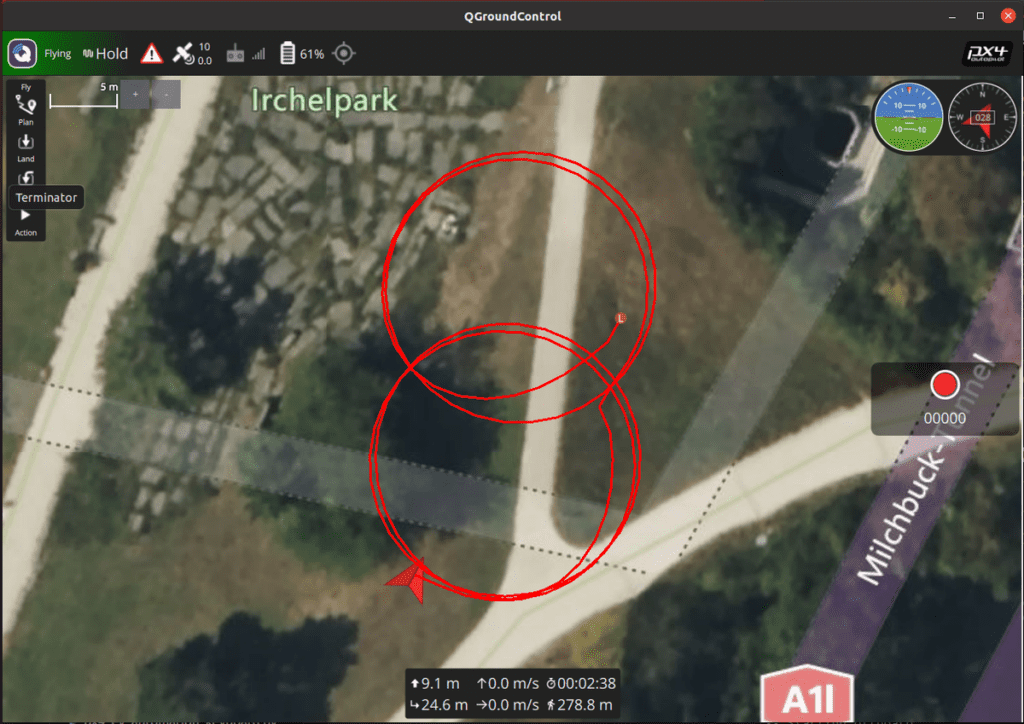
The greatest advantage of BODY control is that it makes implementing Circle Flight incredibly easy.
# 1. Turn clock-wise and climb
print("-- Turn clock-wise and climb")
await drone.offboard.set_velocity_body(VelocityBodyYawspeed(0.0, 0.0, -1.0, 60.0)) [3]
await asyncio.sleep(5) [3]
The code above commands the drone to ascend at a speed of 1m/s (-1.0) while rapidly rotating clockwise at 60 degrees per second, without moving forward, backward, left, or right. Since it waits for 5 seconds, it will spiral upwards to an altitude of about 5 meters.
# 2. Fly a circle
print("-- Fly a circle")
await drone.offboard.set_velocity_body(VelocityBodyYawspeed(5.0, 0.0, 0.0, 30.0)) [5]
await asyncio.sleep(15) [5]
This code commands the vehicle to move forward rapidly at 5m/s relative to its body while simultaneously turning its nose at 30 degrees per second. These two forces combine, causing the drone to fly in a beautiful, large circle.
# 3. Fly a circle sideways
print("-- Fly a circle sideways")
await drone.offboard.set_velocity_body(VelocityBodyYawspeed(0.0, -5.0, 0.0, 30.0)) [6]
await asyncio.sleep(15) [6]
By giving right_m_s a value of -5.0 in the FRD coordinate system, the drone smoothly slides to its left side at 5m/s while rotating.
🚀 Complete Code for BODY Velocity Control
Try running the code below on your PC. You will visually confirm that the vehicle’s movements are much smoother compared to Local Position NED control.
#!/usr/bin/env python3
import asyncio
from mavsdk import System
from mavsdk.offboard import (OffboardError, VelocityBodyYawspeed)

async def run():
    """ Does Offboard control using velocity body coordinates. """
    drone = System()
    await drone.connect(system_address="udp://:14540")

    print("Waiting for drone to connect...")
    async for state in drone.core.connection_state():
        if state.is_connected:
            print(f"-- Connected to drone!")
            break

    print("Waiting for drone to have a global position estimate...")
    async for health in drone.telemetry.health():
        if health.is_global_position_ok and health.is_home_position_ok:
            print("-- Global position estimate OK")
            break

    print("-- Arming")
    await drone.action.arm()

    print("-- Setting initial setpoint")
    await drone.offboard.set_velocity_body(
        VelocityBodyYawspeed(0.0, 0.0, 0.0, 0.0)) [6]

    print("-- Starting offboard")
    try:
        await drone.offboard.start()
    except OffboardError as error:
        print(f"Starting offboard mode failed with error code: {error._result.result}")
        print("-- Disarming")
        await drone.action.disarm()
        return

    print("-- Turn clock-wise and climb")
    await drone.offboard.set_velocity_body(
        VelocityBodyYawspeed(0.0, 0.0, -1.0, 60.0)) [6]
    await asyncio.sleep(5) [6]

    print("-- Turn back anti-clockwise")
    await drone.offboard.set_velocity_body(
        VelocityBodyYawspeed(0.0, 0.0, 0.0, -60.0)) [6]
    await asyncio.sleep(5) [6]

    print("-- Wait for a bit (Hold)")
    await drone.offboard.set_velocity_body(
        VelocityBodyYawspeed(0.0, 0.0, 0.0, 0.0)) [6]
    await asyncio.sleep(2) [6]

    print("-- Fly a circle")
    await drone.offboard.set_velocity_body(
        VelocityBodyYawspeed(5.0, 0.0, 0.0, 30.0)) [6]
    await asyncio.sleep(15) [6]

    print("-- Wait for a bit (Hold)")
    await drone.offboard.set_velocity_body(
        VelocityBodyYawspeed(0.0, 0.0, 0.0, 0.0)) [6]
    await asyncio.sleep(5) [6]

    print("-- Fly a circle sideways")
    await drone.offboard.set_velocity_body(
        VelocityBodyYawspeed(0.0, -5.0, 0.0, 30.0)) [6]
    await asyncio.sleep(15) [6]

    print("-- Wait for a bit (Hold)")
    await drone.offboard.set_velocity_body(
        VelocityBodyYawspeed(0.0, 0.0, 0.0, 0.0)) [6]
    await asyncio.sleep(8) [6]

    print("-- Stopping offboard")
    try:
        await drone.offboard.stop()
    except OffboardError as error:
        print(f"Stopping offboard mode failed with error code: {error._result.result}")

if __name__ == "__main__":
    asyncio.run(run()) [6]
3. Perfect Understanding of NED-Based Velocity Control (offboard_velocity_ned.py)
For velocity control based on absolute Earth bearings, we use the VelocityNedYaw class. The parameters for this class have a different directional reference:
north_m_s: Velocity heading North (m/s)east_m_s: Velocity heading East (m/s)down_m_s: Velocity heading Down (m/s)yaw_deg: ⚠️ Attention! This is not rotational ‘speed’, but the ‘absolute angle (degrees)’ the nose should face. (North:0, East:90, South:180, West:270)
① Logic Analysis and Directional Independence
print("-- Setting initial setpoint")
await drone.offboard.set_velocity_ned(VelocityNedYaw(0.0, 0.0, 0.0, 0.0)) [4]
Similarly, we initialize the setpoint to 0 before entering using set_velocity_ned.
print("-- Go North 2 m/s, turn to face East")
await drone.offboard.set_velocity_ned(VelocityNedYaw(2.0, 0.0, 0.0, 90.0)) [7]
await asyncio.sleep(14) [7]
The movement dictated by this code is fascinating. The vehicle moves North (north_m_s=2.0) at a speed of 2m/s, but the drone’s front nose (camera) turns to face East (90.0 degrees). In other words, it creates a scene where the drone flies North while crab-walking sideways. This demonstrates overwhelming power in surveillance or filming missions where you must continuously look at a specific building or subject regardless of your travel direction.
🚀 Complete Code for NED Velocity Control
If you run the code below, you will see precise bearing-based control where the vehicle climbs and then moves North, South, West, and East at constant speeds.
#!/usr/bin/env python3
import asyncio
from mavsdk import System
from mavsdk.offboard import (OffboardError, VelocityNedYaw)
async def run():
""" Does Offboard control using velocity NED coordinates. """
drone = System()
await drone.connect(system_address="udp://:14540")
print("Waiting for drone to connect...")
async for state in drone.core.connection_state():
if state.is_connected:
print(f"-- Connected to drone!")
break
print("Waiting for drone to have a global position estimate...")
async for health in drone.telemetry.health():
if health.is_global_position_ok and health.is_home_position_ok:
print("-- Global position estimate OK")
break
print("-- Arming")
await drone.action.arm()
print("-- Setting initial setpoint")
await drone.offboard.set_velocity_ned(VelocityNedYaw(0.0, 0.0, 0.0, 0.0)) [7]
print("-- Starting offboard")
try:
await drone.offboard.start()
except OffboardError as error:
print(f"Starting offboard mode failed with error code: {error._result.result}")
print("-- Disarming")
await drone.action.disarm()
return
print("-- Go up 2 m/s")
await drone.offboard.set_velocity_ned(VelocityNedYaw(0.0, 0.0, -2.0, 0.0)) [7]
await asyncio.sleep(14) [7]
print("-- Go North 2 m/s, turn to face East")
await drone.offboard.set_velocity_ned(VelocityNedYaw(2.0, 0.0, 0.0, 90.0)) [7]
await asyncio.sleep(14) [7]
print("-- Go South 2 m/s, turn to face West")
await drone.offboard.set_velocity_ned(VelocityNedYaw(-2.0, 0.0, 0.0, 270.0)) [7]
await asyncio.sleep(14) [7]
print("-- Go West 2 m/s, turn to face East")
await drone.offboard.set_velocity_ned(VelocityNedYaw(0.0, -2.0, 0.0, 90.0)) [7]
await asyncio.sleep(14) [7]
print("-- Go East 2 m/s")
await drone.offboard.set_velocity_ned(VelocityNedYaw(0.0, 2.0, 0.0, 90.0)) [7]
await asyncio.sleep(14) [7]
print("-- Turn to face South")
await drone.offboard.set_velocity_ned(VelocityNedYaw(0.0, 0.0, 0.0, 180.0)) [7]
await asyncio.sleep(12) [7]
print("-- Go down 1 m/s, turn to face North")
await drone.offboard.set_velocity_ned(VelocityNedYaw(0.0, 0.0, 1.0, 0.0)) [7]
await asyncio.sleep(14) [7]
print("-- Stopping offboard")
try:
await drone.offboard.stop()
except OffboardError as error:
print(f"Stopping offboard mode failed with error code: {error._result.result}")
if __name__ == "__main__":
asyncio.run(run()) [7]
Wrapping Up & Core Summary for Your Research
In this Part 9, we conducted an in-depth exploration of OFFBOARD Velocity Control, which is undoubtedly the most beloved feature in research papers and practical autonomous flight algorithm development.
Here are the key points researchers must remember when writing code:
- Watch the Z-axis Direction: Always keep in mind that in the NED coordinate system, negative (-) values for altitude point upwards (into the sky). If you input a positive number in
down_m_sto ascend, your drone will plummet into the ground! - Choose the Right Coordinate System: Select
VelocityBodyYawspeedwhen you need flexible flight based on the vehicle’s front (e.g., evasion, vision tracking), and selectVelocityNedYawwhen the Earth’s absolute cardinal space must be your reference. - Beware of the Initial Setpoint: To prevent Offboard entry errors, you must initialize the setpoints to zero using the specific method that matches your chosen frame (
set_velocity_bodyorset_velocity_ned) right before callingstart().
If you have experienced smooth flights through velocity control codes, the next step is a technique that fuses position and velocity control to reach targets even faster and more precisely. In our next post, [Part 10], we will cover the crown jewel of advanced control engineering: ‘OFFBOARD Position & Velocity Control (Feed-Forward)’, as well as its practical application in ‘Manual Drone Control via Keyboard Inputs’.
If you encounter any bugs or have questions while executing the code, do not hesitate to leave a comment. I sincerely cheer for your brilliant research achievements and safe flights! Thank you.

Author: maponarooo, CEO of QUAD Drone Lab
Date: March 5, 2026
![[Hybrid Navigation System: Part 6] [Implementation-Phase 2] Intermediate Correction: OpenCV/YOLO Terrain Matching and Digital Twin Testing](https://quad-drone-lab.co.kr/wp-content/uploads/2026/06/Absolute_Visual_Localization_for_UAVs-768x429.jpg)
![PX4 MAVSDK – C++ Programming [5편] 시스템 정보 쿼리 및 원격 측정(Telemetry) 활용](https://quad-drone-lab.co.kr/wp-content/uploads/2026/03/0315_인포그래피-768x512.png)

![PX4 MAVSDK – C++ Programming [6편] Action API를 이용한 기본 비행 제어](https://quad-drone-lab.co.kr/wp-content/uploads/2026/03/0316_인포그래피-768x512.png)