PX4 MAVSDK – C++ Programming [Episode 6] Basic Flight Control using Action API
Hello! This is Aiden from the Marketing Team. In our previous episode, we explored the “nervous system” of a drone—the Telemetry plugin—and learned how to receive the aircraft’s current status and GPS location via asynchronous callbacks.
Now that we’ve successfully retrieved sensor data, it’s finally time to command physical movement! In autonomous flight robotics research, triggering a precise Takeoff and ensuring a safe Land are the most fundamental controls, representing the beginning and end of every algorithm.
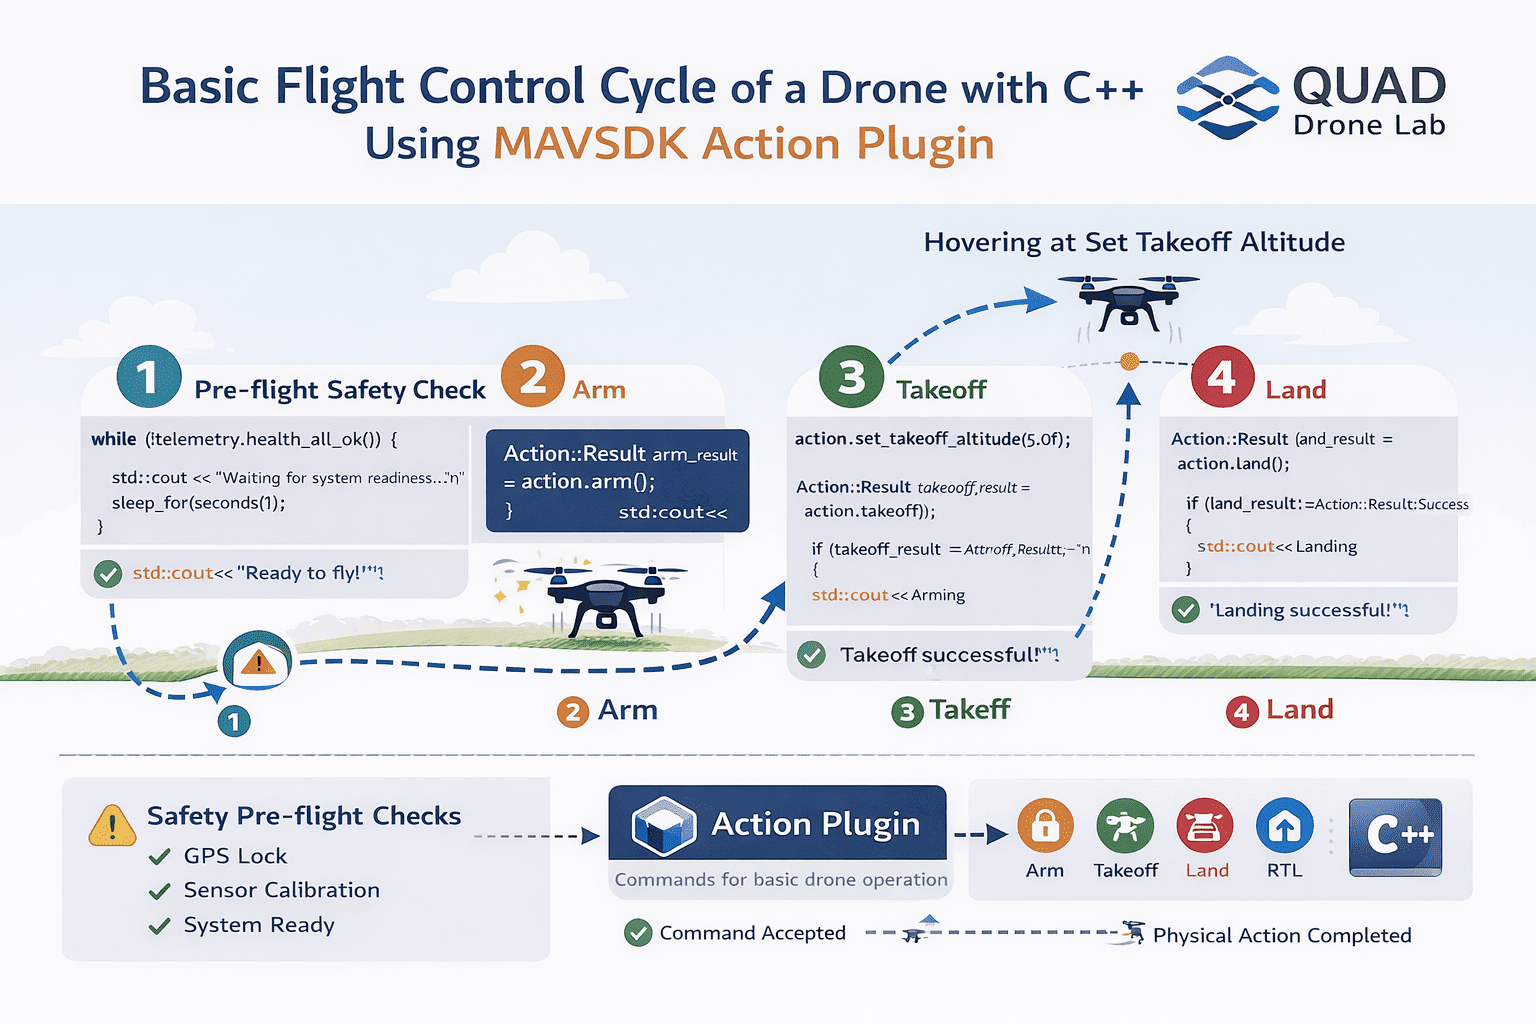
In this 6th installment, I will provide a friendly guide on how to perfectly control the basic flight cycle—from pre-flight safety checks and arming to takeoff, landing, and Return-to-Launch (RTL)—using the MAVSDK Action Plugin in C++.

Action Plugin Overview & Key Design Philosophy
The Action class is used to command essential maneuvers such as Arming, Disarming, Takeoff, Landing, Return-to-Launch (RTL), and VTOL mode transitions.
Before sending commands, it is crucial to understand a very important response design philosophy of the MAVSDK Action API.
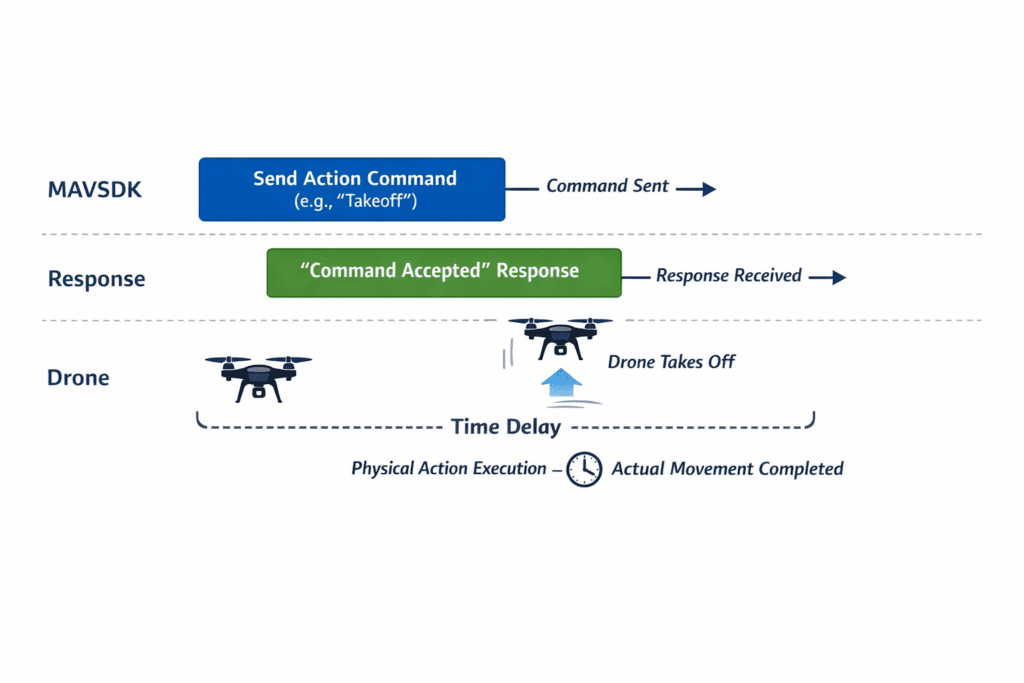
⚠️ Difference between “Command Accepted” and “Action Completed”
Most methods in the Action plugin offer both synchronous and asynchronous versions. The result you receive from these calls (e.g., Action::Result::Success) indicates that the aircraft has accepted the command and intends to act on it—it does not mean the action itself is finished.
For example, if action.takeoff() returns Success, it doesn’t mean the drone is already hovering at the target altitude. It has only just started lifting off from the ground. Therefore, researchers must monitor whether the physical action is complete through separate logic (e.g., monitoring altitude via Telemetry).
1. The First Step: Safety Checks and Arming
Since high-speed propellers are dangerous, the PX4 autopilot only allows arming when the vehicle is in a “Healthy” state. This means sensors are calibrated, the Home position is set, and GPS signal quality is sufficient.
1) Health Check
A common workflow is to synchronously poll the health_all_ok() method from the Telemetry plugin to wait until the system is ready for flight.
// Check if the vehicle is ready to arm via Telemetry
while (!telemetry.health_all_ok()) {
    std::cout << "Waiting for system readiness... (Checking GPS Lock and Sensor Calibration)\n";
    std::this_thread::sleep_for(std::chrono::seconds(1));
}
std::cout << "System ready for flight!\n";2) Arming
Once the system state is healthy, call the action.arm() method to start the motors. If it returns Action::Result::Success, the propellers will begin to spin, and the drone is ready for takeoff.
std::cout << "Arming motors...\n";
const Action::Result arm_result = action.arm();

if (arm_result != Action::Result::Success) {
    std::cerr << "Arming failed: " << arm_result << '\n';
    return 1; // Exit on failure
}
std::cout << "Arming successful! Propellers spinning.\n";2. Taking to the Skies: Takeoff
Once the motors are armed, it’s time to fly. The recommended way to take off using MAVSDK (and PX4) is by using takeoff() or its asynchronous version, takeoff_async().
Upon accepting the command, the drone will climb vertically to a set takeoff altitude and hover stably until the next command is received.
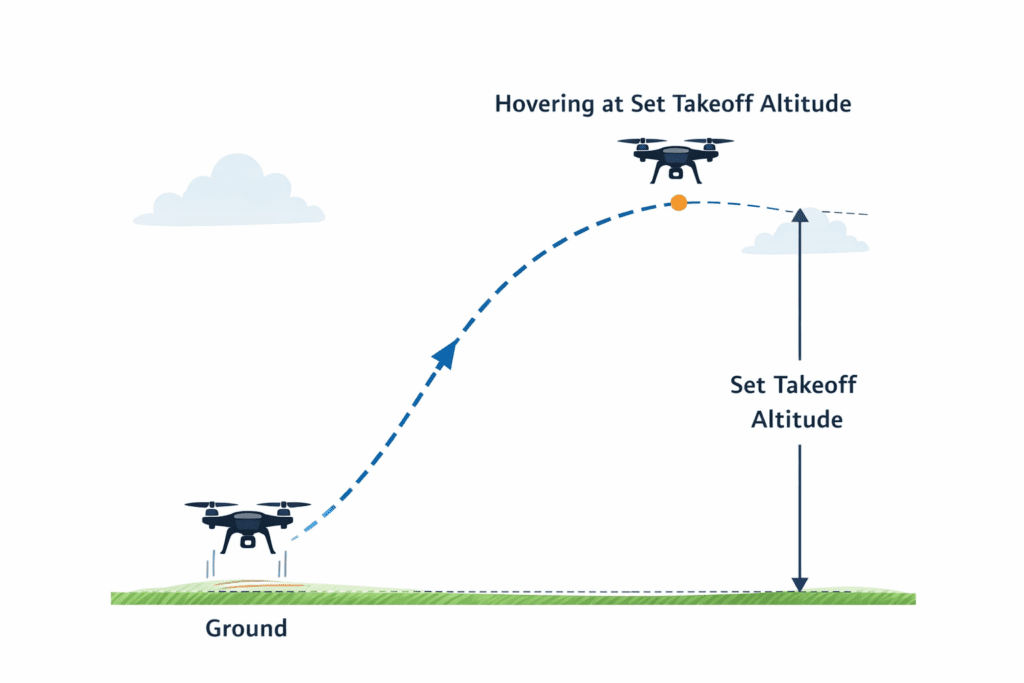
Setting Takeoff Altitude
While there is a default takeoff altitude, you can change it anytime before takeoff using the set_takeoff_altitude() function to suit your research needs.
// Set takeoff altitude to 5.0 meters
action.set_takeoff_altitude(5.0f);

std::cout << "Sending Takeoff command...\n";
const Action::Result takeoff_result = action.takeoff();

if (takeoff_result != Action::Result::Success) {
    std::cerr << "Takeoff failed: " << takeoff_result << '\n';
    return 1;
}
std::cout << "Takeoff command accepted! Climbing to target altitude.\n";As mentioned earlier, takeoff() returning success doesn’t mean the takeoff is finished. To verify completion, you should poll the current altitude until it reaches the target or wait for a sufficient duration (e.g., sleep_for(seconds(10))).
3. Safe Return and Landing (Land, RTL, Disarm)
After your flight test or mission is complete, you must bring the aircraft back to the ground safely. MAVSDK provides several methods:
1) Landing at Current Position (Land)
The land() method is the best way to land the drone directly below its current position.
std::cout << "Landing at current position...\n";
const Action::Result land_result = action.land();

if (land_result != Action::Result::Success) {
    std::cerr << "Landing failed: " << land_result << '\n';
}2) Return To Launch (RTL)
If the drone is far away, you can use return_to_launch(). This commands the drone to return to its original Home position and land.
3) Disarm and Kill
- Disarm (
disarm()): Standard procedure to turn off motors after landing. PX4 usually auto-disarms, but explicit calls ensure certain control. - Kill (
kill()): Immediately stops motors. Warning: Only use this in emergencies; the drone will fall instantly if called mid-air.
Complete C++ Example: Takeoff and Land
This script connects to a drone, performs safety checks, takes off, hovers for 10 seconds, and then lands.
#include <iostream>
#include <thread>
#include <chrono>
#include <mavsdk/mavsdk.h>
#include <mavsdk/plugins/action/action.h>
#include <mavsdk/plugins/telemetry/telemetry.h>

using namespace mavsdk;
using std::chrono::seconds;
using std::this_thread::sleep_for;

int main() {
    // 1. Initialize MAVSDK and connect to SITL simulator
    Mavsdk mavsdk{Mavsdk::Configuration{ComponentType::GroundStation}};
    ConnectionResult connection_result = mavsdk.add_any_connection("udpin://0.0.0.0:14540");

    if (connection_result != ConnectionResult::Success) {
        std::cerr << "Connection failed!\n";
        return 1;
    }

    // 2. Wait for system discovery
    auto system = mavsdk.first_autopilot(3.0);
    if (!system) {
        std::cerr << "Timed out waiting for system\n";
        return 1;
    }

    // 3. Instantiate plugins
    auto action = Action{system.value()};
    auto telemetry = Telemetry{system.value()};

    // 4. Pre-flight health check
    while (!telemetry.health_all_ok()) {
        std::cout << "Waiting for system to be ready...\n";
        sleep_for(seconds(1));
    }
    std::cout << "System ready!\n";

    // 5. Arming motors
    std::cout << "Arming...\n";
    if (action.arm() != Action::Result::Success) {
        std::cerr << "Arming command failed\n";
        return 1;
    }

    // 6. Set takeoff altitude (5m) and Takeoff
    action.set_takeoff_altitude(5.0f);
    std::cout << "Taking off!\n";
    if (action.takeoff() != Action::Result::Success) {
        std::cerr << "Takeoff command failed\n";
        return 1;
    }

    // 7. Hover for 10 seconds
    sleep_for(seconds(10));

    // 8. Land at current position
    std::cout << "Landing...\n";
    if (action.land() != Action::Result::Success) {
        std::cerr << "Landing command failed\n";
        return 1;
    }

    // 9. Wait until landing is complete
    while (telemetry.in_air()) {
        std::cout << "Vehicle is descending...\n";
        sleep_for(seconds(1));
    }
    std::cout << "Landing successful and motors stopped!\n";

    return 0;
}In Part 6, we explored the fundamental flight control loop that allows a drone to spin up its motors, take off into the sky, and safely land back on the ground using C++ code.
Thanks to the intuitive API provided by the Action plugin, it becomes possible to perform powerful flight control with just a few lines of code—without needing to directly handle complex communication packets. This greatly simplifies the development process for robotics researchers and developers.
For those working with VTOL (Vertical Take-Off and Landing) aircraft that combine both helicopter-style vertical lift and fixed-wing flight, the Action API also provides convenient methods such as transition_to_fixedwing(). These functions make it straightforward to implement flight mode transitions within your control logic.
However, a truly autonomous aerial robot cannot simply take off and land in place. To achieve real autonomous navigation, the drone must be able to move toward specific destinations.
In the next article, Part 7: Moving to a Specific Location (goto_location), we will explore how to command a drone to fly autonomously to a designated global coordinate (latitude and longitude) on Earth. We will also cover practical techniques such as distance calculation using the Haversine formula, which will provide valuable insights for real-world robotics research and development.
YouTube Tutorial

Author: Aiden, Marketing Team, QUAD Drone Research Lab
Date: March 16, 2026
![[Hybrid Navigation System: Special Edition] Survive GPS Jamming! A Complete Guide to “PX4 Dead-Reckoning Mode”](https://quad-drone-lab.co.kr/wp-content/uploads/2026/05/Resilient_Drone_Dead-Reckoning_Navigation-768x429.jpg)
![[Hybrid Navigation System: Part 3 Hardware & Modeling] A Deep Dive into Industrial High-Performance INS & Making GPS Jamming Simulator](https://quad-drone-lab.co.kr/wp-content/uploads/2026/04/Physics-of-IMU-Drift-Errors-768x429.jpg)