
[ROS2 Mastery #2] Understanding ROS2 Communication Nodes and Mastering RQT for Visualization
Hello! I’m Aiden from the Marketing Team.
To all the university students researching robotics and autonomous driving, and the researchers working hard in the field—did you successfully finish building your ROS2 workspace in Part 1?
Now, it’s time to connect the “neural network” so your robot system can breathe. Modern robot software isn’t just one giant program; it’s a structure where numerous small programs collaborate by exchanging data.
In this second installment, we’ll explore the core communication concepts that form the backbone of ROS2 (Node, Topic, Service, Action, and Parameter) and learn how to use RQT, the ultimate visualization utility for monitoring and controlling these complex communications at a glance.
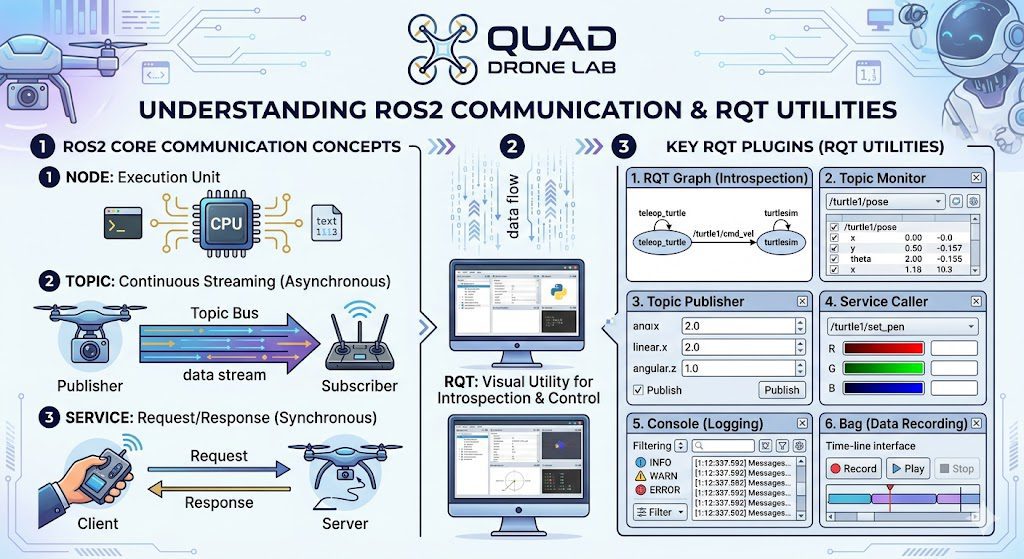
Understanding Core ROS2 Communication Concepts
Before writing code to control a robot, it is essential to clearly understand the basic units and communication methods that make up the system.
1) Node
A Node is the most fundamental unit of execution in a ROS2 system. Each node is an independent program designed for a specific purpose—such as controlling a LiDAR scanner, managing motor speeds, or processing camera images. These nodes come together to form a complete robot system.
2) Topic – Asynchronous Unidirectional Communication
A Topic acts as a bus for nodes to stream data. The node sending data is called the Publisher, and the node receiving it is the Subscriber. For example, to move a turtle in the Turtlesim simulator, you use a topic called /turtle1/cmd_vel.
This topic uses the geometry_msgs/msg/Twist data type. You can inspect its structure—consisting of linear and angular 3D vectors (x, y, z)—using the following command:
[Example: Checking Topic Data Type]
$ ros2 interface show geometry_msgs/msg/Twist
Vector3  linear
Vector3  angular
Topic communication is ideal for continuous data streams like sensor readings or constant control commands.
3) Service – Synchronous Bidirectional Communication
A Service is a one-time communication method where a Client sends a Request to a Server, and the server returns a Response after processing.
You can experience this using a demo node. Open a terminal and run the add_two_ints_server:
$ ros2 run demo_nodes_cpp add_two_ints_server
To see the data specification for this service, use the interface show command:
$ ros2 interface show example_interfaces/srv/AddTwoInts
int64 a
int64 b
---
int64 sum
The --- separator is crucial: the fields above it are the Request (the two numbers a and b), and the field below is the Response (the sum).
$ ros2 run demo_nodes_cpp add_two_ints_client 2 3
4) Action and Parameter
- Action: Similar to a service, but used for long-running tasks like “navigating to a goal.” It provides continuous Feedback during the task and can be canceled.
- Parameter: These are configuration values for a node. You can dynamically tune a robot’s behavior (e.g., maximum speed) by changing these values even while the node is running.
Running Turtlesim and Teleop Nodes
Let’s visualize these theories using Turtlesim, a 2D robot simulator. Open a new terminal and run the simulator node:
$ ros2 run turtlesim turtlesim_node
Next, open another terminal and run the teleop node to control the turtle with your keyboard:
$ ros2 run turtlesim turtle_teleop_key
When you press the arrow keys, the turtle moves. Under the hood, the keyboard node is Publishing to the cmd_vel topic, and the turtle node is Subscribing to it.
Mastering ‘RQT’: The Powerful ROS2 Visualization Utility
For a robotics researcher, RQT is like a stethoscope and a Swiss Army knife. It is a GUI plugin framework that lets you visualize invisible communication states and inject commands.
Open a new terminal and launch RQT:
$ rqt
Since RQT is plugin-based, it will be empty at first.
Click [Plugins] in the top menu to access these 6 essential tools:
- RQT Graph (Introspection -> Node Graph): Visualizes the execution of nodes and their topic connections in a graphical tree. It’s perfect for debugging connection issues.
- Topic Monitor (Topics -> Topic Monitor): Allows real-time monitoring of topic values. You can watch the
x, y, thetacoordinates of the turtle change in real-time. - Topic Publisher (Topics -> Message Publisher): Lets you publish topics manually through the GUI. You can make the turtle move without any code or keyboard input, which is great for unit testing.
- Service Caller (Services -> Service Caller): Allows you to call services directly. For example, you can change the turtle’s pen color by calling the
/turtle1/set_penservice. - Console (Logging -> Console): Aggregates all logs (
INFO,WARN,ERROR, etc.) in one place. No need to check dozens of terminals to find an error. - Bag (Logging -> Bag): Records all topic and sensor data. You can play back these “Bag” files in the lab to replicate experiments performed in the field.
Wrapping Up
In Part 2, we’ve explored the “vessels” of ROS2—Nodes, Topics, and Services—and learned how to use RQT to peer into and manipulate them. Even when faced with complex bugs, RQT Graph and Topic Monitor will help you find the root cause quickly.
Now that you understand how ROS2 communicates, stay tuned for Part 3: Creating Your First ROS2 Package & Python Programming, where we will finally write our own code to control the turtle!
YouTube Tutorial

Author: Aiden, Marketing Team at QUAD Drone Research Lab
Date: May 5, 2026
![PX4 MAVSDK – C++ Programming [Episode 11] Complete Comparison of MAVSDK vs MAVROS vs uXRCE-DDS](https://quad-drone-lab.co.kr/wp-content/uploads/2026/03/0322_인포그래피-768x512.png)
![ROS2 Mastery [Part 1] Complete Guide to ROS2 Jazzy Development Environment and Workspace](https://quad-drone-lab.co.kr/wp-content/uploads/2026/03/0330_인포그래픽-1-768x429.png)
![PX4 MAVSDK – C++ Programming [5편] 시스템 정보 쿼리 및 원격 측정(Telemetry) 활용](https://quad-drone-lab.co.kr/wp-content/uploads/2026/03/0315_인포그래피-768x512.png)