
ROS2 Mastery [Part 1] Complete Guide to ROS2 Jazzy Development Environment and Workspace
Hello! I’m Aiden from the Marketing Team.
To all the university students and field researchers studying robotics and autonomous driving—welcome to our serial blog based on the QUAD Drone Lab’s “ROS2 Express Master Course.”
Before diving into serious robot programming, the most critical foundational step is properly setting up your development environment. If your configuration is tangled from the start, you’ll likely face inexplicable errors when writing complex robot code later. In this first installment, based on ROS2 Jazzy, I will kindly and thoroughly guide you through the entire process: from shell configuration to creating your own Workspace and mastering the concept of Overlays to modify and build code.
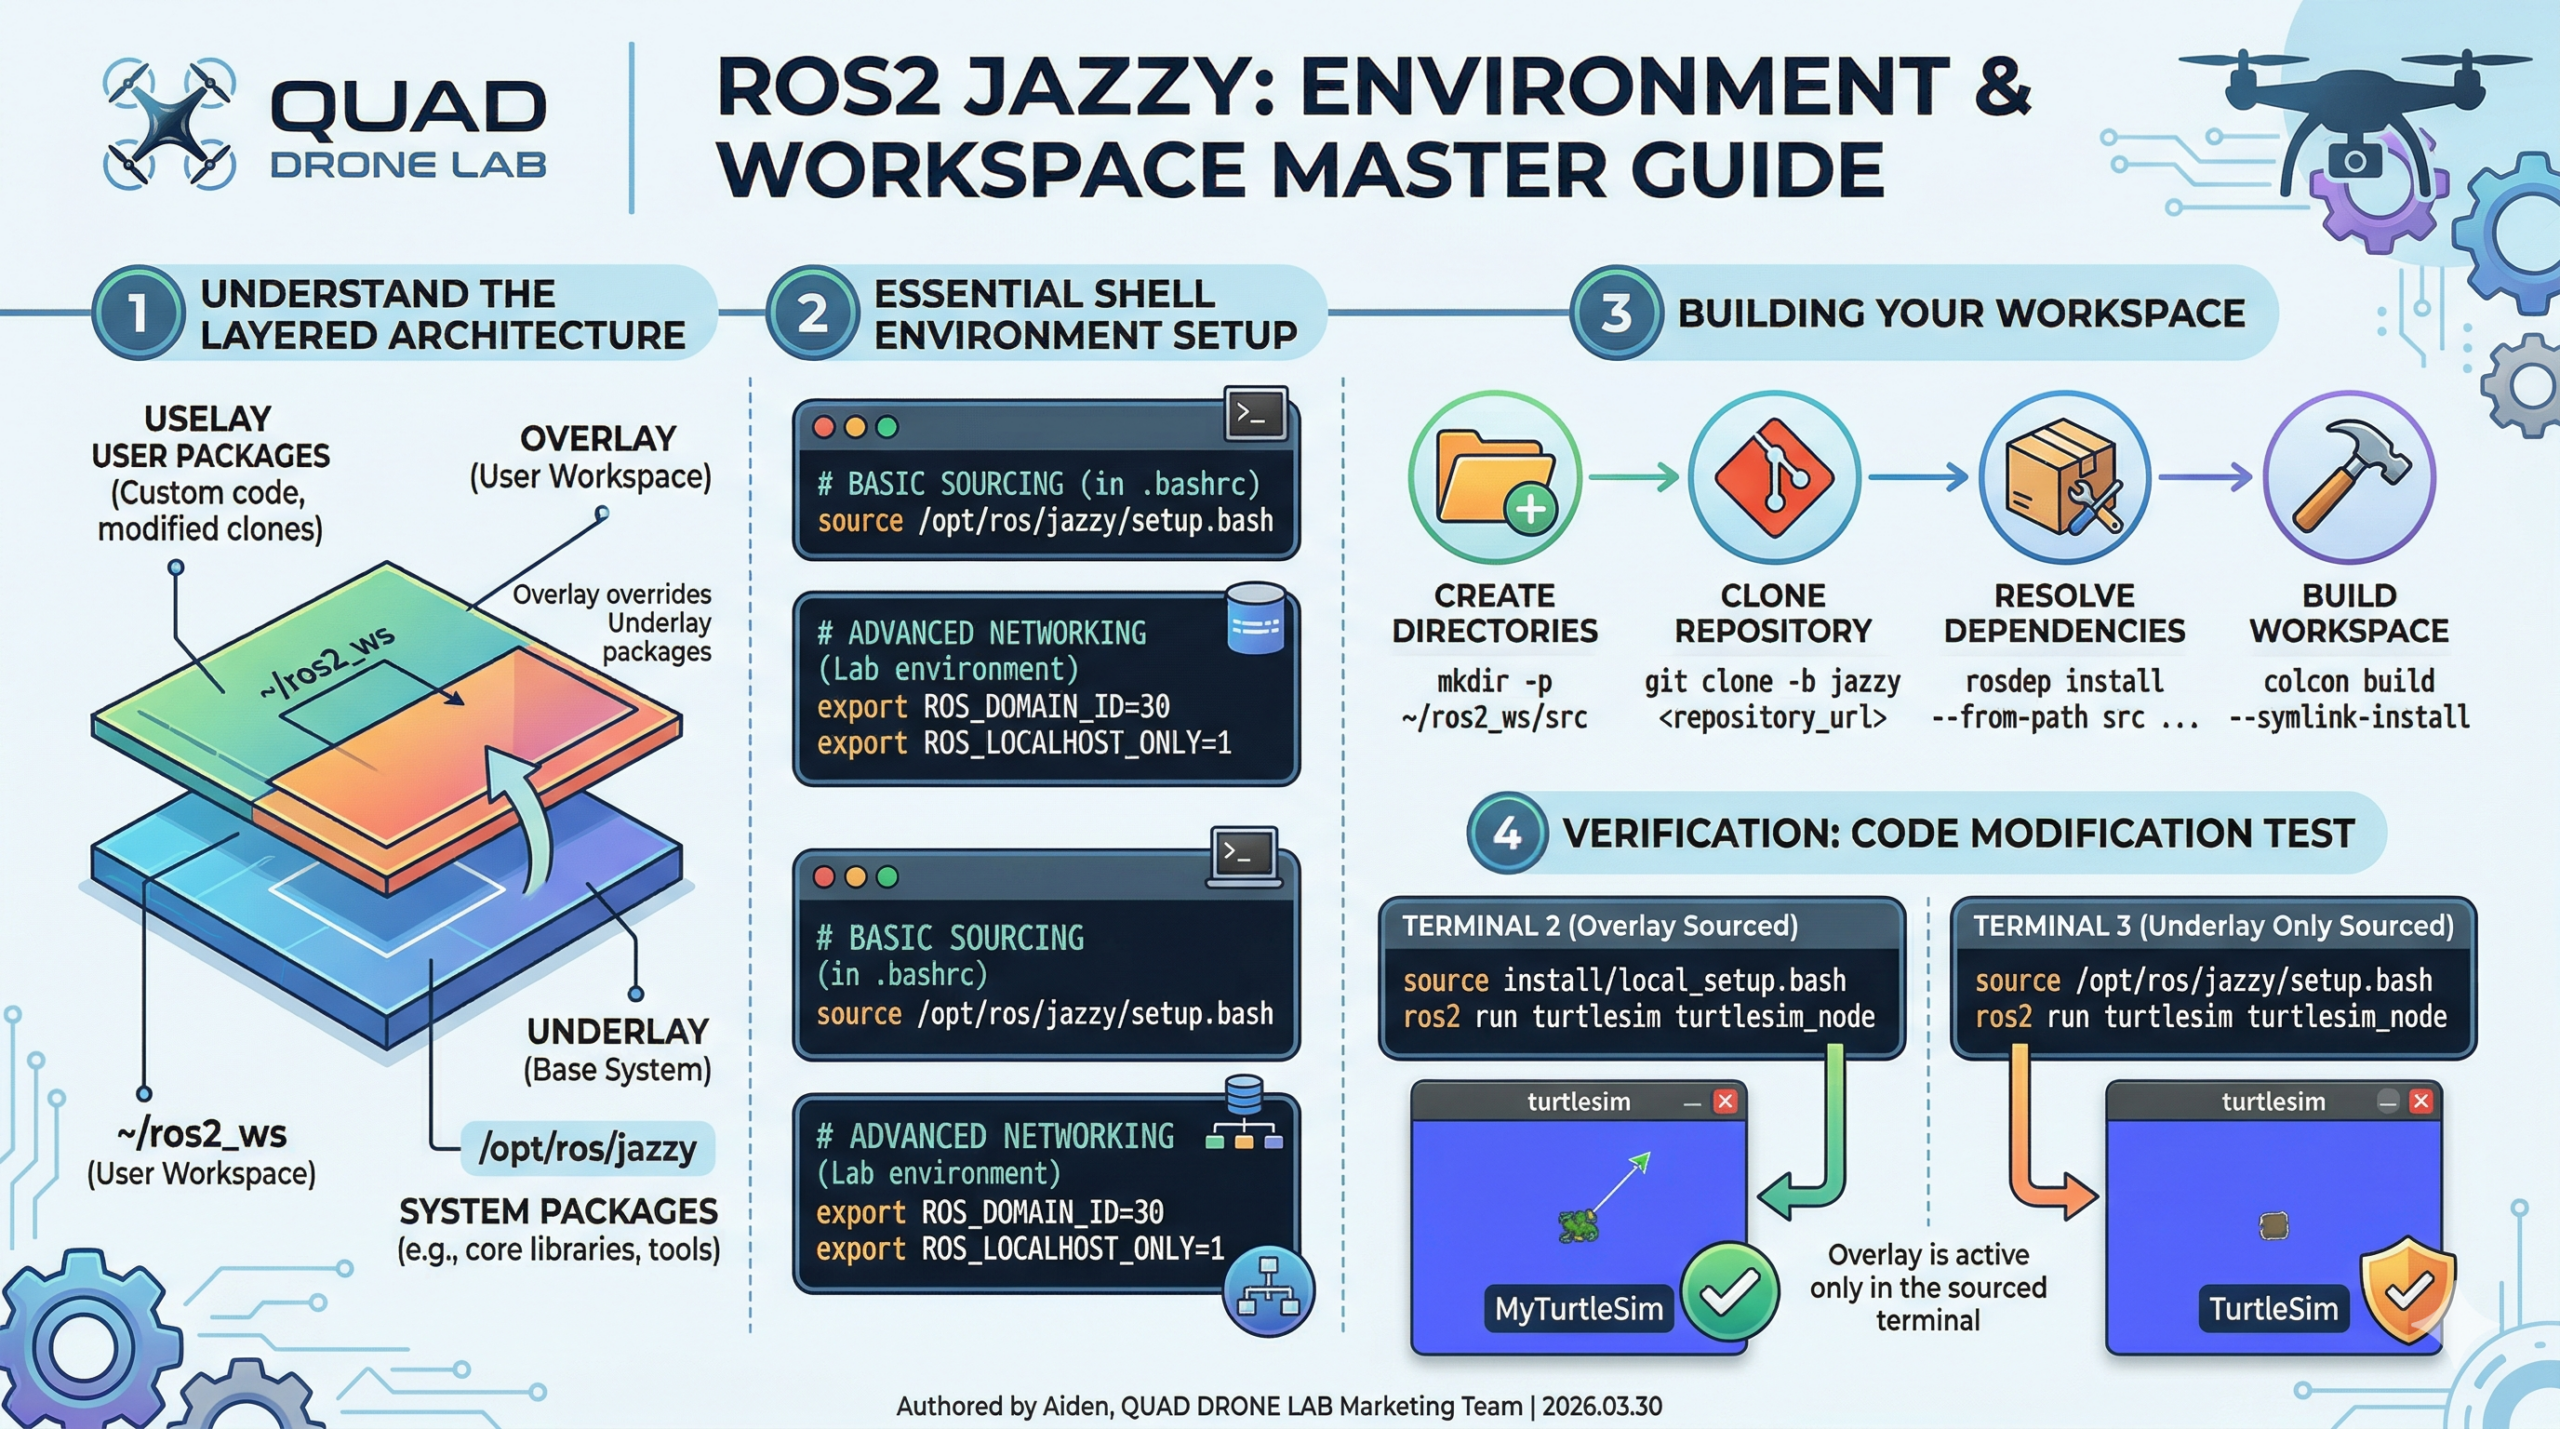
Understanding ROS2 Workspaces and Underlays/Overlays
Before you start ROS2 programming, there are core concepts you must grasp: the Workspace and the Underlay/Overlay system that connects them.
- Workspace: A ROS term for the directory where the packages for the system you are developing are located.
- Underlay: The core ROS2 workspace pre-installed on your computer (e.g.,
/opt/ros/jazzy). - Overlay: A subsequent local workspace you create to write your own code and add packages (e.g.,
~/ros2_ws).

ROS2 combines these workspaces using the terminal (shell environment). A package in the Overlay can override (redefine) an identical package sitting in the Underlay. This allows you to safely test new features or modify existing packages without breaking the base system. It also makes it easy to install and switch between multiple ROS2 distributions on the same machine.
Essential Environment Setup
To use ROS2 packages seamlessly, you must “source” the setup files every time you open a terminal.
1. Sourcing Setup Files and Verifying Variables
Open your terminal and enter the following command to load the base ROS2 Jazzy environment (Underlay):
# Source the base ROS2 environment
source /opt/ros/jazzy/setup.bashIf you find it tedious to type this every time, it is highly recommended to add this command to your shell’s startup script (~/.bashrc).
To verify the setup, check your environment variables:
# Check ROS-related environment variables
printenv | grep -i ROSYou should see variables like ROS_DISTRO and ROS_VERSION. For example, if you are using Jazzy, it should display ROS_DISTRO=jazzy.
2. Advanced Settings for Lab and Classroom Environments
Students and researchers often develop in labs or classrooms sharing a single router (network). To prevent the “nightmare” of someone else’s control signals interfering with your robot, you should know these two variables:
ROS_DOMAIN_ID: ROS2 uses DDS for communication. To prevent interference when different groups share a physical network, each group should set a unique integer as their ID (default is 0).ROS_LOCALHOST_ONLY: This restricts your robot’s communication to stay within your own computer (localhost) only. This is extremely useful in classrooms where multiple robots publishing the same topics might cause erratic behavior.
# Apply these by adding them to your ~/.bashrc file
export ROS_DOMAIN_ID=30
export ROS_LOCALHOST_ONLY=1Creating Your Own ROS2 Workspace
Now, let’s create a local workspace where you will actually write code. Following best practices, every new workspace should have a root directory, and all packages must reside inside a src directory.
# Create a new directory and src folder, then navigate into it
mkdir -p ~/ros2_ws/src
cd ~/ros2_ws/src1. Cloning a Sample Repository
To practice how a workspace functions, we will clone the ros_tutorials repository, which contains the famous turtlesim package. Crucial point: You must fetch the branch (-b) that matches your installed ROS2 distribution (Jazzy).
# Run inside the ~/ros2_ws/src directory
git clone -b jazzy https://github.com/ros/ros_tutorials.git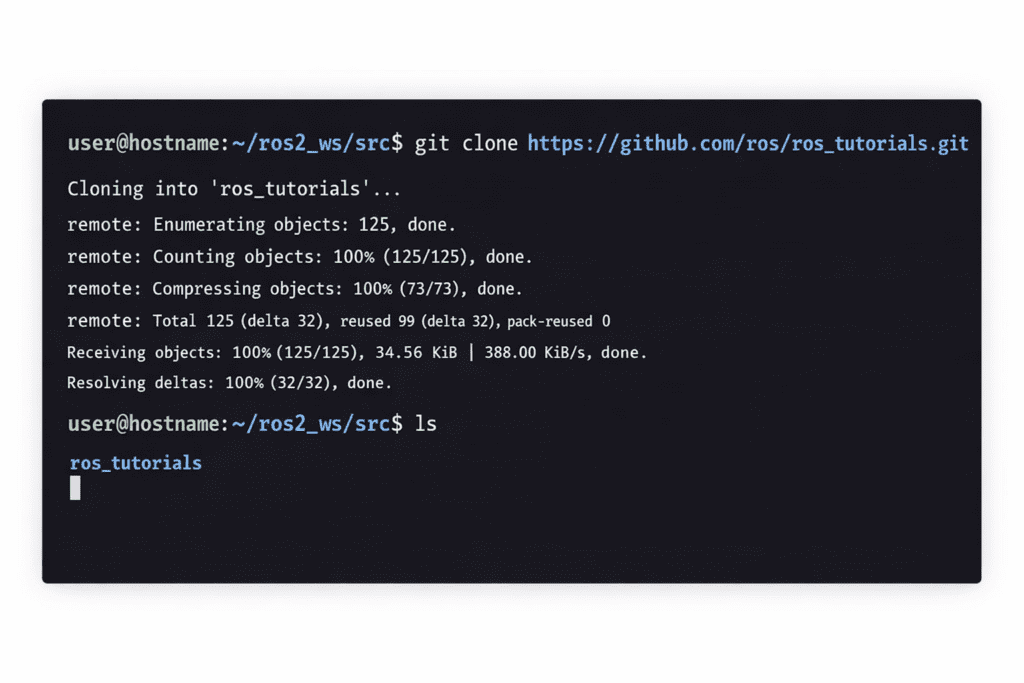
Now, a ros_tutorials folder containing turtlesim is created inside ~/ros2_ws/src. (Note: Some other packages in this repo may contain COLCON_IGNORE files and will be automatically excluded from the build).
2. Resolving Package Dependencies
Before building, you must resolve dependencies. The package.xml file inside a package declares the external libraries required for the code to run. Using the rosdep tool in the workspace root (~/ros2_ws) ensures you don’t run into errors mid-build.
# Move to the workspace root
cd ~/ros2_ws

# Run dependency resolution (automatically installs required packages)
rosdep install -i --from-path src --rosdistro jazzy -yIf all dependencies are already installed, the console will return a confirmation message.
Building the Workspace with Colcon
It’s time to build your workspace using the colcon build system. Run the following from the root (~/ros2_ws).
# Build the entire workspace
colcon build --symlink-install[💡 Colcon Build Tips for Researchers]
--symlink-install: This is vital! It creates symbolic links so that when you modify Python scripts or configuration files, the changes are reflected immediately without needing a full rebuild.--packages-up-to <package_name>: Instead of building everything, this builds only the specific package you want and its dependencies, saving significant time.--event-handlers console_direct+: This allows you to see all logs in real-time in the terminal, which is a lifesaver for debugging build errors.
Once finished, you will see new directories like build, install, and log. The install directory contains the setup files for your Overlay.
Testing the Overlay and Code Modification
Now that the build is complete, you need to “source” the newly built local packages (the Overlay) so the system recognizes them.
1. Always open a NEW terminal!
This is the most common pitfall. Sourcing an overlay in the same terminal used for building, or rebuilding while an overlay is active, can lead to complex path conflicts.
Open a fresh terminal and run:
# Source the base environment (Underlay)
source /opt/ros/jazzy/setup.bash

# Navigate to workspace and source the Overlay
cd ~/ros2_ws
source install/local_setup.bash2. Proving the Power of Overlays: Modifying Turtlesim
Let’s see how the Overlay takes priority over the base Underlay.
- Open
~/ros2_ws/src/ros_tutorials/turtlesim/src/turtle_frame.cppin an editor like VS Code. - Find line ~52:
setWindowTitle("TurtleSim");and change it tosetWindowTitle("MyTurtleSim");. Save the file. - Go back to your first terminal (where you build) and run
colcon buildagain. - Return to your second terminal (where you sourced the overlay) and run:
ros2 run turtlesim turtlesim_nodeYou will see the turtle window title has changed to “MyTurtleSim”.
Is the Underlay safe? To check, open a third terminal, source only the base ROS2 (source /opt/ros/jazzy/setup.bash) without the local overlay, and run the same command. You will see the original “TurtleSim” title. This is the power of the Overlay system—modifying and testing code without touching the core system!
Great job! Today we took a deep dive into “ROS2 Environment Configuration and Workspace Setup,” the most fundamental step for robotics R&D.
For a smoother workflow, I recommend setting up Aliases in your .bashrc for frequent commands and using Visual Studio Code (VS Code) as your primary editor for its powerful debugging features.
In Part 2, we will cover the backbone of ROS2 programming: “Understanding Core Communication Concepts (Node, Topic, Service, Action, Parameter)” and how to use the powerful visualization tool “RQT.”
YouTube Tutorial

Author: Aiden, Marketing Team at QUAD Drone Lab
Date: March 30, 2026
![PX4 MAVSDK – C++ Programming [Episode 6] Basic Flight Control using Action API](https://quad-drone-lab.co.kr/wp-content/uploads/2026/03/0316_인포그래피-768x512.png)
![[MAVSDK C++ Part 4] Building Your Own App: Project Setup and Drone Connection](https://quad-drone-lab.co.kr/wp-content/uploads/2026/03/0314_인포그래피-768x512.png)
![[PX4 Tuning Series 7] Land Detector Configuration: The Essential Guide for a Perfect Flight Conclusion](https://quad-drone-lab.co.kr/wp-content/uploads/2026/03/Drone-Ground-Contact-Landing-Logic-768x429.png)
![PX4 MAVSDK – C++ Programming [Part 2] Core C++ Syntax for MAVSDK](https://quad-drone-lab.co.kr/wp-content/uploads/2026/03/0312_인포그래픽-768x768.jpg)
![PX4 MAVSDK – C++ Programming [12편] MAVSDK C++를 활용한 최신 자율 비행 연구 사례](https://quad-drone-lab.co.kr/wp-content/uploads/2026/03/0322_인프그래피2-768x429.jpg)