[ROS2 Mastery Part 4] ROS2 Topic Programming (1) – Controlling the Turtle with a Publisher
Hello, fellow students and researchers exploring the world of autonomous driving and robotics!
In Part 3, we created an empty ROS2 package and built a very basic node that outputs logs over time using Python. Starting with this fourth installment, we will dive into the core of robot control: ‘Communication.’ In this first session, we will implement a Publisher node to control the Turtlesim turtle, making it move autonomously in a circle through Topic programming.
Analyzing the Control Target: Identifying Topics and Messages
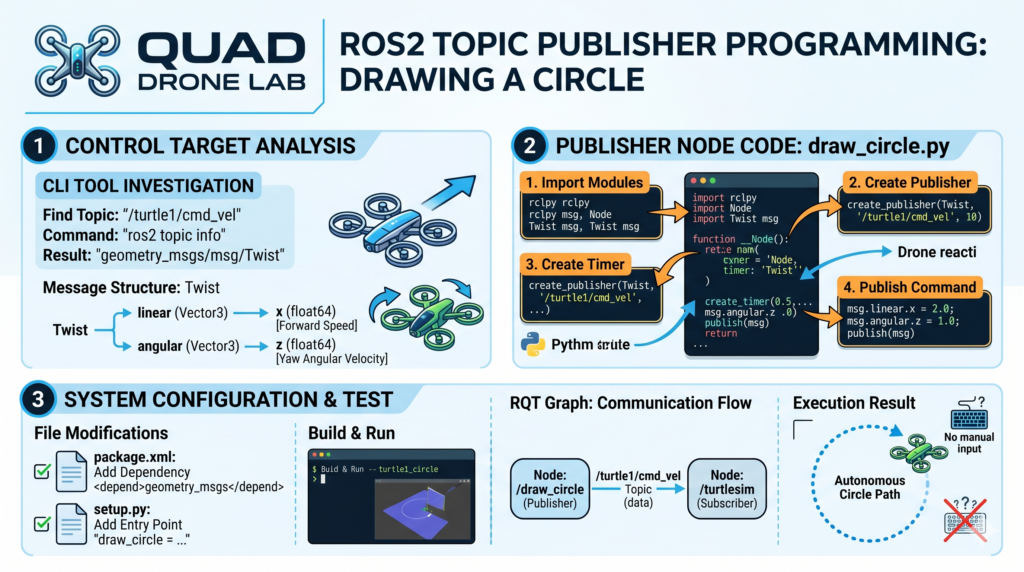
Before writing code to control a robot, the very first step is to identify: “To which topic and in what data format should I send commands to make the robot move?” We will investigate this using ROS2’s powerful CLI (Command Line Interface) tools.
First, open your terminal and run the Turtlesim simulator:
ros2 run turtlesim turtlesim_node
Now, open a new terminal to check the information of the topic used to move the turtle. The name of the topic for controlling the turtle is /turtle1/cmd_vel. Use the ros2 topic info command to look up the data type of this topic.
ros2 topic info /turtle1/cmd_vel
Based on the output, you can see that the /turtle1/cmd_vel topic uses the geometry_msgs/msg/Twist data type. So, what specific variables are contained within this Twist message? To find out, we use the ros2 interface show command.
ros2 interface show geometry_msgs/msg/Twist
Running the command will display the following structure in your terminal:
Vector3  linear
        float64 x
        float64 y
        float64 z
Vector3  angular
        float64 x
        float64 y
        float64 z
Upon analysis, the Twist message consists of two internal structures representing 3D vectors: linear (translational velocity) and angular (rotational velocity).
- linear.x (Forward): The velocity at which the robot moves forward.
- angular.z (Yaw): The rotational speed (angular velocity) at which the robot turns in place.
Therefore, the Python node we are about to write simply needs to create an object of type geometry_msgs/msg/Twist, assign appropriate values to linear.x and angular.z, and periodically publish it to the /turtle1/cmd_vel topic!
Writing the Publisher Node Code: draw_circle.py
Now, let’s get into the actual coding. Navigate to the source code directory of the my_robot_controller package we created in Part 3. Create a new Python file named draw_circle.py and grant it execution permissions (chmod +x) so the system can run the script.
# Navigate to the node directory
cd ~/ros2_ws/src/my_robot_controller/my_robot_controller

# Create the file and grant execution permissions
touch draw_circle.py
chmod +x draw_circle.pyOpen draw_circle.py in an editor like VS Code and write the following code. As you type, think about the specific role each part plays.
#!/usr/bin/env python3
import rclpy
from rclpy.node import Node
from geometry_msgs.msg import Twist  # Import the Twist message type analyzed earlier

class DrawCircleNode(Node):
    def __init__(self):
        super().__init__('draw_circle') # Set the node name to 'draw_circle'

        # 1. Create Publisher
        # Type: Twist, Topic Name: '/turtle1/cmd_vel', Queue Size: 10
        self.cmd_vel_pub_ = self.create_publisher(Twist, '/turtle1/cmd_vel', 10)

        # 2. Create Timer
        # Executes the 'send_velocity_command' callback function every 0.5 seconds
        self.timer_ = self.create_timer(0.5, self.send_velocity_command)

        self.get_logger().info("The Turtle Draw Circle node has started!")

    def send_velocity_command(self):
        # 3. Create Message Object and Assign Data
        msg = Twist()
        msg.linear.x = 2.0   # Move forward at a speed of 2.0 m/s
        msg.angular.z = 1.0  # Rotate at an angular velocity of 1.0 rad/s

        # 4. Publish the Topic
        self.cmd_vel_pub_.publish(msg)

def main(args=None):
    rclpy.init(args=args)
    node = DrawCircleNode()

    try:
        rclpy.spin(node)
    except KeyboardInterrupt:
        pass
    finally:
        node.destroy_node()
        rclpy.shutdown()

if __name__ == '__main__':
main()[In-depth Code Analysis]
- Module Import: We import
rclpy, the core Python client library for ROS2, along with theTwistmessage type fromgeometry_msgs.msg, which we previously identified via the CLI. - Creating the Publisher: We use the
self.create_publishermethod to create the publisher object. The first argument is the data type (Twist), the second is the topic name (/turtle1/cmd_vel), and the third is the Queue size (10), which represents the buffer size for storing messages in case of communication delays. - Setting the Timer: In ROS2 programming, it is recommended to use timer callbacks rather than infinite loops (
while True:). By usingcreate_timer(0.5, ...), we set the registered callback function to execute every 0.5 seconds. - Callback Function and Data Publishing: Inside the
send_velocity_commandfunction—which is called every 0.5 seconds—we create an instance of theTwistmessage. We assign2.0tolinear.xand1.0toangular.zto command the robot to move forward while rotating. Finally, we broadcast the data to the ROS2 network using thepublish()method.
Modifying Configuration Files: package.xml and setup.py
Just writing the Python code isn’t the end of the process! You must modify two configuration files so that the ROS2 build system (Colcon) can correctly build and execute this package.
1) Adding Dependencies to package.xml
In our Python code, we imported and used an external message package called geometry_msgs. You must specify that this package is required during the system build to avoid errors. Open the package.xml file located in the package root directory (~/ros2_ws/src/my_robot_controller) and add the following lines.
Additionally, since we are controlling the Turtlesim simulator, it is good practice to add a dependency for the turtlesim package as well.
<!-- Add below other existing dependency tags -->
  <depend>geometry_msgs</depend>
<depend>turtlesim</depend>2) Adding an Entry Point to setup.py
You need to map the code so that when you enter the command ros2 run my_robot_controller draw_circle in the terminal, the system knows to find and execute the main function inside your Python file. Open the setup.py file in the package root directory and add the following line to the console_scripts array:
entry_points={
        'console_scripts': [
            'test_node = my_robot_controller.my_first_node:main',
            # Add the entry point for the new node here
            'draw_circle = my_robot_controller.draw_circle:main'
        ],
},draw_circle: The name of the node to be executed from the terminal.my_robot_controller.draw_circle:main: Points to themainfunction inside thedraw_circle.pyscript within themy_robot_controllerdirectory.
Build and Execution Test
All coding and configuration are now complete! Now, navigate back to the root directory of your workspace to build the newly updated package.
# Navigate to the workspace root
cd ~/ros2_ws

# Build all packages
colcon build --symlink-installIf the build completes successfully without errors, you are ready to run the node.
[Execution Steps]
- First Terminal: Launch the Turtlesim simulator.
- Second Terminal: Open a new terminal, source your newly created overlay environment, and execute the
draw_circlenode.
Success! Even without manual keyboard input, you will see the turtle rotating infinitely in a beautiful circle because our Publisher node is sending velocity commands (Topics) every 0.5 seconds.
💡 Researcher Tip: Visualizing Communication with RQT Graph
As robotic systems grow in complexity, visually tracking where data flows is crucial for effective debugging. While the turtle is moving, open a completely new terminal and run the rqt_graph command.
rqt_graph
On the screen, you will be able to clearly visualize the communication structure: the /draw_circle node (the publisher we created) sending /turtle1/cmd_vel topic data in real-time toward the /turtlesim node (the subscriber).
Closing
이In this 4th installment, we have explored the entire process of ‘Topic Publishing,’ which can be considered the heart of ROS2 programming, through hands-on coding.
To summarize what we’ve achieved:
- We analyzed the data format we intended to control using CLI commands such as
ros2 topic infoandros2 interface show. - We inherited from
rclpy.node.Nodeto create a Publisher object and a periodic Timer. - We established a structure to continuously transmit data by assigning the correct values to the
Twistmessage.
You now possess the fundamental ability to issue autonomous driving commands using your own algorithms for any robot platform, as long as you can identify the topic name and data structure the robot is Subscribing to!
In the next [ROS2 Mastery Part 5], we will explore the counterpart to this session: “Creating a Subscriber Node.” We will learn how to receive the turtle’s current position (x, y coordinates) sensor data in real-time and print it to the terminal.
We support your successful research in robotics and look forward to seeing you in the next post. Thank you!

Author: Aiden, Marketing Team at QUAD Drone Research Lab
Date: May 10, 2026
![[하이브리드 항법 시스템: 제5편] [구현-1단계] 순항 단계: 고전적 추측 항법, 풍향 추정, 그리고 Gazebo 바람 시뮬레이션 구현](https://quad-drone-lab.co.kr/wp-content/uploads/2026/05/Drone-Vector-Navigation-Crab-Angle-768x429.png)