
[ROS2 Mastery Part 7] ROS2 Service Programming – Guide to Automatic Turtle Pen Color Change Service
Hello! Warm welcome to the long-awaited 7th and final installment of the “ROS2 Express Mastery Course,” brought to you based on materials from the QUAD Drone Lab. A big welcome to all university students and researchers who are diving deep into autonomous driving and system control with dreams of mastering robotics.
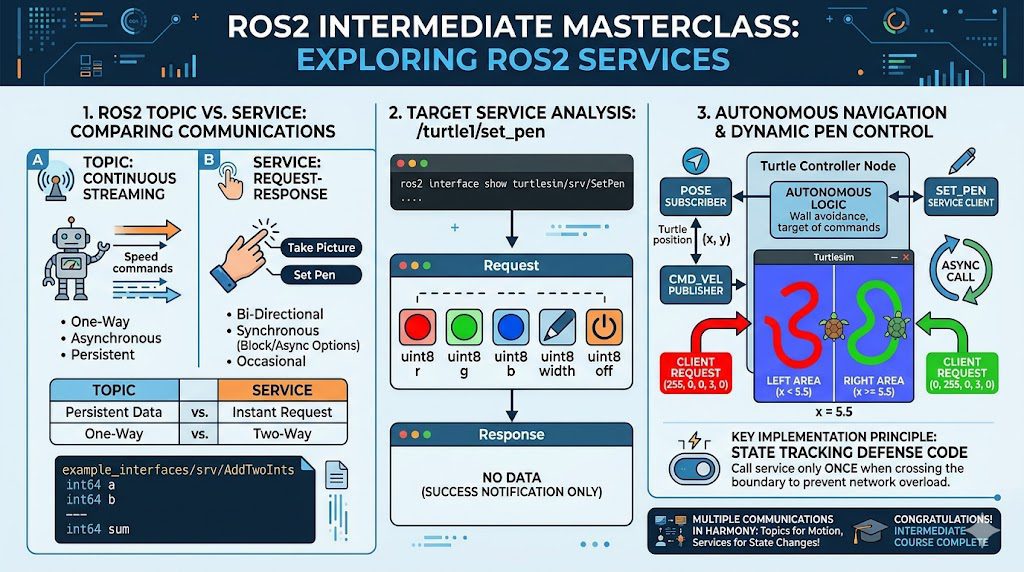
In our previous post (Part 6), we combined Topic Publishing and Subscribing into a single node to implement an “autonomous driving turtle” that perceives walls and avoids them on its own. While Topic communication is ideal for continuous, asynchronous, one-way communication—such as streaming robot sensor data or issuing ongoing speed commands—the Service communication we will explore today possesses entirely different characteristics.
In this 7th edition, we will take a deep dive into ROS2 Service, which is a synchronous, two-way communication system where a Server responds only when a Client sends a Request. Building upon the autonomous driving controller we built last time, we will add a Service Client feature that allows the turtle to automatically change its path’s pen color based on its screen position (red on the left, green on the right).
Understanding the Concept and Structure of ROS2 Service
When researching robot systems, there are frequent occasions where you need one-time commands and result confirmations rather than continuous data streaming—such as “Take a photo with the camera now and send it to me,” or “Open the gripper (robotic arm) at the current position.” The communication method used in these scenarios is the Service.
1.1 Characteristics of Service Communication (Client-Server Architecture)
- Service Server: Waits for external requests, performs a defined task when a request comes in, and then returns the result (Response).
- Service Client: Sends a task request (Request) to the server when needed, and either waits for the processing to finish until the response (Response) arrives or handles the result asynchronously.
1.2 Analyzing the Service Message Specification File (.srv)
To see how a service is structured, let’s take a look at the add_two_ints service example from the QUAD Drone Lab textbook. This service takes two numbers as input, adds them together, and returns the result. For service communication, a .srv file—which serves as the specification sheet for the data exchanged between the server and the client—is required.
If you run the command ros2 interface show example_interfaces/srv/AddTwoInts in the terminal, you can see the following structure:
int64 a
int64 b
---
int64 sum
Here, the --- delimiter in the middle is critical. Based on this separator, the upper section represents the “Request” message sent from the client to the server, while the lower section represents the “Response” message returned from the server to the client.
2. Analyzing the Target Service: /turtle1/set_pen
The service we will use today is the pen configuration service provided by default in Turtlesim. Before we dive into coding, let’s analyze our control target using CLI tools, just as we always do.
With the turtlesim_node running, open a terminal and enter the following command:
ros2 service list
Among the listed services in the output, you can find a service named /turtle1/set_pen, which is related to the turtle’s pen. Let’s find out the data type of this service.
ros2 service type /turtle1/set_pen
The output shows that the type is turtlesim/srv/SetPen. Now, it is time to look into the long-awaited message structure.
ros2 interface show turtlesim/srv/SetPen
uint8 r
uint8 g
uint8 b
uint8 width
uint8 off
---
The analysis results are quite interesting. In the “Request” area above the --- separator, we have the RGB color values (r, g, b), the pen thickness (width), and a flag to turn the pen on or off (off). On the other hand, the “Response” area below the --- separator is completely empty. This means that when the client requests a pen color change, the server (Turtlesim) changes the color and simply notifies the client of the completion without returning any separate result data.
Our goal is now crystal clear! We just need to create a SetPen type service client inside our autonomous driving node, and then send a Request object containing the appropriate RGB values to the server based on the turtle’s x-coordinate position.
3. Designing the Logic for Automatic Turtle Pen Color Change
We are going to upgrade the turtle_controller.py autonomous driving code that we wrote in Part 6.
[Automatic Change Algorithm Logic]
- Position Tracking: Continuously check the turtle’s real-time x-coordinate within the
pose_callbackfunction. - Setting the Boundary: The width of the Turtlesim screen is approximately 11.0. Therefore, we set the midpoint,
x = 5.5, as our boundary line. - Color Decision: When the turtle is on the left side of the screen (
x < 5.5), the pen changes to red (r:255, g:0, b:0). When it is on the right side (x >= 5.5), it changes to green (r:0, g:255, b:0).
[Key Tip for Researchers]
State-Tracking Defensive Code: If you send a service call with every
posetopic received at 60Hz, it will generate a meaningless communication load of 60 times per second. To prevent this, you must create a variable that remembers the previous state (left/right) so that a one-time service call is triggered only at the exact “moment” the turtle crosses the boundary.
4. Modifying the Autonomous Driving Node Code: turtle_controller.py
Open the ~/ros2_ws/src/my_robot_controller/my_robot_controller/turtle_controller.py file you were working on in your editor and completely modify (add to) the code as follows.
#!/usr/bin/env python3
import rclpy
from rclpy.node import Node
from geometry_msgs.msg import Twist
from turtlesim.msg import Pose
from turtlesim.srv import SetPen  # 1. Import the new service type to be used.

class TurtleControllerNode(Node):
    def __init__(self):
        super().__init__('turtle_controller')

        # [Existing Logic] Control command Publisher and position info Subscriber
        self.cmd_vel_publisher_ = self.create_publisher(Twist, '/turtle1/cmd_vel', 10)
        self.pose_subscriber_ = self.create_subscription(Pose, '/turtle1/pose', self.pose_callback, 10)

        # 2. Create a 'Service Client' to change the pen color
        self.set_pen_client_ = self.create_client(SetPen, '/turtle1/set_pen')

        # 3. Initialize a state tracking flag to prevent infinite service calls
        self.is_on_left_ = True

        self.get_logger().info("Turtle autonomous driving and pen color control node has started!")

    # 4. Helper function for service calls
    def call_set_pen_service(self, r, g, b, width, off):
        # Wait in 1-second intervals until the service server is ready on the network
        while not self.set_pen_client_.wait_for_service(1.0):
            self.get_logger().warn("Waiting for the service server...")

        # Create a Request object and assign arguments
        request = SetPen.Request()
        request.r = r
        request.g = g
        request.b = b
        request.width = width
        request.off = off

        # Call the service asynchronously and register a callback
        future = self.set_pen_client_.call_async(request)
        future.add_done_callback(self.future_callback)

    # Callback function to handle the response when it arrives from the server
    def future_callback(self, future):
        try:
            response = future.result()
            self.get_logger().info("Pen color change has been successfully applied to the server.")
        except Exception as e:
            self.get_logger().error(f"Error occurred during service call: {e}")

    # Main logic callback executed repeatedly upon receiving position updates
def pose_callback([In-Depth Code Analysis: Architecture Guide for Researchers]
The part that researchers should observe with particular attention is the Asynchronous Call structure of the service client.
create_client(): Very similar to creating a topic Publisher, it creates a client by specifying the service type to be used (SetPen) and the service name (/turtle1/set_pen).wait_for_service(): In ROS2, which is a distributed system, a server node might start up later than a client node. This function allows the client to wait safely until the server is discovered on the network.call_async(request): This is the most recommended asynchronous method when sending service requests in Python. The autonomous driving node must continuously receive position data dozens of times per second to avoid walls (pose_callback). If the program execution stops and blocks (Block) while waiting for a service response synchronously here, the turtle might lose control and crash into a wall during that split second. Therefore,call_asynctriggers an asynchronous event—essentially saying, “I will throw out the request and keep doing my own job (autonomous driving)”—and is designed to handle the response separately usingadd_done_callback()once it arrives.
5. Building and the Long-Awaited Final Execution
The logic design and code writing are now fully complete. Since the node name and entry point are identical to those in Part 6, there is no need to modify setup.py. Let’s now build and run our workspace to verify that the system we built operates perfectly.
# Go to the workspace root and build the package
cd ~/ros2_ws
colcon build --symlink-install[Execution Steps]
- First Terminal (Run Turtlesim Server): [Run the turtlesim node]
- Second Terminal (Run Autonomous Driving Client Node): Open a new terminal, source the overlay, and execute the node.
As soon as you run it, the turtle starts driving autonomously toward the walls. Every time it crosses the invisible center line of the screen ($x = 5.5$), a completion log pops up in the terminal, and you can watch the pen color trailing behind the turtle change in real time—vibrant red on the left and bright green on the right.
A brilliant system has been successfully built, where topic communication for motor control and service communication for configuration operate in perfect harmony within a single program!
Conclusion
With this, you have successfully completed all the tutorials in the QUAD Drone Lab’s ROS2 Express Mastery Course (Intermediate). Fantastic job!
Through this series, you have mastered the most critical backbone of ROS2, starting from the basics of Workspace configuration, moving to Node programming, sensor and motor control via Topics, and system state manipulation through Services. Furthermore, since you have also learned how to use RQT to visualize and debug your systems, you now possess a solid foundation that allows you to see right through the internal communication structures of any open-source robot package you encounter.
Do not stop here—we encourage you to move forward into advanced research by subscribing to actual LiDAR sensors or camera video data to analyze and control more complex algorithms. We sincerely root for the brilliant achievements that lie ahead for all university students and researchers. Thank you so much for subscribing to this series!
YouTube Tutorial

Author: Aiden, Marketing Team at QUAD Drone Research Lab
Date: May 30, 2026
![[ROS2 Mastery Chapter 8] The Essence of Robotics Math: The Ultimate Guide to the TF2 (Transform) System](https://quad-drone-lab.co.kr/wp-content/uploads/2026/05/0531_인포그래피-768x384.png)
![PX4 MAVSDK – C++ Programming [Episode 11] Complete Comparison of MAVSDK vs MAVROS vs uXRCE-DDS](https://quad-drone-lab.co.kr/wp-content/uploads/2026/03/0322_인포그래피-768x512.png)
![PX4 MAVSDK – C++ Programming [Part 2] Core C++ Syntax for MAVSDK](https://quad-drone-lab.co.kr/wp-content/uploads/2026/03/0312_인포그래픽-768x768.jpg)
![[연재 안내] ROS2 Mastery: 대학생 & 연구원을 위한 ROS2 가이드](https://quad-drone-lab.co.kr/wp-content/uploads/2026/03/image-11-768x429.png)
![[ROS2 Mastery Part 3] A Guide to Creating Your First ROS2 Package and Programming a Python Node](https://quad-drone-lab.co.kr/wp-content/uploads/2026/05/0507_인포그래픽-768x512.png)