
[ROS2 Mastery Part 3] A Guide to Creating Your First ROS2 Package and Programming a Python Node
Welcome, undergraduate students and researchers majoring in robotics and studying autonomous driving and system control. Welcome to the third installment of the ‘ROS2 Fast Track Master Course’ blog series, based on materials from the QUAD Drone Research Lab.
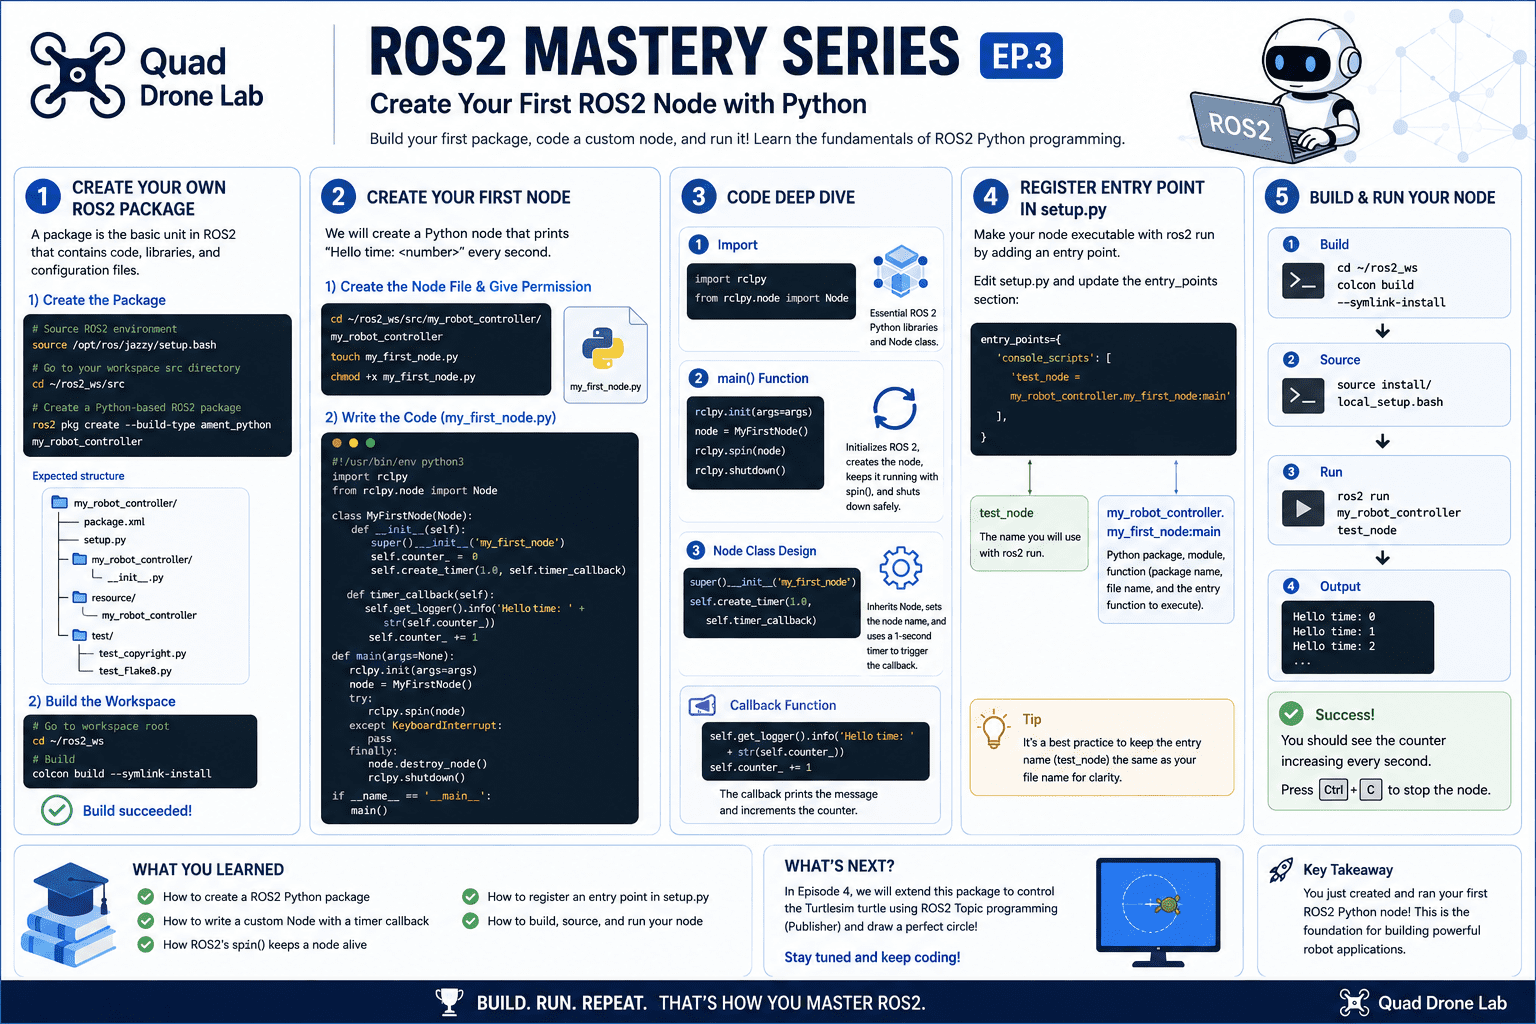
In Parts 1 and 2, we covered how to build a ROS2 Workspace, core communication concepts, and how to use RQT—a powerful visualization tool. In this third part, we will finally get our hands on some code. I will guide you through the entire process of creating your “First ROS2 Package,” which acts as the brain of your robot control, and programming a “Custom Node” using Python.
Beyond just copying and pasting code, I will explain the principles and structures behind how the code works to help you gain a deep understanding. Let’s dive in!

Creating Your Own ROS2 Package
To write a program (node) that drives a robot in a ROS2 system, you must first create a ‘Project Package,’ which serves as the container for your code. A package is the basic unit that bundles related code, libraries, and configuration files together.
For this practice, we will name our package my_robot_controller.
1) Executing the Package Creation Command
Open your terminal and move to the source directory of the workspace we created in Part 1: ~/ros2_ws/src. After sourcing the ROS2 environment, run the package creation command.
# Source the base environment
source /opt/ros/jazzy/setup.bash

# Move to the workspace src directory
cd ~/ros2_ws/src

# Create a Python-based ROS2 package
ros2 pkg create --build-type ament_python my_robot_controllerWhen you run this command, the terminal will display a message indicating that the my_robot_controller package directory and essential programming files have been automatically generated.
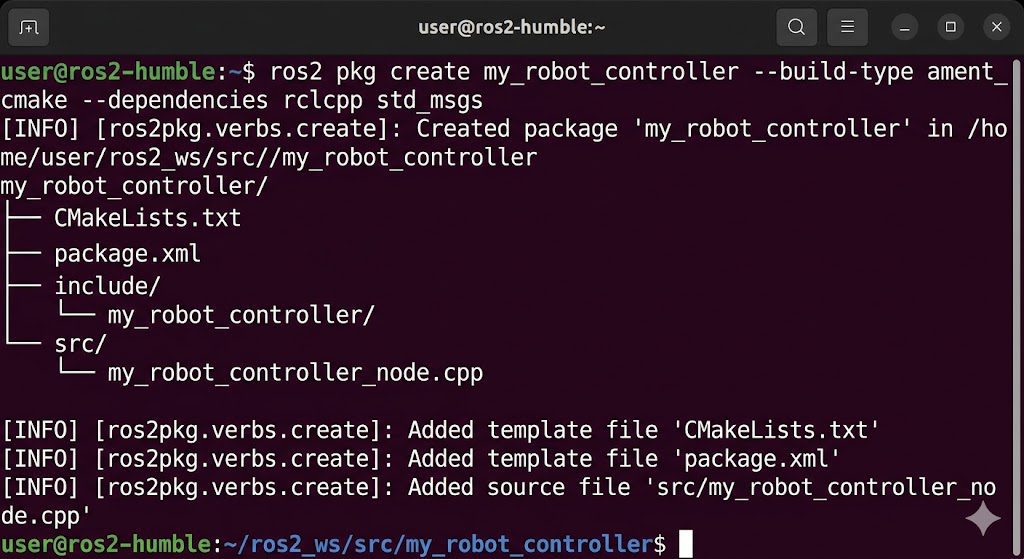
2) Checking Created Files and Performing the First Build
Once the package is successfully created, use an editor like Visual Studio Code (VS Code) to examine the file structure. You will see a package.xml file containing metadata and a setup.py file for Python package installation and entry point settings.
Now, let’s perform the first build to ensure this empty package functions correctly. Move to the workspace root (~/ros2_ws) and run colcon build.
# Move to the workspace root directory
cd ~/ros2_ws

# Build the entire workspace
colcon build --symlink-installIf the build completes without errors, you have successfully created your ROS2 package!
Creating the my_robot_controller Node
Now, let’s program the Node—the actual subject of work in a ROS2 program—using Python. This sample node will periodically print the message “Hello time: ” to the terminal.
1) Creating the Node File and Granting Execution Permission
The Python source code must be located inside the directory with the same name as the package (my_robot_controller). Move to that directory and create a file named my_first_node.py.
In ROS2, Python scripts are treated as independent executables, so you must grant execution permission (x) using the chmod +x command.
# Move to the directory where the source code will live
cd ~/ros2_ws/src/my_robot_controller/my_robot_controller

# Create the Python node file
touch my_first_node.py

# Grant execution permission
chmod +x my_first_node.py2) Writing Code with VS Code
Open VS Code from the workspace root and write the following code in my_first_node.py.
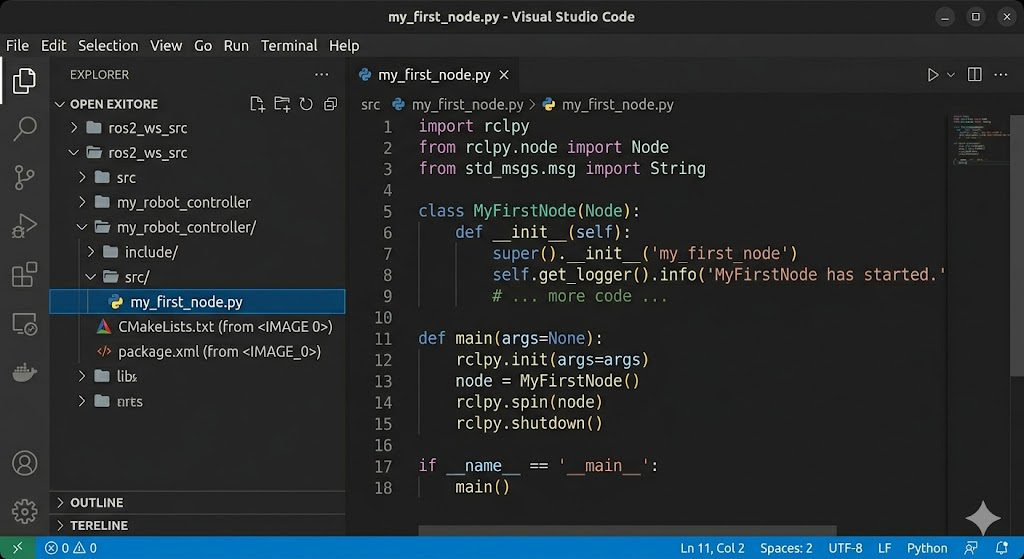
#!/usr/bin/env python3
import rclpy
from rclpy.node import Node

class MyFirstNode(Node):
    def __init__(self):
        # Initialize the parent Node class and specify the node name
        super().__init__('my_first_node')
        self.counter_ = 0
        # Create a timer that executes the timer_callback function every 1.0 second
        self.create_timer(1.0, self.timer_callback)

    def timer_callback(self):
        # Output log to the screen
        self.get_logger().info('Hello time: ' + str(self.counter_))
        self.counter_ += 1

def main(args=None):
    # Initialize ROS2 communication
    rclpy.init(args=args)
    node = MyFirstNode()
    try:
        # Keep the node running to process callbacks
        rclpy.spin(node)
    except KeyboardInterrupt:
        pass
    finally:
        # Clean up and shutdown
        node.destroy_node()
        rclpy.shutdown()

if __name__ == '__main__':
main()In-depth Code Analysis
For researchers and students, it is vital to understand why the code is designed this way. Let’s break it down into three parts.
1) Importing Essential Packages
import rclpy<br>from rclpy.node import Node<br>At the top, we import rclpy, the core client library for ROS2 Python programming, and the Node class. These are the essential building blocks.
2) The Role of the main() Function
def main(args=None):
    rclpy.init(args=args)
    node = MyFirstNode()
    rclpy.spin(node)
rclpy.shutdown()The main() function is the entry point of the program. First, it calls the rclpy.init() method to initialize the ROS2 communication environment and creates the MyFirstNode object that we defined.
Next comes the most important function: rclpy.spin(node). In ROS2, a node is not designed to execute once and terminate immediately. Instead, it must remain active and continuously wait for incoming events until it receives an external shutdown signal such as Ctrl + C. The spin() method keeps the node alive and continuously processes callback functions at runtime. Once a shutdown signal is detected, the loop exits and the shutdown() method is called to safely release the node and clean up ROS2 resources from memory.
At the bottom of the program, the statement if __name__ == '__main__': ensures that the main() function runs only when this script is executed directly as an independent executable file from the terminal, rather than being imported as a module by another Python script.
3) Node Class Design
class MyFirstNode(Node):
    def __init__(self):
        super().__init__('my_first_node')
        self.counter_ = 0
self.create_timer(1.0, self.timer_callback)A typical ROS2 node is implemented using the principles of Object-Oriented Programming (OOP) by inheriting from the Node class. Inside the __init__ constructor, the parent Node class is initialized, and the node is assigned the name 'my_first_node'.
Robot controller node classes generally use a passive structure based on “callback functions.” In other words, instead of running continuously through a sequential infinite loop, the node is designed to react only when specific events occur, such as a timer expiration or the arrival of a message. In the example above, the create_timer() method is used to create a timer with a 1.0-second period, causing the timer_callback function to execute automatically at every interval.
    def timer_callback(self):
        self.get_logger().info('Hello time: ' + str(self.counter_))
        self.counter_ += 1
Inside the callback function triggered by the timer, the get_logger().info() method is used. This is a dedicated logging method provided by the ROS2 node class, similar to Python’s standard print() function, for displaying strings and data in the terminal. Through this mechanism, the node continuously outputs the "Hello time:" message together with an incrementing counter value.
Modifying setup.py and Registering Entry Points
Simply writing the Python script does not mean that the node can immediately be executed using the ros2 run command. In order for the terminal command to locate and execute the Python file we created, we must register the executable script inside the entry_points field of the package configuration file, setup.py.
Open the setup.py file located in the package root directory using the VS Code explorer, then find the entry_points section near the bottom of the file and modify it as follows.
    entry_points={
        'console_scripts': [
            'test_node = my_robot_controller.my_first_node:main'
        ],
},Understanding the exact logic behind the entries in the console_scripts field is of utmost importance.
test_node: The name you will use with theros2 runcommand.my_robot_controller.my_first_node:main: Maps the package name, file name, and themain()function.
In professional practice, it is considered a best practice to match the executable node name with the Python filename to prevent confusion for developers.
However, in this exercise, we have intentionally registered the executable node name as test_node (making it different from the filename). This is designed to help you clearly understand the distinct role and meaning of each entry in the configuration.
Final Build and Execution Test
All code writing and configurations are now complete. It’s time to build the code and see if our first node “breathes” correctly.
Move to the root directory of your workspace and rebuild the package using the colcon build command.
# Move to the workspace root
cd ~/ros2_ws

# Build the package
colcon build --symlink-installOnce the build is successfully completed, source the environment configuration file (overlay) to notify the system of the newly built node’s existence. Then, execute the node using the ros2 run command.
# Source the environment configuration
source install/local_setup.bash

# Execute by entering the package name (my_robot_controller)
# and the registered executable node name (test_node)
ros2 run my_robot_controller test_node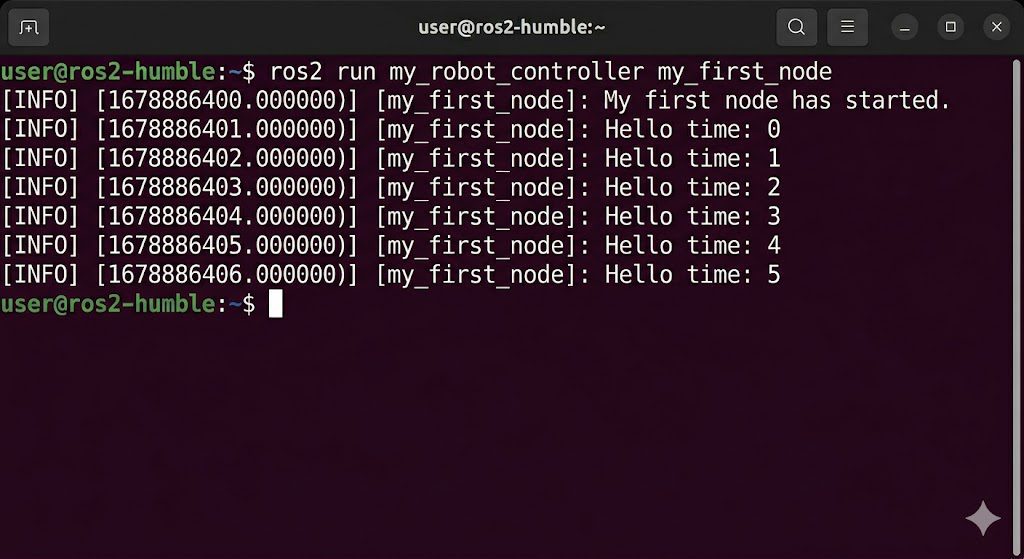
Success! You will see the string “Hello time:” printed on the screen, with the counter incrementing by 1 every second via the timer callback. With this, you have grasped the basics of the ROS2 system and gained the ability to design and execute your own Python nodes. You can safely terminate the running node by pressing Ctrl + C in the terminal window.
Closing Thoughts
In this third installment of our blog series, we explored how to create an empty ROS2 package from scratch and learned the in-depth process of programming a Python-based node using Object-Oriented Programming (OOP) by inheriting from the Node class. We also identified how the ROS2 build system locates and executes code through the Entry Point settings in the setup.py file.
While it was a simple counter-output node, the timer creation and callback structure you learned today serve as the fundamental and essential backbone for processing vast amounts of robot sensor data and controlling motors in the future.
In [ROS2 Mastery Part 4], we will build upon the my_robot_controller package to conduct a “ROS2 Topic Programming (Publisher)” practice, where we will finally take full control of the Turtlesim turtle. See you in the next post, where we’ll watch the turtle draw magnificent circular trajectories! We support your passionate research!
YouTube Tutorial

Author: Aiden, Marketing Team at QUAD Drone Research Lab
Date: May 5, 2026

![[ROS2 Mastery Part 5] ROS2 Topic Programming (2) – Receiving Location Information with a Subscriber](https://quad-drone-lab.co.kr/wp-content/uploads/2026/05/0516_인포그래피-768x429.jpg)
![[ROS2 Mastery Chapter 8] The Essence of Robotics Math: The Ultimate Guide to the TF2 (Transform) System](https://quad-drone-lab.co.kr/wp-content/uploads/2026/05/0531_인포그래피-768x384.png)
![[하이브리드 항법 시스템: 특별편] GPS 교란을 버텨라! PX4 Dead-Reckoning (추측 항법) 모드 완벽 가이드](https://quad-drone-lab.co.kr/wp-content/uploads/2026/05/Resilient_Drone_Dead-Reckoning_Navigation-768x429.jpg)