

[PX4 Tuning Series 6] Trajectory Generator and Setpoint Tuning: The Art of Flight Feel and Smooth S-Curves
Hello once again to all university students, graduate students, and researchers dedicating yourselves to aerospace engineering and autonomous drones! Welcome to the sixth and final installment of our comprehensive PX4 Tuning Series.
From [Series 1] through [Series 5], we have covered a massive amount of ground. We started by physically eliminating hardware vibrations, moved on to filtering residual noise via high-rate logging, and finally mastered both manual and automatic PID tuning techniques. As a result, your drone should now boast incredible, ‘locked-in’ flight performance—able to hold its position against strong winds and react to controller commands with zero hesitation.
However, you might now encounter a new “problem.” Because your vehicle’s control loops are so perfectly tuned, if you rapidly flick the RC stick (a step-input), the drone will attempt to track that command instantly. It will aggressively snap to the new angle, moving sharply and robotically. While this razor-sharp response is exactly what you want for an FPV racing drone, if your research involves cinematic filming, precise 3D mapping, or sensitive cargo delivery, such jerky, violent movements are unacceptable.
In this final Series 6, we will explore how to take your perfectly tuned drone and elegantly sculpt its responsiveness to suit your specific mission needs. We will dive deep into the Trajectory Generator and Setpoint Tuning, teaching you how to achieve buttery-smooth flight trajectories.
1. Understanding the Difference: Lower-Level (PID) vs. Higher-Level (Setpoint) Tuning
Before we touch any parameters, we must clarify a crucial concept in control theory. Many beginner researchers make a critical mistake: when their drone moves too aggressively, they try to fix it by lowering the PID gains (like the P gain). Do not do this! Lowering PID gains ruins your drone’s stability and its ability to fight the wind.
- Lower-Level Tuning (PID Tuning): The PID controller determines how fast and accurately to reduce the ‘error’ between the desired setpoint and the vehicle’s current estimated state. This is strictly responsible for the drone’s stability and tracking performance.
- Higher-Level Tuning (Setpoint Value Tuning): When a pilot moves the stick or a mission waypoint is commanded (Demanded Setpoint), the Trajectory Generator determines ‘how to transform’ that demand into the final Desired Setpoint that the PID controller will follow.
If a pilot instantly snaps the stick from 0 to 100, the trajectory generator decides whether to pass that 0 to 100 command instantly as a harsh “step,” or to gradually ramp it up over time. Therefore, if the “flight feel” (User Experience) is too sharp, you should leave the PID gains alone and instead tune the trajectory generator to smooth out the speed at which the setpoint changes.
2. The Three Trajectory Implementations in Position Mode
In PX4’s manual Position Mode, there are three different ways to map your RC stick inputs into trajectory setpoints. You can select these using the MPC_POS_MODE parameter.
① Direct Velocity (Simple Position Control)
- How it works: Stick inputs are directly mapped to velocity setpoints with absolutely no smoothing.
- Use case: Because it passes raw step-inputs directly to the controllers, this mode is strictly used for Velocity Controller PID tuning (as we did in previous series). It is too jerky and harsh for normal, everyday flight.
② Acceleration Based (Default)
- How it works: Horizontal stick inputs are mapped to acceleration setpoints rather than velocity.
- Use case: This provides a very intuitive “flight feel,” as if you are physically pushing the vehicle around in the air. It prevents unexpected tilt changes when reaching maximum travel speed. It is an excellent, well-rounded default mode for general multicopter flight.
③ Smoothed Velocity (Jerk-Limited Type)
- How it works: This is the most advanced trajectory generator. It limits not only the velocity and acceleration but also the ‘Jerk’, generating perfectly symmetric and smooth S-Curves.
- Use case: Absolutely essential for cinematic camera drones, 3D photogrammetry, and cargo delivery where smooth motion is required. (Note: It is not suitable for racing quads that require instant, aggressive reactions).

3. The Magic of the S-Curve: Principles of Jerk-Limited Trajectories
Let’s assume you have set MPC_POS_MODE to Smoothed velocity to achieve the ultimate smooth flight.
In physics, Jerk is the rate at which acceleration changes (the derivative of acceleration). For a multicopter to accelerate forward, it must physically tilt its body to direct its thrust vector. If there is no limit on jerk, the drone will violently snap to the required tilt angle to reach the target acceleration instantly.
However, when you apply a Jerk-limited trajectory, the drone’s acceleration is forced to increase and decrease gradually. Consequently, the speed at which the drone tilts becomes incredibly smooth. If you plot the resulting velocity over time, it forms a beautiful, symmetrical S-Curve.
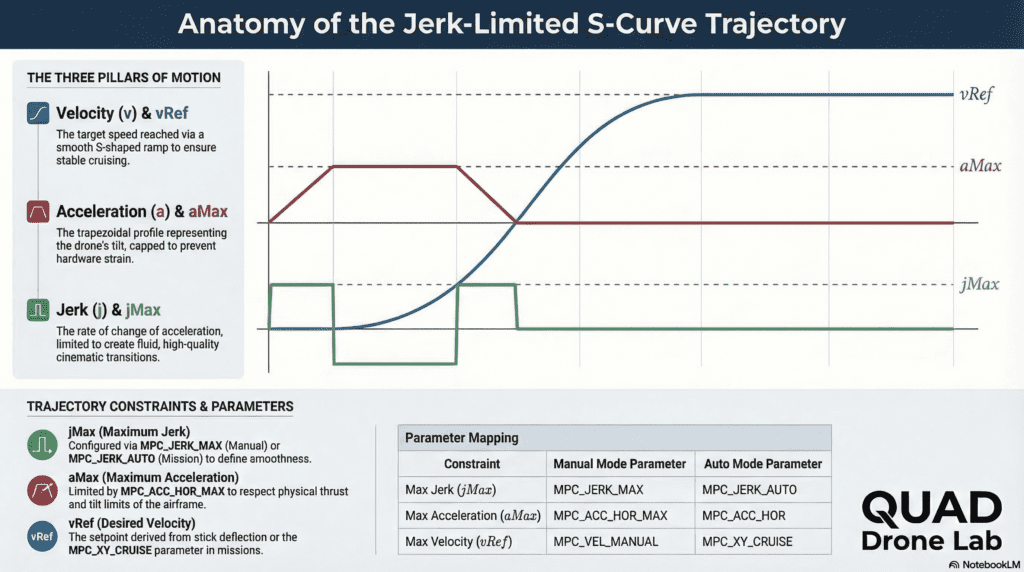
This elegant trajectory is calculated using a combination of the following constraints:
jMax(Maximum Jerk): Determines how smoothly the drone tilts (the transition into acceleration).aMax(Maximum Acceleration): Determines how fast the drone reaches its top speed.vRef(Desired Velocity): The maximum travel speed when the stick is fully deflected.
4. Practical Guide: QGroundControl Parameter Setup
Now, let’s open QGroundControl (QGC) and configure the parameters to make your research drone fly as smoothly as a massive Hollywood cinema drone.
Step 1: Change the Trajectory Generator Mode
- Search for the
MPC_POS_MODEparameter and change it to Smoothed velocity.
Step 2: XY-Plane (Horizontal) Tuning
These parameters determine the smoothness and speed of horizontal flight.
- Max Velocity (MPC_VEL_MANUAL): The maximum horizontal speed when the stick is fully pushed (e.g., 5.0 m/s).
- Max Acceleration (MPC_ACC_HOR_MAX): The acceleration used to reach the max speed. Lower values result in sluggish, heavy-feeling departures (e.g., 2.0 m/s^2).
- Max Jerk (MPC_JERK_MAX): The core parameter for smoothness. It dictates how softly the drone initiates its tilt. The default is relatively high, so lower it for cinematic filming (e.g., 1.5 m/s^3).
Step 3: Z-Axis (Vertical) Tuning
Because ascending and descending require vastly different dynamics on a multicopter, vertical parameters are separated.
- Max Up/Down Velocity (MPC_Z_VEL_MAX_UP / MPC_Z_VEL_MAX_DN): (e.g., Up: 3.0 m/s, Down: 1.5 m/s).
- Max Up/Down Acceleration (MPC_ACC_UP_MAX / MPC_ACC_DOWN_MAX): (e.g., Up: 2.0 m/s^2, Down: 1.0 m/s^2).
# Example: Recommended S-Curve parameter settings for a Mapping/Filming Drone
MPC_POS_MODE = Smoothed velocity  # Enable Jerk-limited S-Curve mode
MPC_VEL_MANUAL = 5.0              # Max horizontal velocity 5m/s
MPC_ACC_HOR_MAX = 2.0             # Smooth horizontal acceleration
MPC_JERK_MAX = 1.5                # Extremely soft and smooth tilt transitions
MPC_ACC_UP_MAX = 1.5              # Gentle takeoff and vertical acceleration
Note: Trajectories in Auto Mode (Missions)
The settings above apply to manual stick flying in Position Mode. However, if you are flying autonomous waypoint missions (Auto Mode), PX4 is designed to always use the Jerk-limited S-Curve trajectory by default. To adjust the smoothness of your autonomous missions, you must tune a separate set of parameters using the exact same principles: MPC_XY_CRUISE (cruising speed), MPC_ACC_HOR (mission acceleration), and crucially, MPC_JERK_AUTO (mission maximum jerk).
5. Conclusion: From Suppressing Vibrations to the Art of Flight
Over the course of these six series, we have explored the entire spectrum of drone tuning using PX4.
Just as we saw in the real-world case of the QUAD Drone Lab, everything begins with the hardware. By tightening structural gaps, they eliminated the invisible 60~80Hz vibrations right at the source. From there, we learned to filter out the remaining noise, perfectly synchronize the three elements of PID control, and finally, today, we learned how to use the Trajectory Generator to sculpt an artistic, buttery-smooth flight path tailored exactly to our intentions.
We truly hope that the drone you have spent countless days and nights designing and building in your lab has now evolved from a mere mechanical machine into a perfect, responsive partner that understands your exact intentions.
The world of flight data analysis and tuning is fierce, often requiring practical intuition that equations alone cannot provide. We hope this blog series serves as a reliable compass for your research. We sincerely wish all university students, graduate students, and researchers the utmost success and safety in your upcoming flight tests.
Thank you so much for following the [PX4 Tuning Series]!
YouTube Tutorial

Author: maponarooo, CEO of QUAD Drone Lab
Date: March 6, 2026
![PX4 MAVSDK – C++ Programming [5편] 시스템 정보 쿼리 및 원격 측정(Telemetry) 활용](https://quad-drone-lab.co.kr/wp-content/uploads/2026/03/0315_인포그래피-768x512.png)
![PX4 MAVSDK – C++ Programming [3편] MAVSDK C++ 설치 및 SITL 시뮬레이션 환경 구축](https://quad-drone-lab.co.kr/wp-content/uploads/2026/03/0313_인포그래픽-768x419.jpg)
![PX4 MAVSDK – C++ Programming [12편] MAVSDK C++를 활용한 최신 자율 비행 연구 사례](https://quad-drone-lab.co.kr/wp-content/uploads/2026/03/0322_인프그래피2-768x429.jpg)
![[드론 배터리의 모든 것]Part 3: 고전압 시스템으로의 진화: 6S, 8S, 그리고 12S의 세계](https://quad-drone-lab.co.kr/wp-content/uploads/2026/05/Inside-the-Intelligence-Battery-Diagram-768x429.png)