[Series Announcement] ROS2 Mastery: A Comprehensive ROS2 Guide for Students and Researchers
Hello! I’m Aiden from the Marketing Team.
To the university students majoring in robotics and the researchers developing robot systems in the field: Welcome to the world of ROS2 (Robot Operating System 2)!
In modern robotics development, ROS2 has become a necessity, not an option. However, the vast concepts and complex configurations encountered when first starting can often be frustrating. In this “ROS2 Mastery” blog series, based on the ROS2 Jazzy version, we will provide step-by-step guidance—from environment setup and node communication to TF2 coordinate transformations and robot modeling using URDF.
Let’s take a sneak peek at the core topics we will cover:
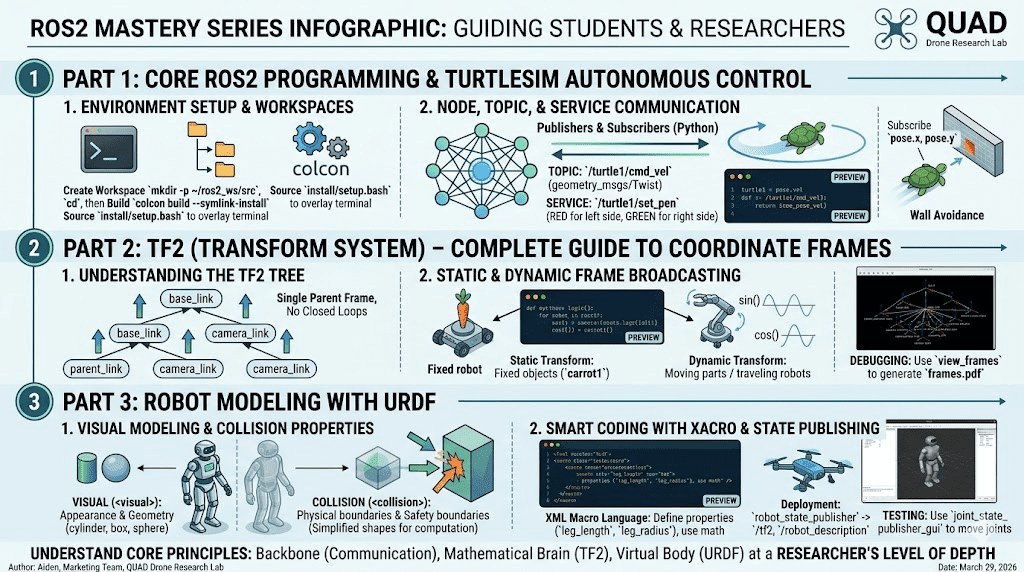
Part 1: Core ROS2 Programming & Turtlesim Autonomous Control
In the first part, we will solidify our ROS2 fundamentals and gain hands-on experience by writing code to control the “Turtlesim” simulator.
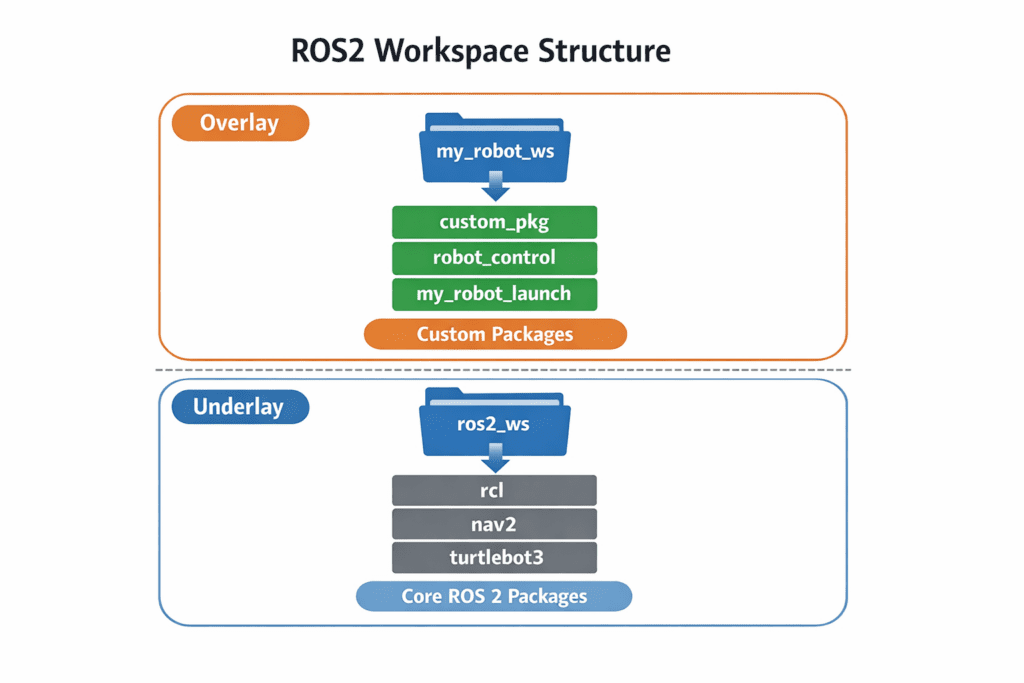
1. Environment Setup and Understanding Workspaces
ROS2 uses the concept of a “Workspace” to manage multiple packages. Your first task is to create your own workspace and learn how to use colcon, the ROS2 build system.
# Create a new workspace directory
mkdir -p ~/ros2_ws/src
cd ~/ros2_ws/src

# Build the workspace
cd ~/ros2_ws
colcon build --symlink-installWe will also cover how to apply your build to your terminal environment by “sourcing” the overlay setup file (source install/setup.bash) after the build is complete.
2. Mastering Node, Topic, and Service Communication
A robot system consists of numerous “Nodes” communicating with each other. We will create a custom package called my_robot_controller and build Publishers and Subscribers using Python.
- Topic Communication: Periodically publish
geometry_msgs/msg/Twistmessages to the/turtle1/cmd_veltopic to make the turtle move in a circle. - Service Communication: Call the
/turtle1/set_penservice to dynamically change the pen color—red when the turtle is on the left side of the screen and green when it’s on the right.

[Preview Code: Publisher Node to move the turtle in a circle]
import rclpy
from rclpy.node import Node
from geometry_msgs.msg import Twist

class DrawCircleNode(Node):
    def __init__(self):
        super().__init__('draw_circle')
        # Create a Publisher for Twist type messages
        self.cmd_vel_pub_ = self.create_publisher(Twist, '/turtle1/cmd_vel', 10)
        # Execute callback every 0.5 seconds
        self.timer_ = self.create_timer(0.5, self.send_velocity_command)

    def send_velocity_command(self):
        msg = Twist()
        msg.linear.x = 2.0  # Linear velocity
        msg.angular.z = 1.0 # Angular velocity
        self.cmd_vel_pub_.publish(msg)

def main(args=None):
    rclpy.init(args=args)
    node = DrawCircleNode()
    rclpy.spin(node)
rclpy.shutdown()By evolving this code, we will eventually complete an autonomous turtle controller that subscribes to real-time positions (pose.x, pose.y) and turns automatically before hitting a wall.
Part 2: TF2 (Transform System) – Complete Guide to Coordinate Frames
As a robotics researcher, you know the importance of “Coordinate Transformation.” Whether a mobile robot is tracking a target or a manipulator arm is moving its gripper to a detected object, understanding the spatial relationship between parts (frames) is crucial.
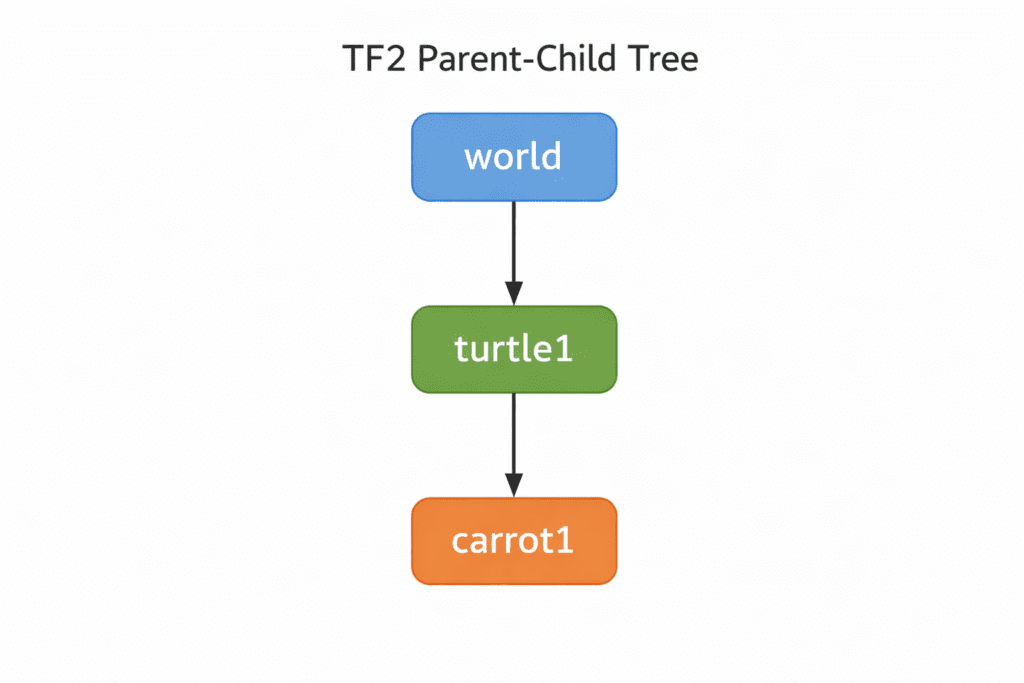
1. Understanding the TF2 Tree
ROS2 provides the TF2 (Transform version 2) system to handle these complex mathematical operations. TF2 is structured as a “Tree” where each frame has exactly one parent, ensuring no closed loops.
2. Static and Dynamic Frame Broadcasting
In this series, we will program TF2 Broadcasters and Listeners using Python.
- Static Transform: For transformations that don’t change over time, like walls or fixed obstacles. We use
StaticTransformBroadcasterto fix a target frame,carrot1, in front of the turtle. - Dynamic Transform: For moving joints or traveling robots. We will implement dynamic frames whose trajectories change over time using mathematical functions like
sin()andcos().
We will also share professional debugging tips, such as using the view_frames command from the tf2_tools package to generate a frames.pdf file for visual inspection.
Part 3: Robot Modeling with URDF
Simulating a robot in a computer environment before physical production is essential. In Part 3, we learn URDF (Universal Robot Description Format).
1. Visual Modeling and Collision Properties
URDF is an XML file describing the kinematic structure of a robot. We create the robot’s appearance (<visual>) by combining geometric elements like cylinders, boxes, and spheres.
However, visuals aren’t everything! To prevent the robot from passing through walls in simulators like Gazebo, you must set <collision> tags. We will introduce advanced techniques, such as using simplified shapes for collision calculations to reduce computational load.

2. Smart Coding with Xacro and State Publishing
As robots become more complex, URDF files grow exponentially. We solve this by introducing Xacro, an XML macro language. We can define constants (e.g., leg length) and use math and macros to significantly reduce repetitive code.
The finished model is deployed via the robot_state_publisher node to the /tf2 and /robot_description topics. We will then test it in the joint_state_publisher_gui, moving sliders to bend the robot’s joints as we wish.
[Preview Code: Defining Constants and Math with Xacro]
<robot xmlns:xacro="http://www.ros.org/wiki/xacro" name="my_robot">
  <xacro:property name="leg_length" value="0.6" />
  <xacro:property name="leg_radius" value="0.2" />

  <link name="left_leg">
    <visual>
      <geometry>
        <cylinder length="${leg_length}" radius="${leg_radius}"/>
      </geometry>
    </visual>
  </link>
</robot>The “ROS2 Mastery” series is designed to go beyond just copying code. It aims to help you understand the core principles—the “Backbone” (Communication), the “Mathematical Brain” (TF2), and the “Virtual Body” (URDF)—at a researcher’s level of depth.
Our next post will kick off with “Part 1: ROS2 Jazzy Environment Setup and Workspace Creation.” I truly support your first steps toward becoming a robotics expert. See you in the next post!

Author: Aiden, Marketing Team at QUAD Drone Research Lab
Date: March 29, 2026
![[PX4 튜닝 시리즈 부록] 레이싱 드론 튜닝 가이드 (Racer Setup): 한계를 뛰어넘는 극강의 퍼포먼스](https://quad-drone-lab.co.kr/wp-content/uploads/2026/03/Racing-Drone-Minimalism-and-Balance-768x429.png)
![[하이브리드 항법 시스템: 특별편] GPS 교란을 버텨라! PX4 Dead-Reckoning (추측 항법) 모드 완벽 가이드](https://quad-drone-lab.co.kr/wp-content/uploads/2026/05/Resilient_Drone_Dead-Reckoning_Navigation-768x429.jpg)
![PX4 MAVSDK – C++ Programming [Part 3] Installing MAVSDK C++ and Setting Up the SITL Simulation Environment](https://quad-drone-lab.co.kr/wp-content/uploads/2026/03/0313_인포그래픽-768x419.jpg)