
The Ultimate Guide to MAVSDK-Python Programming [Part 7]: Understanding the Core Principles of OFFBOARD Mode
Hello once again, university students and researchers dedicating yourselves to autonomous flight robotics and drone control algorithms! Welcome to the seventh installment of our MAVSDK-Python blog series.
So far, we have mastered the basic classes of MAVSDK, understood asynchronous (asyncio) programming, and learned how to make a drone take off, land, and fly to designated Waypoints. However, for graduate students and researchers working on autonomous flight algorithms using Reinforcement Learning (RL), real-time object tracking based on computer vision, or swarm flights, the basic ‘Mission’ or ‘Goto’ modes have clear limitations in terms of precision and responsiveness.
To overcome these limitations and control the vehicle’s movements exactly as you intend—dozens of times per second—you must conquer the ultimate mountain: ‘OFFBOARD Mode’.
In this [Part 7: Understanding the Core Principles of OFFBOARD Mode], we will thoroughly and kindly break down everything from the concept of Offboard mode (often called the crown jewel of drone control) to its strict prerequisites, and finally, practical code examples for position, velocity, and feed-forward control.
1. What is OFFBOARD Mode?
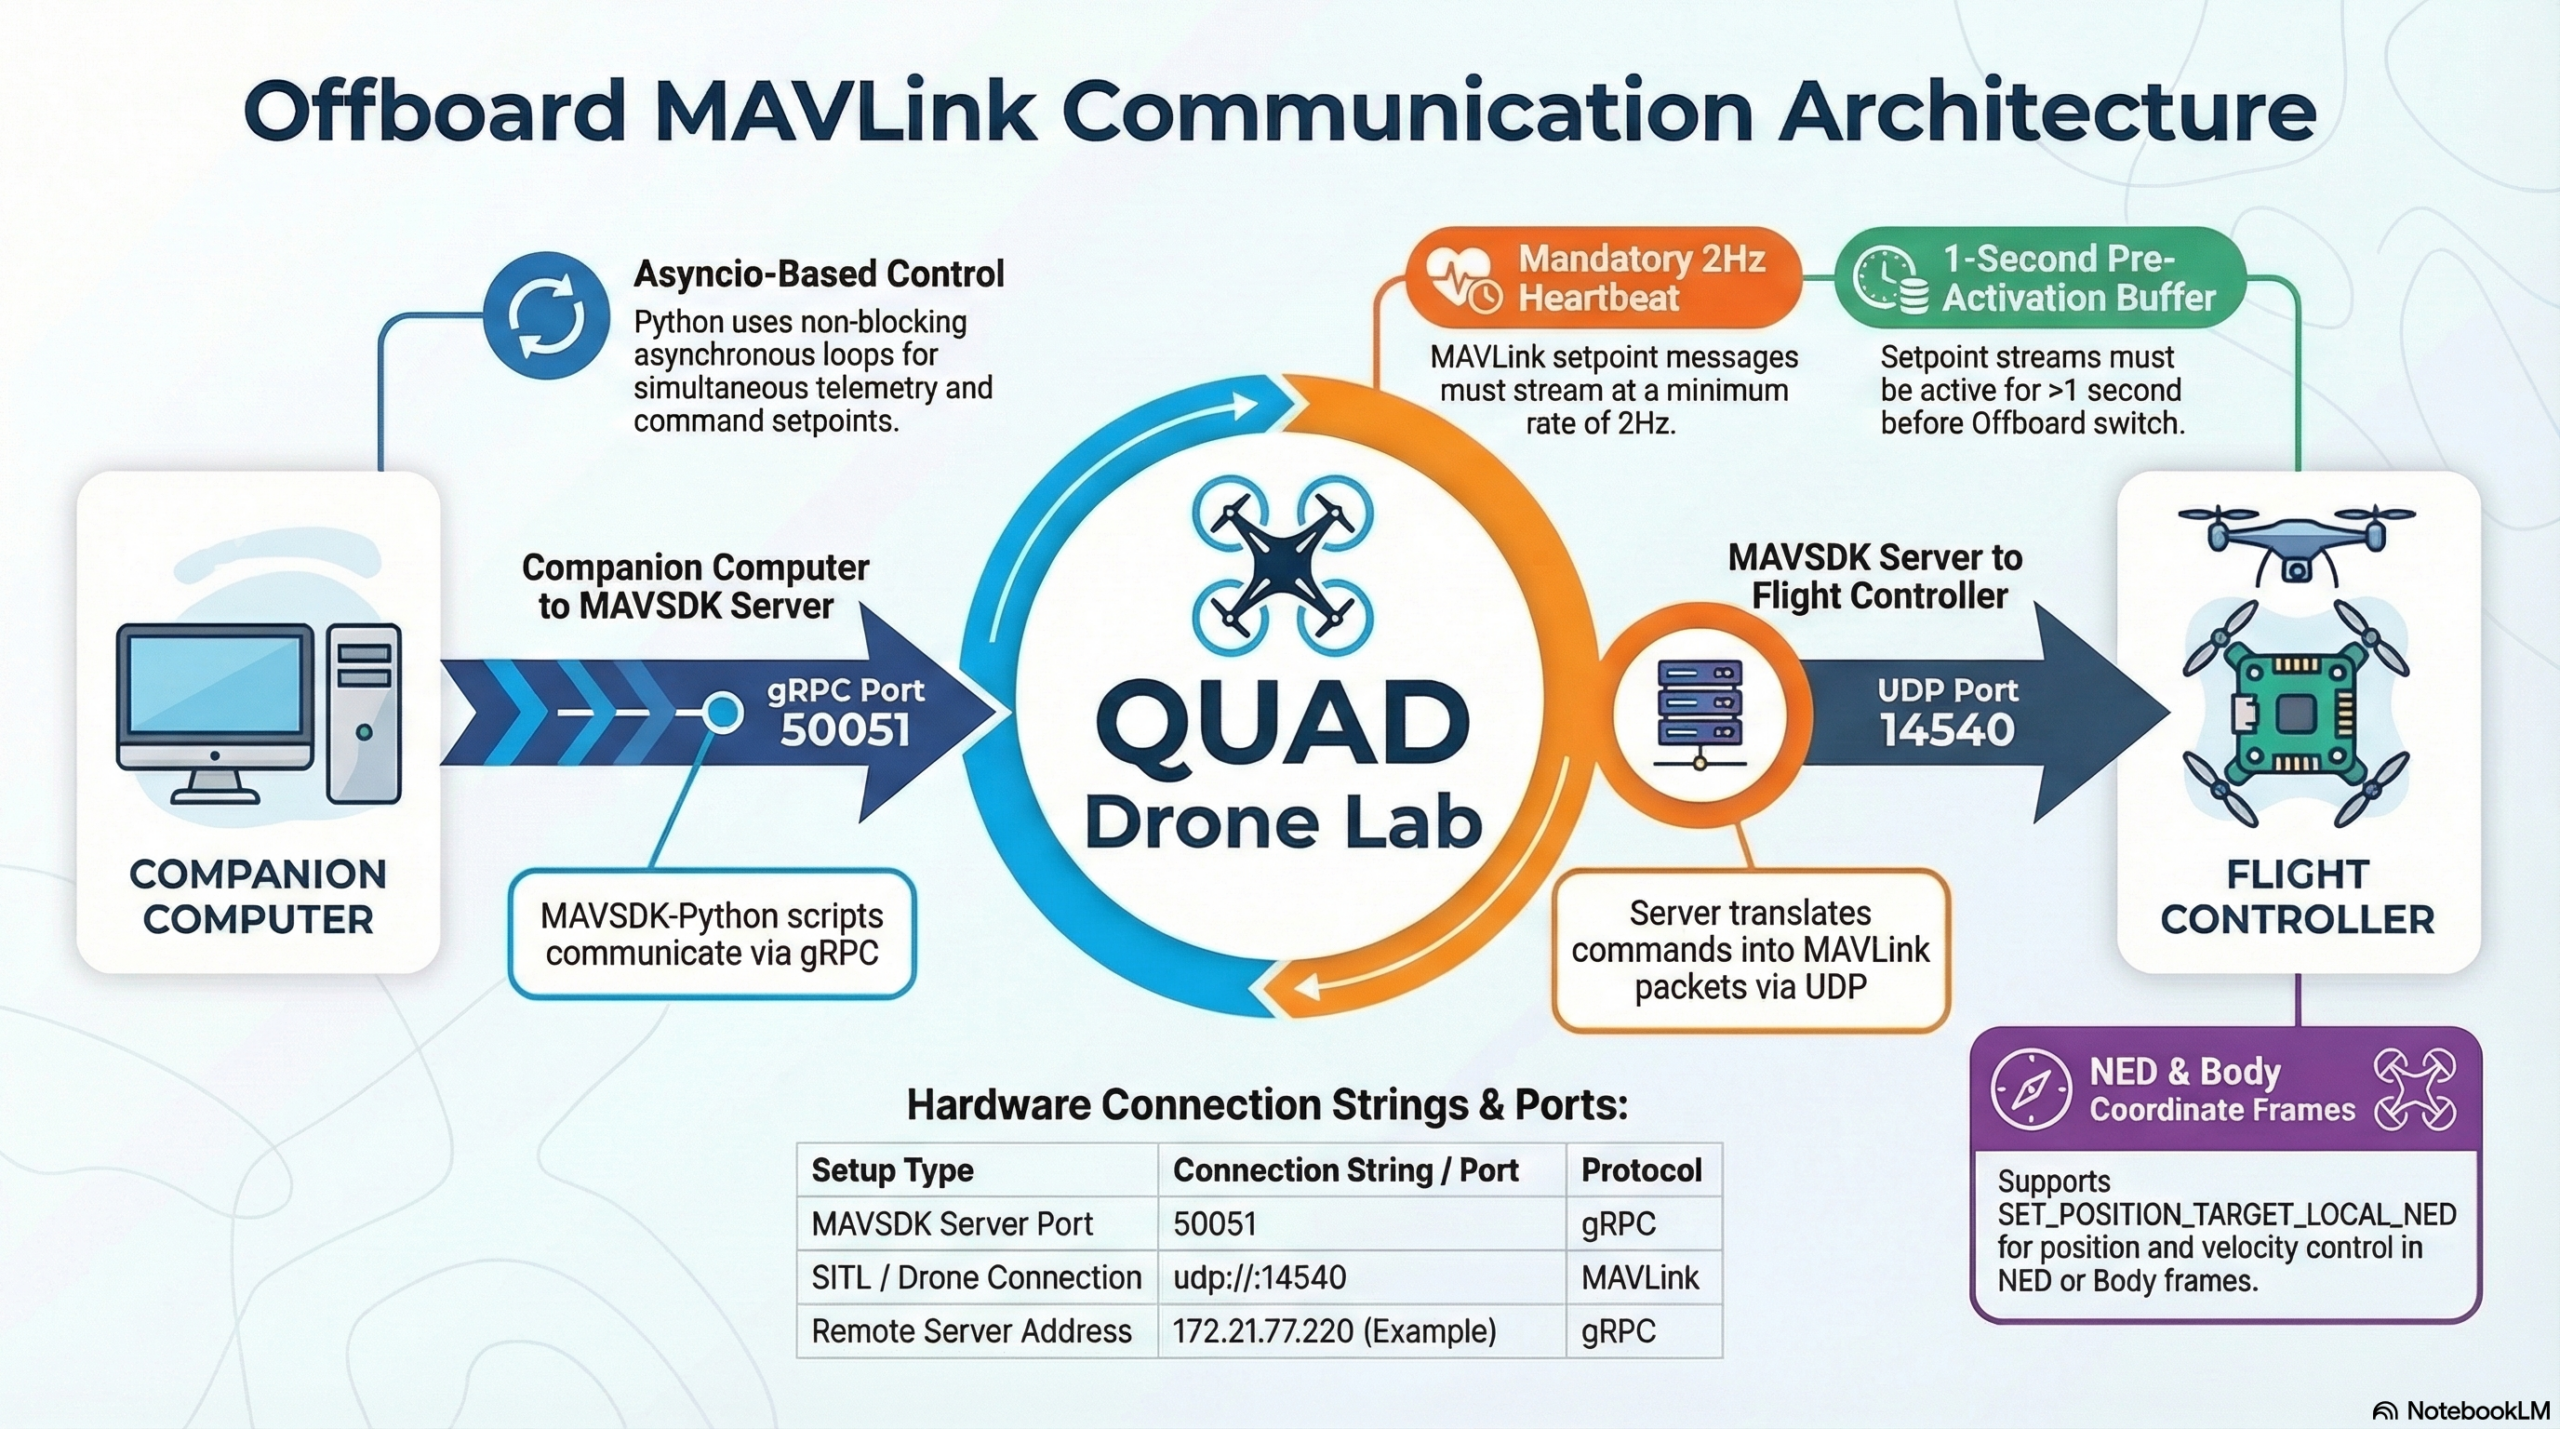
Typically, a drone flies by receiving stick inputs from a remote controller (RC) or by following a pre-programmed GPS-based route (Mission). However, in OFFBOARD mode, the drone’s “joystick” is taken over not by the internal Flight Controller (FC), but by an ‘external (off-board)’ companion computer (e.g., Raspberry Pi, Jetson Nano) or a Ground Station PC.
When your Python algorithm running on the external computer calculates target values (Setpoints) for position, velocity, acceleration, attitude, or thrust, and streams them in real-time to the drone via MAVLink (or ROS 2), the drone blindly follows only those commands.

2. 3 Essential Prerequisites Every Researcher Must Know (Failsafes)
Because the external computer takes complete control in Offboard mode, it is a highly dangerous mode where the vehicle could simply crash if the communication drops or the code freezes. Therefore, PX4 enforces three very strict conditions for entering and maintaining Offboard mode.
① Continuous “Heart-beat” Signal of at least 2Hz
As proof that the external controller (your Python code) is alive and functioning normally, PX4 must receive a continuous stream of Setpoint messages at a minimum rate of 2Hz (twice per second). If your code stops due to an error or network latency drops this rate below 2Hz, PX4 will forcibly exit Offboard mode after a timeout defined by the COM_OF_LOSS_T parameter. The safety action taken when communication is lost is determined by the COM_OBL_RC_ACT parameter, which usually commands the drone to Hold its position, Land, or Return to Launch (RTL).
② Initial Setpoint Injection
When a drone switches to Offboard mode mid-flight, it might jerk violently if it suddenly doesn’t know where to go. Therefore, you must stream setpoint messages for at least 1 second before permission to enter Offboard mode is granted. Because of this, every MAVSDK offboard script must include code to set initial setpoints right before calling drone.offboard.start().
③ Reliable Position/Attitude Sensor Information
Since Offboard mode requires precise control, it only operates when reliable position or attitude information is being stably received from sensors like GPS, Optical-Flow, VIO (Visual Inertial Odometry), or Mocap (Motion Capture). If you are in an indoor environment without GPS, setting up position estimation via vision sensors must precede any offboard flight.
3. Clearing Up Confusing Coordinate Systems (NED vs BODY)
Before writing code, you must understand the reference coordinate systems used to indicate direction. Choosing the right coordinate system according to your research scenario is key.
- Local NED (North-East-Down) Coordinate System: This is based on Earth’s cardinal directions. Regardless of which way the drone is facing, Forward (X) is North, Right (Y) is East, and Down (Z) is towards the ground. The most critical thing to remember is that the Z-axis (Altitude) is Down, so if you want to fly the drone at an altitude of 10m, you must input -10.0 for the Z value.
- BODY Coordinate System: This is based on the drone’s current Nose direction. It consists of Forward, Right, and Down (FRD). This is an highly intuitive and essential coordinate system when a camera is mounted on the front of the drone, and you are using vision recognition to control the drone so that the tracked object remains in the center of the frame.
4. Analyzing Practical MAVSDK-Python Offboard Examples
Now, let’s see how these theories are integrated into actual code. In MAVSDK-Python, handling OffboardError exceptions is crucial, so you should always wrap your start/stop commands in a try...except block.
Example 1: OFFBOARD Position Control (NED Frame)
This is the most basic form, moving the drone to a specific coordinate (X meters North, Y meters East, Z meters Altitude).
import asyncio
from mavsdk import System
from mavsdk.offboard import (OffboardError, PositionNedYaw)

async def run():
    drone = System()
    await drone.connect(system_address="udp://:14540")

    # 1. Arming
    await drone.action.arm()

    # 2. 💡 Key Point: Send initial setpoint (EKF Origin 0,0,0) before starting offboard
    print("-- Initializing EKF origin (Initial Setpoint)")
    await drone.offboard.set_position_ned(PositionNedYaw(0.0, 0.0, 0.0, 0.0))

    # 3. Start Offboard Mode
    try:
        await drone.offboard.start()
    except OffboardError as error:
        print(f"Failed to start offboard mode: {error._result.result}")
        return

    # 4. Move based on Local NED coordinate system
    # Go 5m North, 10m East, 5m UP (-5.0 Down), facing East (90 deg)
    print("-- Moving 5m North, 10m East, Altitude 5m (Yaw 90 deg)")
    await drone.offboard.set_position_ned(PositionNedYaw(5.0, 10.0, -5.0, 90.0))

    # Give it enough time (15 sec) to move. Use asyncio.sleep in an async environment
    await asyncio.sleep(15)

    print("-- Stopping offboard")
    await drone.offboard.stop()

if __name__ == "__main__":
    asyncio.run(run())

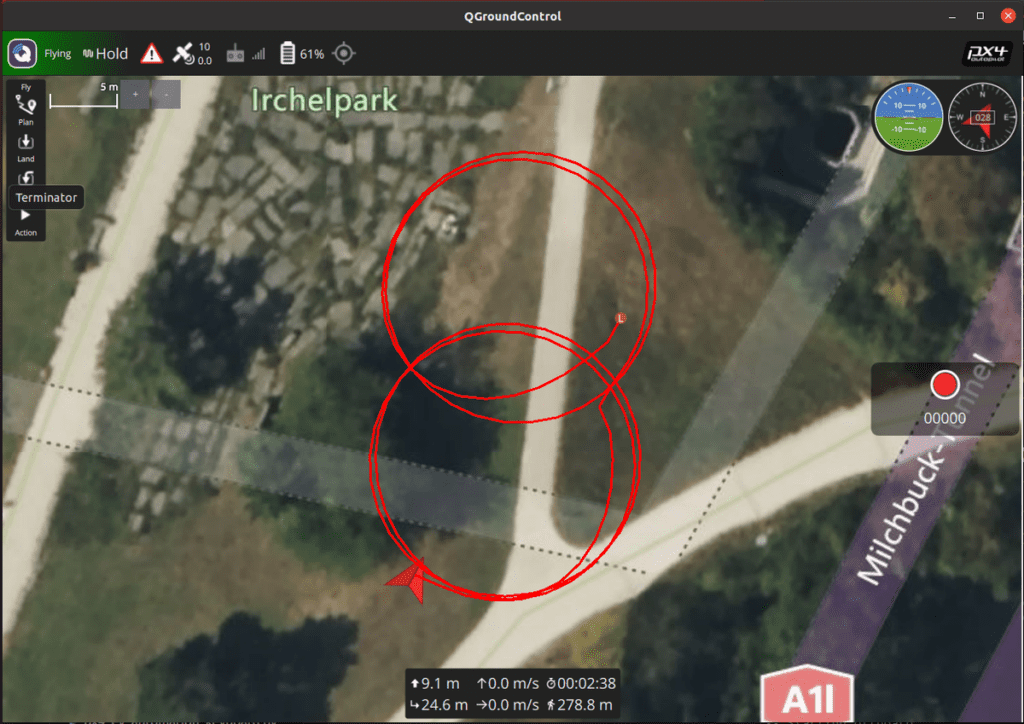
Example 2: OFFBOARD Velocity Control (BODY Frame)
This is the velocity control based on the vehicle’s frame, which is the most widely used in robot vision or obstacle avoidance algorithms. You can easily issue commands like “move the vehicle to the right” if the target drifts to the right of the camera frame.
from mavsdk.offboard import (OffboardError, VelocityBodyYawspeed)
# ...(connection and initialization omitted)...

    # 💡 Initialize the velocity control setpoint to 0 m/s.
    await drone.offboard.set_velocity_body(VelocityBodyYawspeed(0.0, 0.0, 0.0, 0.0))
    await drone.offboard.start()

    print("-- Fly forward at 5m/s and rotate clockwise at 30 deg/s (Circle Flight)")
    await drone.offboard.set_velocity_body(VelocityBodyYawspeed(5.0, 0.0, 0.0, 30.0))

    await asyncio.sleep(15) # Maintain this velocity and rotation for 15 seconds

    # 💡 When movement is complete, set velocity back to 0 to Hold position.
    await drone.offboard.set_velocity_body(VelocityBodyYawspeed(0.0, 0.0, 0.0, 0.0))
    await asyncio.sleep(5)
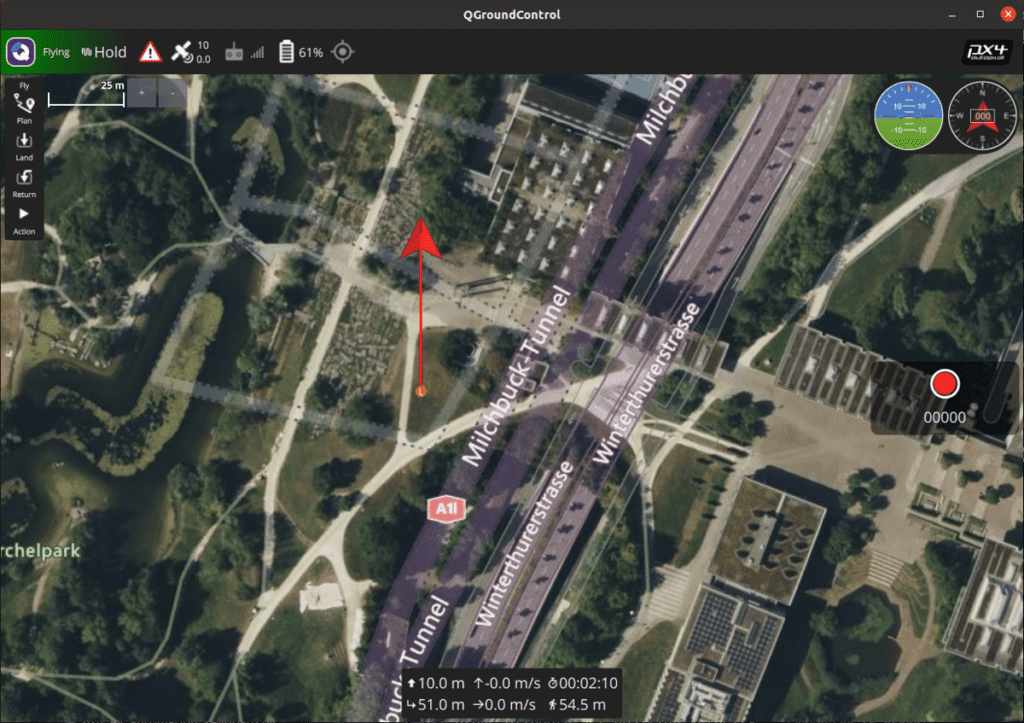
Example 3: Position + Velocity Control (Feed-Forward) for Maximizing Research Performance
When commanding a drone to move to a target position relying only on Position instructions, the system relies purely on ‘Feedback’ control—meaning it corrects errors only after they occur. This can result in sluggish movement or oscillations (overshooting) at the destination.
To improve this, PX4 supports ‘Feed-Forward’ techniques. This is an advanced control method that anticipates the necessary velocity required to reach a position and adds it to the control signal upfront. As a result, the drone reaches the target position and velocity much faster, smoother, and with higher precision.
from mavsdk.offboard import (PositionNedYaw, VelocityNedYaw)

    # Initialization omitted...

    print("-- Move 50m North, but inject a Feed-Forward velocity of 1.0m/s North")
    # Use set_position_velocity_ned() to transmit position and velocity setpoints simultaneously
    await drone.offboard.set_position_velocity_ned(
        PositionNedYaw(50.0, 0.0, -10.0, 0.0), # Target Position (50m N, 10m UP)
        VelocityNedYaw(1.0, 0.0, 0.0, 0.0)     # Target Velocity (1m/s N)
    )
    await asyncio.sleep(20)
To effectively use feed-forward control in dynamic environments, you must thoroughly understand your system’s dynamic characteristics and carefully tune these values to extract maximum performance.
Wrapping Up
In this Part 7, we deeply analyzed the communication principles, essential prerequisites, and practical examples handling position and velocity in OFFBOARD Mode, which can easily be called the ultimate weapon of autonomous flight research.
Beginners often make frequent mistakes with long class names like PositionNedYaw or VelocityBodyYawspeed, or by forgetting that the DOWN direction is negative (-). Therefore, before flying a real drone, please make it a habit to thoroughly verify in a SITL (Virtual Simulator) environment that your vehicle moves exactly in the intended coordinate system and direction.
In our next post, [Part 8], we will apply this offboard knowledge to directly implement a ‘Manual Drone Control Program using Keyboard Inputs’, allowing us to truly enjoy the thrill of real-time control.
If you have any questions about the offboard feed-forward concepts or codes learned today, please feel free to leave a comment anytime. I cheer for your amazing algorithm flights! Thank you.
YouTube Class

Author: maponarooo, CEO of QUAD Drone Lab
Date: March 5, 2026
![[ROS2 Mastery Part 5] ROS2 Topic Programming (2) – Receiving Location Information with a Subscriber](https://quad-drone-lab.co.kr/wp-content/uploads/2026/05/0516_인포그래피-768x429.jpg)
![[PX4 Tuning Series 6] Trajectory Generator and Setpoint Tuning: The Art of Flight Feel and Smooth S-Curves](https://quad-drone-lab.co.kr/wp-content/uploads/2026/03/Drone-Trajectory-Comparison-768x429.png)