
[ROS2 Mastery Part 6] Guide to Implementing Turtlesim Autonomous Driving Using Topic Communication
Hello! Welcome to Part 6 of the ‘ROS2 Crash Course Master Series’, which is based on data from the QUAD Drone Lab and tailored for undergraduate students and researchers studying autonomous driving and robot system control in depth.
In Parts 4 and 5, we studied the core of ROS2 communication by isolating the Publisher and Subscriber nodes. In Part 4, we implemented an open-loop control system that blindly gave movement commands (cmd_vel) to the turtle. In Part 5, we focused on passively receiving the turtle’s current position data (pose).
This sixth installment marks the highlight of basic ROS2 communication programming. We will combine the previously learned Publisher and Subscriber into a single node. By doing so, we will directly implement an “autonomous driving” algorithm that allows the turtle to recognize the walls (fences) on the screen on its own and turn around to avoid them before colliding.
Going beyond simple remote control, we will firmly solidify the basic principles of “Closed-loop Control,” where a robot makes its own decisions and moves accordingly.
Designing Autonomous Driving Algorithms: Robot Perception, Decision-Making, and Control
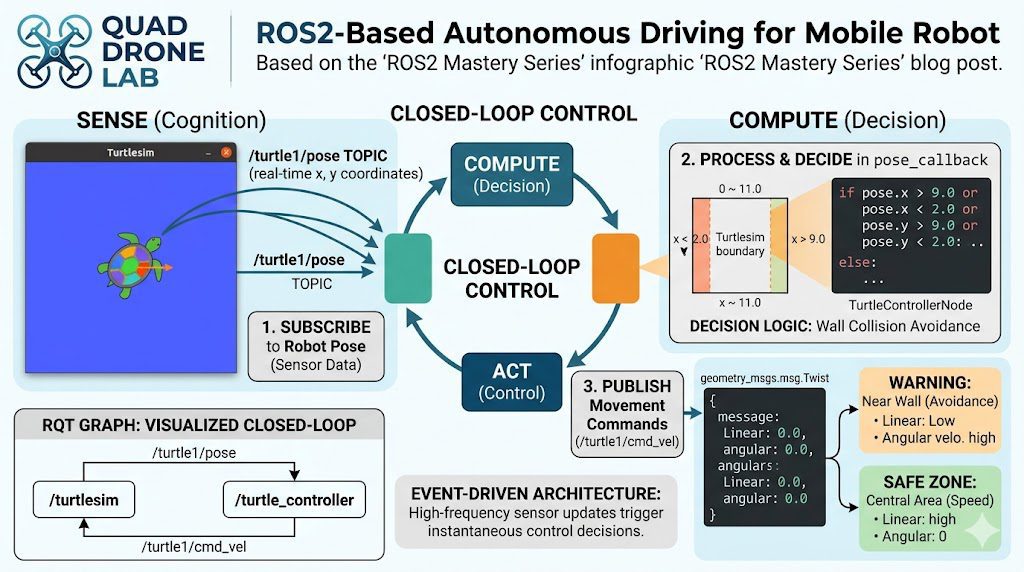
In robotics, the most fundamental feedback loop when designing an autonomous driving system is as follows:
- Perception (Sense): Collects the robot’s current state and surrounding environmental information through sensors.
- Decision-Making (Compute/Plan): Calculates the next action based on the collected data.
- Control (Act): Sends the calculated commands to the motors (actuators) to move the robot.
We will apply this very principle directly to our turtle simulator (Turtlesim).
- Perception (Sense): Determines the current position by subscribing to the
/turtle1/posetopic, which provides the turtle’s real-time $x$ and $y$ coordinates. - Decision-Making (Compute): Determines the boundary coordinates of the white fence (wall) where the turtle moves. The Turtlesim screen has a coordinate system ranging from approximately $0.0$ to $11.0$ for both the $x$ and $y$ axes. Therefore, it uses conditional statements to check if the turtle is within a certain distance of the wall, such as $x < 2.0$, $x > 9.0$, $y < 2.0$, or $y > 9.0$.
- Control (Act): Generates a message to publish to the
/turtle1/cmd_veltopic, sending a rotation command (angular) if the turtle is close to the wall, or a straight-forward command (linear) if it is in a safe zone.
Now that the goal and algorithm are clear, let’s dive into the actual coding.
Writing the Autonomous Driving Node Code: turtle_controller.py
Navigate to the source code directory of the my_robot_controller package that we have been working on, create a new Python source file, and grant it execution permissions so the system can run it.
# Navigate to the directory containing the node source code
cd ~/ros2_ws/src/my_robot_controller/my_robot_controller

# Create the file and grant execution permissions (+x)
touch turtle_controller.py
chmod +x turtle_controller.pyOpen an editor such as VS Code and write the following code in the turtle_controller.py file. Detailed comments have been included to help you understand.
#!/usr/bin/env python3
import rclpy
from rclpy.node import Node
from geometry_msgs.msg import Twist  # Message type to control the robot
from turtlesim.msg import Pose       # Message type to receive the robot's position

class TurtleControllerNode(Node):
    def __init__(self):
        super().__init__('turtle_controller')

        # 1. Create a Publisher to issue control commands
        self.cmd_vel_publisher_ = self.create_publisher(
            Twist,
            '/turtle1/cmd_vel',
            10
        )

        # 2. Create a Subscriber to receive position data (triggers pose_callback upon reception)
        self.pose_subscriber_ = self.create_subscription(
            Pose,
            '/turtle1/pose',
            self.pose_callback,
            10
        )

        self.get_logger().info("Turtle autonomous driving controller has started! (Collision Avoidance Mode)")

    # 3. Callback Function: Decision-making and control logic that automatically executes whenever position data is received
    def pose_callback(self, pose: Pose):
        cmd = Twist()

        # The boundaries of the Turtlesim screen range approximately from 0 to 11.0.
        # Check if the turtle is close to the wall (whether the x or y coordinate is too small or too large).
        if pose.x > 9.0 or pose.x < 2.0 or pose.y > 9.0 or pose.y < 2.0:
            # If close to the wall, decrease linear velocity and turn sharply.
            cmd.linear.x = 1.0
            cmd.angular.z = 1.5
            self.get_logger().info("Warning: Approaching wall detected! Changing direction.")
        else:
            # In the safe central area, move forward quickly.
            cmd.linear.x = 5.0
            cmd.angular.z = 0.0

        # Publish the determined action (Twist message) to the motor (cmd_vel topic).
        self.cmd_vel_publisher_.publish(cmd)

def main(args=None):
    rclpy.init(args=args)
    node = TurtleControllerNode()

    try:
        # Keep the node running and wait for callback functions.
        rclpy.spin(node)
    except KeyboardInterrupt:
        pass
    finally:
        node.destroy_node()
        rclpy.shutdown()

if __name__ == '__main__':
main()💡 [In-Depth Code Analysis for Researchers]
This node showcases the essence of the “Event-Driven” approach in ROS2 programming. In our previous publisher examples, we actively published data at regular intervals using a timer. However, this autonomous driving controller does not utilize a separate timer.
Instead, it relies entirely on the callback event (pose_callback) triggered the exact moment the subscriber receives data. The /turtle1/pose topic is received at a high rate of approximately 60Hz (60 times per second). Every time new data arrives, the callback function wakes up, evaluates the turtle’s coordinates (pose.x, pose.y), and immediately publishes the appropriate values for either an avoidance maneuver or straight-line cruising (publish(cmd)), thereby establishing a tight feedback loop. This structural architecture, where sensor inputs and control outputs are intimately coupled, serves as the core framework for real-world autonomous driving software.
Updating the Configuration File (setup.py) and Registering the Entry Point
Once you have finished writing the node code, you must register the execution entry point in setup.py so that the system can recognize and execute this script.
Open the setup.py file located in the root directory of your package (~/ros2_ws/src/my_robot_controller), and add our newly created autonomous driving node to the entry_points section.
entry_points={
        'console_scripts': [
            'test_node = my_robot_controller.my_first_node:main',
            'draw_circle = my_robot_controller.draw_circle:main',
            'pose_subscriber = my_robot_controller.pose_subscriber:main',
            # Add the entry point for the autonomous driving node we just wrote.
            'turtle_controller = my_robot_controller.turtle_controller:main'
        ],
},Building the Package and Testing Autonomous Driving
Everything is ready! Now, let’s build the modified package and proceed with the long-awaited autonomous driving test.
Open a terminal, navigate to the root directory of your workspace, and execute the build.
# Navigate to the workspace root
cd ~/ros2_ws

# Build the package
colcon build --symlink-installIf the build completes without any errors, open two terminals to run the system.
💡 [Execution Steps]
- First Terminal (Run the Simulator):
- Second Terminal (Run the Autonomous Driving Controller): Open a new terminal, source our modified overlay environment, and run the autonomous driving node.
It is a success! As soon as the controller node is executed, the turtle moves forward quickly. Whenever it touches the invisible boundaries at the edges of the screen (such as $x < 2.0$ or $x > 9.0$), it autonomously turns toward the safe zone according to the logic we implemented. You can watch it continuously drive itself without ever crashing or going past the fence.
Checking the Closed-Loop Communication Network Visualization with RQT Graph
What does the internal communication structure of this beautifully functioning system look like? Open a third terminal and run the rqt_graph tool we learned about earlier.
rqt_graph
Checking the graph will leave you in awe!
The real-time sensor data originating from the /turtlesim node flows into the /turtle_controller node via the /turtle1/pose topic. (Perception) The /turtle_controller node processes this information, generates control commands, and sends the feedback commands back to the /turtlesim node through the /turtle1/cmd_vel topic. (Control)
As you can see, a flawless, circulating Closed-loop Control system is visually and clearly established. When conducting robotics research, verifying whether this feedback loop is properly formed on rqt_graph is a highly crucial debugging habit.
Conclusion
In Part 6, we combined the individual concepts of “Topic Publishing” and “Topic Subscribing” that we learned previously to successfully build an autonomous driving node that implements a robot’s perception-decision-making-control process.
Inside this seemingly simple wall-avoidance code lies the exact core feedback loop principle that drives modern autonomous vehicles and robotic arms. By expanding on this algorithm slightly, you can develop more sophisticated robotics software—such as receiving LiDAR sensor data to avoid physical obstacles or processing camera feeds to follow driving lanes.
In the next installment, [ROS2 Mastery Part 7], we will move beyond Topic communication (which relies on one-way or two-way streaming) and dive deep into “ROS2 Service Programming,” where a server processes a request and returns a response only when a client asks for it. An exciting service demo awaits, where we will change the pen color of the turtle’s path in real time, so please stay tuned for the next article!
We are always rooting for your passionate research in autonomous driving. Thank you!
YouTube Tutorial

Author: Aiden, Marketing Team at QUAD Drone Research Lab
Date: May 17, 2026
![[ROS2 Mastery Part 3] A Guide to Creating Your First ROS2 Package and Programming a Python Node](https://quad-drone-lab.co.kr/wp-content/uploads/2026/05/0507_인포그래픽-768x512.png)
![PX4 MAVSDK – C++ Programming [Part 12] Advanced Autonomous Flight Research Cases Using MAVSDK C++](https://quad-drone-lab.co.kr/wp-content/uploads/2026/03/0322_인프그래피2-768x429.jpg)
![[Hybrid Navigation System Series Part 5: Implementation-Stage 1] Cruising Phase: Classical Dead Reckoning, Wind Estimation, and Gazebo Wind Simulation](https://quad-drone-lab.co.kr/wp-content/uploads/2026/05/Drone-Vector-Navigation-Crab-Angle-768x429.png)
![PX4 MAVSDK – C++ Programming [Episode 10] Custom Logging and Integration Testing (gtest)](https://quad-drone-lab.co.kr/wp-content/uploads/2026/03/0320_인포그래피-768x419.jpg)
![PX4 MAVSDK – C++ Programming [Episode 6] Basic Flight Control using Action API](https://quad-drone-lab.co.kr/wp-content/uploads/2026/03/0316_인포그래피-768x512.png)