

PX4 MAVSDK – C++ Programming [Part 9] Precision Drone Control: Offboard Mode
Hello! I’m Aiden from the Marketing Team. In our previous series, we’ve covered receiving drone sensor data (Telemetry), performing basic Actions (takeoff/landing), and autonomous flight following multiple waypoints (Mission).
However, to conduct advanced robotics research—such as camera-based (Vision) obstacle avoidance, AI target tracking, or multi-vehicle Swarm flight—simply following a pre-defined path is not enough. The Companion Computer, acting as the drone’s “brain,” must make decisions in milliseconds (ms) and directly control the vehicle’s velocity and attitude.
In this 9th installment, we will dive deep into the highlight of autonomous flight research using MAVSDK C++: the concept and practical application of Offboard Control Mode.
What is Offboard Mode?
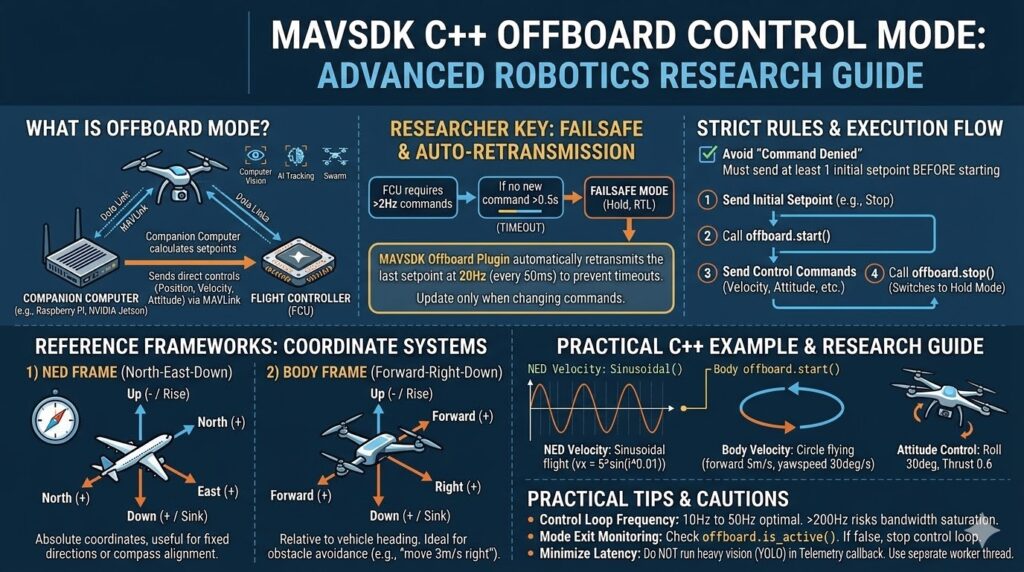
Offboard mode is a flight mode where the drone is controlled not by RC stick inputs or pre-programmed mission paths, but by an external Companion Computer (e.g., Raspberry Pi, NVIDIA Jetson). This external computer calculates Setpoints (target values for position, velocity, attitude, etc.) and transmits them to the Flight Controller (FCU) via MAVLink.
This mode is essential for research where computer vision algorithm results must be immediately reflected in the flight trajectory, such as in collision avoidance or Visual Servoing.

⚠️ Key for Researchers: Failsafe Mechanisms and 20Hz Auto-Retransmission
Offboard mode is powerful but inherently risky. What happens if the companion computer hangs or the communication cable is disconnected? For safety, the PX4 Autopilot will immediately trigger a ‘Failsafe’ mode (forcing a stop or RTL – Return to Launch) if it does not receive a new control command within a certain timeframe (usually 0.5 seconds).
To prevent this, PX4 requires setpoints to be sent at a minimum rate of 2Hz. Fortunately, the MAVSDK C++ Offboard plugin automatically retransmits the last received setpoint at 20Hz for the developer’s convenience. Therefore, you only need to update the setpoint using the setpoint method when your algorithm requires a change in direction or state.
Reference Points: NED and Body Coordinate Systems
To control velocity in Offboard mode, you must clarify the coordinate system. MAVSDK supports both the Earth-centered NED frame and the vehicle-centered Body frame.
1) NED Frame (North-East-Down)
An absolute coordinate system based on global compass directions.
- North (+): Positive for North, Negative (-) for South.
- East (+): Positive for East, Negative (-) for West.
- Down (+): Positive for descending, Negative (-) for ascending. (This is often the most confusing part, so keep it in mind!)
Use case: Useful for moving consistently in a compass direction or maintaining a specific heading (Yaw).
2) Body Frame (Forward-Right-Down)
A relative coordinate system based on the drone’s current heading.
- Forward (+): Forward, Negative (-) for Reverse.
- Right (+): Rightward movement, Negative (-) for Leftward.
- Down (+): Same as NED (Positive for descending).
- Use case: Ideal for relative maneuvers like “avoid the obstacle by moving 3m/s to the right,” or implementing spiral searches and circular flights.

Strict Rules for Starting Offboard Mode
The most common error in Offboard API usage is “Command Denied.” PX4 only allows the transition to Offboard mode if at least one initial Setpoint is already being streamed.
Correct Execution Flow:
- Generate and send an initial setpoint (e.g., a “Stay Still” command).
- Call
offboard.start(). - Send desired control commands (Velocity/Position/Attitude).
- Call
offboard.stop()when finished (the drone will automatically switch to Hold mode).
Practical C++ Example: Implementing Velocity and Attitude Control
(Note: It is highly recommended to run this code in a SITL simulation environment.)
[The C++ code provided in your text remains identical in structure but operates using the logic defined above.]
#include <iostream>
#include <thread>
#include <chrono>
#include <cmath>
#include <mavsdk/mavsdk.h>
#include <mavsdk/plugins/action/action.h>
#include <mavsdk/plugins/offboard/offboard.h>
#include <mavsdk/plugins/telemetry/telemetry.h>

using namespace mavsdk;
using std::chrono::seconds;
using std::this_thread::sleep_for;

int main() {
    // Establish connection to the SITL (Software In The Loop) simulator
    Mavsdk mavsdk{Mavsdk::Configuration{ComponentType::GroundStation}};
    mavsdk.add_any_connection("udpin://0.0.0.0:14540");

    auto system = mavsdk.first_autopilot(3.0);
    if (!system) {
        std::cerr << "No autopilot found, exiting...\n";
        return 1;
    }

    auto action = Action{system.value()};
    auto offboard = Offboard{system.value()};
    auto telemetry = Telemetry{system.value()};

    // 1. Wait for system health and prepare for flight
    while (!telemetry.health_all_ok()) {
        std::cout << "Waiting for system to be healthy...\n";
        sleep_for(seconds(1));
    }

    std::cout << "Arming and taking off...\n";
    action.arm();
    action.takeoff();
    sleep_for(seconds(8)); // Wait for takeoff to complete

    // ----------------------------------------------------
    // [Phase 1] NED Coordinate Control: Sinusoidal flight to the North
    // ----------------------------------------------------
    std::cout << "[Phase 1] Starting NED Velocity Control\n";

    // REQUIREMENT: Send at least one setpoint BEFORE starting Offboard mode
    offboard.set_velocity_ned(Offboard::VelocityNedYaw{});

    if (offboard.start() == Offboard::Result::Success) {
        // Fly in a sine wave pattern along the North-South axis
        for (unsigned i = 0; i < 628; ++i) { // 2*PI cycle
            float vx = 5.0f * sinf(i * 0.01f); // Velocity change in North direction

            Offboard::VelocityNedYaw ned_velocity{};
            ned_velocity.north_m_s = vx;
            ned_velocity.yaw_deg = 90.0f; // Keep heading fixed to East (90 degrees)

            offboard.set_velocity_ned(ned_velocity);
            std::this_thread::sleep_for(std::chrono::milliseconds(10)); // 100Hz Loop
        }
    }

    // ----------------------------------------------------
    // [Phase 2] Body Coordinate Control: Circular Flight
    // ----------------------------------------------------
    std::cout << "[Phase 2] Starting Body Velocity Control (Circular Orbit)\n";

    Offboard::VelocityBodyYawspeed circle{};
    circle.forward_m_s = 5.0f;       // Move forward at 5m/s
    circle.yawspeed_deg_s = 30.0f;   // Rotate clockwise at 30 degrees per second

    offboard.set_velocity_body(circle);
    sleep_for(seconds(12)); // Fly in a circle for 12 seconds

    // ----------------------------------------------------
    // [Phase 3] Attitude Control: 30-degree Roll flight
    // ----------------------------------------------------
    std::cout << "[Phase 3] Starting Attitude Control\n";

    Offboard::Attitude roll_cmd{};
    roll_cmd.roll_deg = 30.0f;       // Tilt 30 degrees to the right
    roll_cmd.thrust_value = 0.6f;    // Set thrust (0.0 to 1.0) to maintain altitude

    offboard.set_attitude(roll_cmd);
    sleep_for(seconds(3));

    // ----------------------------------------------------
    // Safe Shutdown and Landing
    // ----------------------------------------------------
    std::cout << "Stopping Offboard mode and landing...\n";
    offboard.stop(); // Reverts to 'Hold' mode automatically

    action.land();
    while (telemetry.in_air()) {
        sleep_for(seconds(1));
    }

    std::cout << "Flight Complete!\n";
    return 0;
}Practical Guide and Cautions for Researchers
The following is the English translation for your section on practical tips for robotics research.
- Optimization of Control Loop Frequency: It is most stable to transmit offboard control commands (setpoints) at a frequency between 10Hz and 50Hz. Sending commands too frequently (above 200Hz) risks wasting MAVLink communication bandwidth and saturating the message queue. High-frequency loops (e.g., 100Hz) should only be used when micro-adjustments are necessary—such as the sinusoidal flight in our example. For general navigation, lower update frequencies are sufficient as MAVSDK internally maintains a 20Hz retransmission rate.
- Monitoring Mode Transitions (
is_active()): If a pilot manually intervenes via the Ground Control Station (QGroundControl) and changes the flight mode, the vehicle will exit Offboard mode. In this case,offboard.is_active()returnsfalse, and MAVSDK will stop its automatic retransmissions. It is highly recommended to include logic that monitors this state to safely halt your control loops. - Minimizing Latency: Never execute “heavy” vision computations (e.g., YOLO) directly inside a Telemetry callback. A critical design philosophy for preventing communication lag is to run vision processing in a separate worker thread and only pass the final calculated velocity/position targets to the offboard control thread.
In this 9th installment, we explored the core technology of Offboard mode, which transforms a drone from a simple “toy” into an advanced autonomous robot controlled in real-time by an external computer.
Mastering the ability to manipulate coordinate systems and directly control the vehicle’s velocity, position, and attitude is the key to implementing advanced features such as obstacle avoidance, visual servoing, and swarm flight.
In the next [Part 10: Custom Logging and Integration Testing (gtest)], we will look into the Google Test (gtest) framework and logging systems to verify that our complex C++ flight code works perfectly before the actual flight.

Author: Aiden, QUAD Drone Research Lab, Marketing Team
Date: 2026.03.19

![[Everything About Drone Batteries]Part 3: The Evolution to High-Voltage Systems: The World of 6S, 8S, and 12S](https://quad-drone-lab.co.kr/wp-content/uploads/2026/05/Inside-the-Intelligence-Battery-Diagram-768x429.png)
![[Everything About Drone Batteries] Part 1: Drone Battery Fundamentals and Chemical Characteristics: LiPo vs. Li-Ion](https://quad-drone-lab.co.kr/wp-content/uploads/2026/04/Drone-Battery-Anatomy-and-Assembly-768x429.jpg)
![PX4 MAVSDK – C++ Programming 제 [2편] MAVSDK 활용을 위한 C++ 핵심 문법](https://quad-drone-lab.co.kr/wp-content/uploads/2026/03/0312_인포그래픽-768x768.jpg)
![[하이브리드 항법 시스템: 제6편] [구현-2단계] 중간 보정 단계: OpenCV/YOLO 지형지물 대조 및 Digital Twin 테스트](https://quad-drone-lab.co.kr/wp-content/uploads/2026/06/Absolute_Visual_Localization_for_UAVs-768x429.jpg)